Updated Date: 07/07/2026
BIG-IP Edge Client and F5 Access for macOS
The table lists requirements for installing and using client components on a macOS system. These requirements apply to the Network Access client component that is downloaded from the browser and to BIG-IP Edge Client for Mac and F5 Access for macOS.
|
Requirement |
Specification |
|---|---|
|
Browser |
For App Tunnels to work, the browser must have Java enabled. For installation, Java is optional. The client uses Java to streamline the installation process only. Without Java, users can manually download and install the client packages. Note: Java App Tunnels are supported on Edge Client only. |
|
Installation privilege |
The remote user must have superuser authority, or, must be able to supply an administrative password to successfully install the Network Access client. |
For Linux, Mac OS X, and Windows-based systems, the Network Access client component is available for automatic download from the BIG-IP system.
Note: The client component supports secure remote web-based access to the network. It is not the same as the customizable client package that is associated with the connectivity profile.
The first time a remote user starts Network Access, APM® downloads a client component. This client component is designed to be self-installing and self-configuring. If the browser does not meet certain requirements, APM prompts the user to download the client component and install it manually.
Users of BIG-IP Edge Client®for Mac can connect securely and automatically to your network while roaming using the automatic reconnect, password caching, and location awareness features of Edge Client. You can customize the client package; you must download it and make it available to users as hosted content on the BIG-IP system, or through another delivery mechanism.
The BIG-IP Edge Client provides a location-awareness feature. Using location awareness, the client connects automatically only when it is not on a specified network. The administrator specifies the networks that are considered in-network, by adding DNS suffixes to the connectivity profile. With a location-aware client enabled, a user with a corporate laptop can go from a corporate office, with a secured wireless or wired network connection, to an offsite location with a public wireless network connection, and maintain a seamless connection to allowed corporate resources. Network location-awareness can be triggered to run because of various reasons, such as IP changes and network interfaces starting up or shutting down. In reconnect mode, Edge Client might briefly establish a VPN tunnel before the network location-awareness feature can disconnect it. The Edge Client matches DNS suffixes reported by the system API to detect network location.
Note: During a network switch, such as changing Wifi connections, Edge Client with network location-awareness must detect whether the new connection is local or remote. During this detection timeframe, there is a brief amount of time that Edge Client does not block certain external websites and can be reachable during the network switch.
BIG-IP Edge Client provides an automatic reconnection feature. This feature attempts to automatically reconnect the client system to corporate network resources whenever the client connection drops or ends prematurely.
Update the connectivity profile in your Network Access configuration to configure security settings, servers, and location-awareness for BIG-IP Edge Client for macOS.
-
On the Main tab, click Access > Connectivity / VPN > Connectivity > Profiles.
A list of connectivity profiles displays.
-
Select the connectivity profile that you want to update and click Edit Profile.
The Edit Connectivity Profile popup screen opens and displays General Settings.
-
From the left pane of the popup screen, select Win/Mac Edge Client.
Edge Client settings for Mac and Windows-based systems display in the right pane.
-
Retain the default (selected) or clear the Save Servers Upon Exit check box.
Specifies whether Edge Client maintains a list of recently used user-entered APM servers. Edge Client always lists the servers that are defined in the connectivity profile, and sorts them by most recent access, whether this option is selected or not.
-
To enable the client to launch an administrator-defined script on session termination, select Run session log off script check box. The administrator specifies parameters which are passed by Edge Client to the script file. These parameters are defined by the session variable
session.edgeclient.scripting.logoff.params. The client retrieves parameters from BIG-IP after session establishment. The administrator has the flexibility to set up variable values according to policy branching. Each time the Edge Client closes an APM session, the configured script is invoked. On macOS, the script is located at/Library/Application Support/F5Networks/EdgeClient/Scripting/onSessionTermination.bat.The Run session log off script check box is cleared by default.
-
To enable the client to display a warning before launching the pre-defined script on session termination, select Show warning to user before launching script check box.
This is selected by default.
-
To support automatic reconnection without the need to provide credentials again, allow password caching.
-
Select the Allow Password Caching check box.
This check box is cleared by default.
The remaining settings on the screen become available.
-
From the Save Password Method list, select disk or memory.
If you select disk, Edge Client caches the user’s password (in encrypted form) securely on the disk where it is persisted even after the system is restarted or Edge Client is restarted.
If you select memory, Edge Client caches the user’s password within the BIG-IP Edge Client application for automatic reconnection purposes.
If you select memory, the Password Cache Expiration (minutes) field displays with a default value of 240.
-
If the Password Cache Expiration (minutes) field displays, retain the default value or type the number of minutes to save the password in memory.
-
-
To enable automatic download and update of client packages, from the Component Update list, select yes (default).
If you select yes, APM updates Edge Client software automatically on the client system when newer versions are available. This option applies to updates for these components only: BIG-IP Edge Client, component installer service, DNS relay proxy service, and user logon credentials access service.
-
Beginning BIG-IP version 16.0.0, connectivity profile has optional OAuth Settings that Edge Client will use for authenticating Native Apps using OpenID Connect specification. When OAuth is configured, the end-users are required to authenticate via the OAuth authentication flow. This OIDC support provides consistent authentication experience by enabling two-factor verification and Single Sign-On across Browser and Edge Client.
Note: For security reasons, when configuring for OAuth settings, ensure that the BIG-IP local traffic policy enforces HTTPS by redirecting HTTP requests to HTTPS for a virtual server on the BIG-IP system. Refer OIDC RFC for details on OAuth 2.0 Authorization Framework.
-
From the left pane of the popup screen, select OAuth Settings.
-
Select the OAuth provider in the Provider list. If you select None, OAuth configuration is disabled.
-
Specify the OAuth Client ID identifier in the Client ID field. The client identifier is not a secret and is exposed by the BIG-IP APM virtual server. OAuth configuration is disabled if client ID is not specified.
-
Specify the OAuth client secret in the Client Secret (Public) field. The authorization server defines this string. All printable ASCII characters from 0x20 to 0x7E are allowed.
-
Specify the scopes that will be requested by the client in the Scopes field. The value of the scope parameter is expressed as a list of space-delimited, case-sensitive strings defined by the authorization server. When using multiple strings, the order does not matter. All printable ASCII characters are allowed excluding quote (") and backslash (\).
-
In the Complete Redirection URI field, enter the optional URI for OAuth client to be directed to when authentication completes or fails. The default APM page is used if this URI is not specified. The URI should start with “https://”, “http://” or “/”.
Note: Refer section Configuring policies for OAuth client and resource server in the BIG-IP Access Policy Manager: OAuth Concepts and Configuration for details on adding an OAuth Resource Server to the access policy.
-
-
Specify the list of APM servers to provide when the client connects.
The servers you add here display as connection options in the BIG-IP Edge Client.
Note: Users can select from these servers or they can type a hostname.
-
From the left pane of the popup screen, select Server List.
A table displays in the right pane.
-
Click Add.
A table row becomes available for update.
-
You must type a host name in the Host Name field.
Typing an alias in the Alias field is optional.
-
Click Update.
The new row is added at the top of the table.
-
Continue to add servers, and when you are done, click OK.
-
-
Specify DNS suffixes that are in the local network.
Providing a list of DNS suffixes for the download package enables Edge Client to support the autoconnect option. With Auto-Connect selected, Edge Client uses the DNS suffixes to automatically connect when a client is not on the local network (not on the list) and automatically disconnect when the client is on the local network.
DNS suffixes specified here are considered local network suffixes and conform to the rules specified for the local network. The BIG-IP Edge Client uses these suffixes when the user clicks the Auto-Connect option. The administrator configured DNS suffixes are compared with the DNS suffixes present on the system to detect the network access connection. When the BIG-IP Edge Client detects that it is on one of the specified internal networks, the client is idle and does not connect. When the BIG-IP Edge Client detects the network as a remote, the client attempts to establish a Network Access VPN connection.
-
From the left pane of the popup screen, select Location DNS List.
Location DNS list information is displayed in the right pane.
-
Click Add.
An update row becomes available.
-
Type a name and click Update.
Type a DNS suffix that conforms to the rules specified for the local network.
The new row displays at the top of the table.
-
Continue to add DNS names and when you are done, click OK.
-
-
Click OK.
The popup screen closes, and the Connectivity Profile List displays.
Customize a Mac client package for a connectivity profile to specify whether to launch BIG-IP Edge Client after a user logs in to the Mac.
-
On the Main tab, click Access > Connectivity / VPN > Connectivity > Profiles.
A list of connectivity profiles displays.
-
Select a connectivity profile.
-
Click the arrow on the Customize Package button and select Mac.
The Customize Mac Client Package screen displays.
-
Retain the selection or clear the Auto launch BIG-IP Edge Client after User Log In check box.
-
Click Download.
The customized package,
BIGIPMacEdgeClient.zip, is downloaded to your client. It is available for you to distribute.
If you plan to distribute Mac client packages to your users and you customize multiple Mac client packages (for different connectivity profiles), you need to rename or otherwise organize the packages. Otherwise, your download location contains packages named BIGIPMacEdgeClient.zip, BIGIPMacEdgeClient.zip(1), and so on.
You can download a Mac Client package and distribute it to clients.
-
On the Main tab, click Access > Connectivity / VPN > Connectivity > Profiles.
A list of connectivity profiles displays.
-
Select a connectivity profile.
-
Click the arrow on the Customize Package button and select Mac.
The Customize Mac Client Package screen displays.
-
Click Download.
The screen closes and the package,
BIGIPMacEdgeClient.zip, downloads.
The ZIP file includes a Mac installer package (PKG) file and configuration settings.
The launch application feature specifies a client application that starts when the client begins a Network Access session. You can use this feature when you have remote clients who routinely use Network Access to connect to an application server, such as a mail server.
-
On the Main tab, click Access > Connectivity / VPN > Network Access (VPN) > Network Access Lists.
The Network Access Lists screen opens.
-
In the Name column, click the name of the network access resource you want to edit.
-
To configure applications to start for clients that establish a Network Access connection with this resource, click Launch Applications on the menu bar.
-
Click Add to add an application list.
-
In the Application Path field, type
open. -
In the Parameters field, type a parameter.
For example, type
-a/Applications/ie.app http://www.f5.com. -
From the Operating System list, select Mac.
-
Click Finished to add the configuration.
Now when remote users with assigned resources make a Network Access connection, the application you configured starts automatically.
You can edit log settings in the configuration file on Mac systems.
-
In the
~/Library/F5Networksdirectory, open thef5networks.conffile. -
Edit the settings to change the log level.
For debugging purposes, set the values to 48.
With Edge Client’s enhanced user interface, the client minimizes to the status menu on the right end of the menu bar. You can quickly access connection options by clicking on the Edge Client icon.
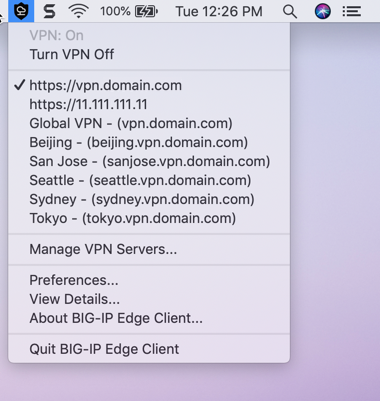
BIG-IP Edge Client for Mac icon menu has the following settings.
- Turn VPN On
- Starts and maintains a secure access connection at all times, regardless of the network location. This setting is disabled in an Always connected mode.
- Turn VPN Off
- Temporarily disconnects from the VPN without logging the user out. The login session remains active and allows a user to establish a VPN without the need for re-authentication by clicking Turn VPN On. This setting is disabled in an Always connected mode.
- Manage VPN Servers
- Allows a user to add, edit, and delete servers. BIG-IP Edge Client populates a list of all the servers available for users’ connections. Users can select from these servers, or they can add a server by typing its name and address.
- Preferences
- Allows a user to customize different settings such as notifications, auto-connect, and showing a welcome or splash screen when starting Edge Client.
- Notifications
- Displays alert about an error, pending authentication or an auto-update. This option is accessed from the Preferences screen and is enabled by default. Alert appears in the top-right corner of the screen and the Notifications pane, accessed by clicking the Notification Center icon.
- Auto-Connect
- Starts a secure access connection as needed. This option is accessed from the Preferences screen and is disabled by default. A user can enable Auto-Connect when the administrator has configured the Network Location Awareness feature.
When the computer is on an enterprise network, the client disconnects and remains active in the status menu. In this case, the Edge Client icon menu displays the message In Enterprise Network, and the Turn VPN On option is not available. When the computer moves outside the enterprise network, the login session remains active, and the VPN connection establishes automatically without the need for re-authentication. Authentication is required only when a new session is created.
- View Details
- Allows a user to view details of the VPN connection, DNS Configuration, Routing Table, IP Configuration, and other settings.
- Quit BIG-IP Edge Client
- Disconnects the VPN, logs out the user, and exits the application. This setting not available in an Always connected mode.
Edge Client for macOS supports authentication of Native Apps using OpenID Connect specification. When OAuth is configured, the end-users are required to authenticate via the OAuth authentication flow. The Edge Client User Interface displays the VPN status while the OAuth authentication is in progress.
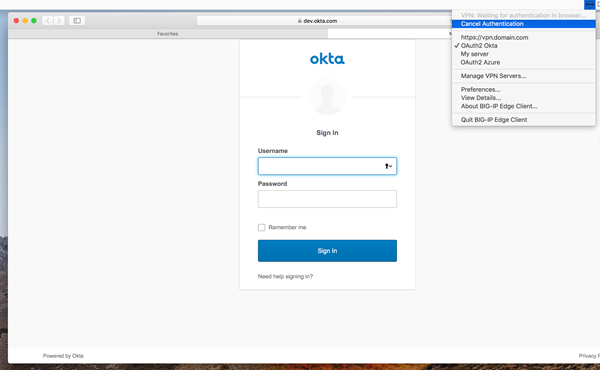
BIG-IP Edge Client for Mac icon menu has the following additional settings in an OAuth flow:
- Cancel Authentication
- Allows a user to cancel authentication manually if OAuth 2.0 is configured, and the user authentication using the OAuth flow is in progress.
- Retry Authentication
- Allows the user to retry authentication manually if the browser window has accidentally closed before the user is authenticated using the OAuth 2.0 flow.
- VPN: Waiting for authentication in browser…
- Indicates that the user authentication using the OAuth 2.0 flow is in progress.
BIG-IP Edge Client provides Always Connected mode for macOS. This feature allows you to specify that the client is always connected to the VPN, and allows you to configure exclusion addresses to grant connectivity when the VPN is not connected. The FWCTL service in always connected mode manages the connectivity. To configure and install Always Connected mode for macOS, you must create a config file for the exclusion list and prepare the Edge Client installation package for macOS.
macOS has a network Packet Filter (PF) firewall that is installed and disabled by default. FWCTL is the PF Firewall management service for macOS that is bundled and installed along with Edge Client installation. When the VPN is disconnected, the firewall becomes active, and the FWCTL service ensures that the user can only access the list of addresses in the whitelist. The FWCTL service is configured when the Edge Client installation package BIGIPMacEdgeClient.zip is customized for download for macOS.
- Default firewall rules
- The following default firewall rules are applied when the firewall is enabled. A static exclusion rule overrides these default rules.
- Allow all incoming traffic
- Block all outgoing traffic
- Allow all traffic on the loopback interface
- Allow all UDP traffic on port 68 for DHCP protocol
- Allow all UDP and TCP traffic on port 53 for DNS protocol
- Allow all traffic to captive portal probe destination configured on the system
- APM virtual destinations are excluded
- Static Exclusion List
- The static exclusion list is an XML file in which you specify the destination hosts. All traffic is allowed to the destinations you add to the exclusion list. The config file must be named f5fwctl.xmland placed in the
/Library/Application Support/F5Networks/directory. The exclusion list supports the following data format.- IPv4 or IPv6 address (preferred)
- Hostname
- HTTP or HTTPS URL
- Port number may be included to the hostname, IP address and HTTP or HTTPS URL separated by ‘:’ (colon)
-
An example entry is:
-
<ITEM>vpn.example.com</ITEM> -
<ITEM>10.1.1.1</ITEM> -
<ITEM>http://www.mydomain.com</ITEM> -
When an IP address, Hostname or URL is specified, complete access to the endpoint is given, and requests can be sent to multiple ports on the server with the same IP address, whereas when a port is specified, access is given to only to that particular port.
Note: Static exclusion list does not support subnet mask or network address.
- Configured firewall settings
- The following settings are configured to enable and disable the firewall rules.
- Enable firewall when VPN is disconnected
- Disable firewall when VPN is connected
- Disable firewall when inside a corporate network
- When firewall is enabled, only the FWCTL firewall rules are in effect. The static exclusion rule overrides the default firewall rules. Use
<FLUSH_RULES>false</FLUSH_RULES>in the f5fwctl.xml file to keep the connection alive. This option is TRUE by default. - When firewall is disabled, the default firewall rules remain in effect.
- Periodic re-evaluation of static exclusion list
- The FWCTL service does a periodic re-evaluation of the static exclusion and APM server host lists, and updates the firewall rules in the following cases.
- changes in the static exclusion list
- changes in the APM server configuration file
- network change event
Note: When the IP address list is unchanged, the FWCTL service does not update the firewall rule.
The FWCTL service caches IP addresses for re-evaluation of exclusion and APM server host lists for the period of DNS TTL (time-to-live) or Maximum TTL - whichever is smaller. By default, maximum TTL is 30 minutes. The cache expires when the DNS server is changed. When the cache expires, the FWCTL service resolves IP addresses and updates the firewall rules if there is any change. When an IP address cannot be resolved, the FWCTL service builds the firewall rules using previously resolved addresses (if any). The FWCTL service retries unresolved hosts in a 15 seconds interval. The DNS TTL can be configured in the f5fwctl.xml file.
The following options used for DISCONNECTED_VPN_TRAFFIC_OPTION in the Edge Client configuration file decide the behavior of the firewall when the VPN is not connected.
|
Disconnected VPN Traffic Option |
Behavior |
Description |
|---|---|---|
|
0 |
Block |
Enable firewall irrespective of whether the user is in an enterprise or non-enterprise LAN. Any connectivity will be blocked until the user establishes VPN. |
|
1 |
Allow |
The firewall is not installed. The user can connect to the external networks even when VPN is not established. |
|
2 |
AllowInLan |
Disable firewall only in an enterprise LAN. The user can connect to external networks in an enterprise LAN which is determined by the NLA configuration. If the user is not in enterprise LAN and if VPN is not established, the firewall will remain active. |
|
Any other value |
Block |
If any other value is set, it is ignored and will default to 0, blocking any connectivity until the user establishes VPN. |
|
No value set |
Block |
If no value is set, it will default to 0, blocking any connectivity until the user establishes VPN. |
|
Option missing |
Block |
If this option is missing, it will default to 0, blocking any connectivity until the user establishes VPN. |
The NLA feature is enabled when the option DISCONNECTED_VPN_TRAFFIC_OPTION is set to 2 (Allow in Enterprise LAN) in the Edge Client configuration file. The firewall reads the configured DNS suffixes and performs NLA on the matching suffixes. When suffixes match, the network is detected as a corporate network and the firewall rules are disabled, thereby allowing all traffic. The NLA service only runs at startup or when a network connection changes.
The following is a sample Edge Client profile with DNS suffixes:
   <?xml version="1.0" encoding="UTF-8"?>
   <PROFILE VERSION="2.0">
   <ALWAYS_CONNECTED_MODE>YES</ALWAYS_CONNECTED_MODE>
   <DISCONNECTED_VPN_TRAFFIC_OPTION>3</DISCONNECTED_VPN_TRAFFIC_OPTION>
   <LOCATIONS>
   <CORPORATE>
   <DNSSUFFIX>domain1.com</DNSSUFFIX>
   </CORPORATE>
   <CORPORATE>
   <DNSSUFFIX>domain2.com</DNSSUFFIX>
   </CORPORATE>
   <CORPORATE>
   <DNSSUFFIX>*.domain2.com</DNSSUFFIX>
   </CORPORATE>
   </LOCATIONS>
</PROFILE>Create an XML file for the FWCTL service.
-
Populate the exclusion list with an IP address, hostname, URL, FLUSH RULES and DNS TTL. Following is a sample config file:
<?xml version="1.0" encoding="UTF-8"?> <CLIENT_CONFIGURATOR> <STONEWALL_EXCLUSIONS> <ITEM>vpn.example.com</ITEM> <ITEM>10.1.1.1</ITEM> <ITEM>http://www.mydomain.com</ITEM> </STONEWALL_EXCLUSIONS> <DNS_TTL>30</DNS_TTL> <FLUSH_RULES>false</FLUSH_RULES> </CLIENT_CONFIGURATOR> -
Name the config file
f5fwctl.xml. -
Place the file in the
/Library/Application Support/F5Networks/directory.
To configure and install Always Connected mode for macOS, you must create a config file for the exclusion list and prepare the Edge Client installation package for macOS.
-
Install the APM client.iso available from downloads.f5.com to the BIG-IP APM server.
-
On the Main tab, click Access > Connectivity / VPN > Connectivity > Profiles.
A list of connectivity profiles displays.
-
Select the connectivity profile that you want to update and click Edit Profile.
The Edit Connectivity Profile popup screen opens and displays General Settings.
-
From the left pane of the popup screen, select Win/Mac Edge Client > Location DNS List.
-
Add one or more DNS names for the Enterprise Network and click OK.
-
Click the arrow on the Customize Package button and select Mac.
The Customize Mac Client Package screen displays.
-
Clear the Auto launch BIG-IP Edge Client after User Log In check box.
-
Click Download.
The customized package,
BIGIPMacEdgeClient.zip, is downloaded to your client. -
Extract the content of the zip file on a macOS system.
-
Place the config file f5fwctl.xml created for the exclusion list in the same location as mac_edgesvpn.pkg file.
-
Create opt-fwctl (an empty file - ’touch opt-fwctl’), and place it in the same locations as mac_edgesvpn.pkg file.
-
Double click the file mac_edgesvpn.pkg to install the Edge Client.
When Edge Client installation completed, the FWCTL application and the related files and modules are downloaded to the /Applications/BIG-IP Edge Client.app/Contents/Resources directory.
To uninstall Edge Client installed in Always Connected mode, perform the following steps:
Note: Dragging and dropping the Edge Client application to the trash for uninstalling is not supported in Always Connected mode.
-
Open the terminal application as an administrative user.
-
To start a privileged session, type the
sudo-icommand. -
When prompted, enter your administrator password.
-
To start the uninstallation script, type the following command:
/Applications/BIG-IP\ Edge\ Client.app/Contents/Resources/uninstall.sh
When the uninstall of Edge Client completes, the FWCTL application and all related files and modules are removed from the system.
BIG-IP Edge Client supports the use of Touch ID to log in for Touch ID enabled macOS devices. Previously, for a returning user, when the Save Password was enabled, the login credentials were auto-filled, giving unauthorized users access to resources on an unlocked device. The new Touch ID support on macOS allows you to provide fingerprint as device authentication, thereby preventing unauthorized users from getting VPN access. After the user scans the fingerprint, the password is retrieved, and login credentials are auto-filled without requiring any user interaction.
For macOS devices that do not have Touch ID capability or that do not have any fingerprints enrolled, the user experience is the same as before, with the password being retrieved and credentials auto-filled when the user tries to log in.
The following conditions are required to use this feature:
-
Enable Allow Password Caching to Disk to cache the user’s password.
Click Access > Connectivity / VPN > Connectivity > Profiles > Edit Profile > Win/Mac Edge Client > Allow Password Caching. From the Save Password Method list, select disk to cache the user’s password (in encrypted form) securely on the disk.
-
macOS Edge Client is running on a Touch ID compatible device with an enrolled fingerprint.
-
The user has allowed Save Password on the logon page.
When logging in for the first time, the user enters the password. These credentials are then saved in the keychain. With the next login, a logon page displays an auto-filled user name and prompts for fingerprint authentication. The user then scans the fingerprint, auto-filling the password from the keychain.
When the touch ID is locked out after failed attempts, the system offers a fallback option and requires the user to enter the device password. The user can choose the Use Password option at any time during authentication attempts.
Edge Client for macOS supports authentication of Native Apps using OpenID Connect specification. When OAuth is configured, the end-users are required to authenticate via the OAuth authentication flow. The OAuth 2.0 Authorization Framework describes the method of authorization and defines client, resource server, and identity provider roles. OpenID Connect is built on top of OAuth 2.0 and complements the OAuth 2.0 Authorization framework.
The OIDC support provides consistent authentication experience by enabling two-factor verification and Single Sign-On across Browser and Edge Client. It provides:
- Ability to use security keys (Yubikey) as an additional factor of authentication for Edge Client (For example, U2F).
- Ability to support password-less authentication through public key registration and authentication.
- Single Sign-On for Edge Client and other enterprise apps that share a common IDP.
Beginning BIG-IP version 16.0.0, connectivity profile has optional OAuth Settings using which administrators can specify the OIDC authorization server discovery endpoint, Client ID, Scopes, and the Complete Redirection URI.
Note: For security reasons, when configuring for OAuth settings, ensure that the BIG-IP local traffic policy enforces HTTPS by redirecting HTTP requests to HTTPS for a virtual server on the BIG-IP system. Refer OIDC RFC for details on OAuth 2.0 Authorization Framework.
The OAuth authorization flow for Native Apps using the browser is as follows:
- The Edge Client queries the authorization server details from BIG-IP and opens the browser tab with the authorization request.
- The authorization endpoint receives the authorization request, authenticates the user, and obtains authorization.
- The authorization server then issues an authorization code to the redirect URI.
- The Edge Client receives the authorization code and responds with HTTP 302 redirect URI to the Complete Redirection URI page on the BIG-IP APM or external web server.
- The browser issues a request to the Complete Redirection URI page and receives a response from the BIG-IP APM or external web server.
- The Edge Client presents the authorization code at the token endpoint, which validates the authorization code and issues the tokens requested.
- The Edge Client provides a token in the session authorization request to BIG-IP APM.
- The BIG-IP system allows or denies access to the APM session.
When the Edge Client opens the browser for OAuth 2.0 authentication, the client displays the status as VPN: Waiting for authentication in browser.., indicating that the browser has been opened for the authentication, and the Edge Client is waiting for the authorization code. In case of an error, a window with a BIG-IP logout page and an error message are displayed.
Access Policy Manager (APM) supports all of the primary Network Access features for Mac clients, except for Drive Mappings and some endpoint security features.
For endpoint security support, refer to BIG-IP APM Client Compatibility Matrix on AskF5 at http://support.f5.com/.
For information about Network Access features, refer to BIG-IP Access Policy Manager: Network Access on AskF5 at http://support.f5.com/.
On Macintosh operating systems, the client installs the VPN components and writes VPN logs to the locations listed in the table.
| VPN component | Location |
|---|---|
| Network Access plugin | /Library/Internet Plugins/ |
| Endpoint Security (client checks) | ~/Library/Internet Plugins/ |
VPN logs are written to the following directory: ~/Library/Logs/F5Networks.