Updated Date: 07/07/2026
BIG-IP Edge Client for Windows
The Component Installer service enables you to install and upgrade client-side Access Policy Manager (APM) components on Windows-based clients for all kinds of user accounts, regardless of the rights under which the user is working. This component is especially useful for installing and upgrading client-side components when the user has insufficient rights to install or upgrade the components directly.
After you install the Component Installer, it automatically installs and upgrades client-side APM components. It can also update itself. The Component Installer requires that installation or upgrade packages be signed using the F5 Networks certificate or another trusted certificate. By default, F5 Networks signs all components using the F5 Networks certificate.
You can pre-install client components for your users who do not have administrative privileges on Windows-based systems.
-
On the Main screen, click the F5 logo to display the Welcome page.
-
Scroll to the Downloads area.
-
In the links for BIG-IP Edge Client Components, click Component Installer Package for Windows.
The MSI installer downloads to your local folder.
-
On Windows-based clients, install the Component Installer with elevated privileges so that it can install, upgrade, and run APM components that require elevated privileges.
For information about configuring the MSI installer to run with elevated privileges, see the documentation for your operating system.
Users of BIG-IP Edge Client for Windows can connect securely and automatically to your network while roaming using the automatic reconnect, password caching, and location awareness features of Edge Client. You can also enforce Always Connected mode, and configure the list of trusted sites to which to allow access. You can customize the client package and you must download it and make it available to users as hosted content on the BIG-IP system or through another delivery mechanism. Users must install the package, or Component Installer, if available on the client, can install it for them.
-
Configuring a connectivity profile for Edge Client for Windows
-
Configuring Always Connected mode for the Windows Edge Client
A Machine Cert Auth check requires administrative privilege. The Windows client package associated with a connectivity profile can be configured to include a Machine Certificate Checker Service component. The service can check the machine certificate on a client endpoint even when the user does not have admin privilege. The option to include this component in the package is disabled by default.
The BIG-IP Edge Client provides a location-awareness feature. Using location awareness, the client connects automatically only when it is not on a specified network. The administrator specifies the networks that are considered in-network, by adding DNS suffixes to the connectivity profile. With a location-aware client enabled, a user with a corporate laptop can go from a corporate office, with a secured wireless or wired network connection, to an offsite location with a public wireless network connection, and maintain a seamless connection to allowed corporate resources. Network location-awareness can be triggered to run because of various reasons, such as IP changes and network interfaces starting up or shutting down. In reconnect mode, Edge Client might briefly establish a VPN tunnel before the network location-awareness feature can disconnect it. The Edge Client matches DNS suffixes reported by the system API to detect network location.
Note: During a network switch, such as changing Wifi connections, Edge Client with network location-awareness must detect whether the new connection is local or remote. During this detection timeframe, there is a brief amount of time that Edge Client does not block certain external websites and can be reachable during the network switch.
BIG-IP Edge Client provides an automatic reconnection feature. This feature attempts to automatically reconnect the client system to corporate network resources whenever the client connection drops or ends prematurely.
BIG-IP Edge Client® provides Always Connected mode. This feature allows you to specify that the client is always connected to the VPN, and allows you to configure the behavior when the client is not connected. You can specify whether the client is connected automatically after Windows logon, and configure exclusion addresses.
Update the connectivity profile in your Network Access configuration to configure security settings, servers, OAuth settings, and location-awareness for BIG-IP Edge Client for Windows.
-
On the Main tab, click Access > Connectivity / VPN > Connectivity > Profiles.
A list of connectivity profiles displays.
-
Select the connectivity profile that you want to update and click Edit Profile.
The Edit Connectivity Profile popup screen opens and displays General Settings.
-
From the left pane of the popup screen, select Desktop Client Settings.
Edge Client settings for Mac and Windows-based systems display in the right pane.
-
Set Edge Client action settings:
-
Retain the default (selected) or clear the Save Servers Upon Exit check box.
Specifies whether Edge Client maintains a list of recently used user-entered APM servers. Edge Client always lists the servers that are defined in the connectivity profile, and sorts them by most recent access, whether this option is selected or not.
-
To enable the client to try to use the Windows logon session for an APM session also, select the Reuse Windows Logon Session check box.
This is cleared by default.
-
To enable the client to try to use the credentials that they typed for Windows logon in an APM session also, select the Reuse Windows Logon Credentials check box.
This is cleared by default.
Note: To support this option, you must also include the User Logon Credentials Access Service in the Windows client package for this connectivity profile and you must ensure that the access policy includes an uncustomized Logon Page action.
-
To enable the client to launch an administrator-defined script on session termination, select the Run session log off script check box. The administrator specifies parameters which are passed by Edge Client to the script file. These parameters are defined by the session variable
session.edgeclient.scripting.logoff.params. The client retrieves parameters from BIG-IP after session establishment. The administrator has the flexibility to set up variable values according to policy branching. Each time the Edge Client closes an APM session, the configured script is invoked. On Windows, the script is located atC:\Program Files\F5 VPN\scripts\onSessionTermination.bat.The Run session log off script check box is cleared by default.
-
To enable the client to display a warning before launching the pre-defined script on session termination, select Show warning to user before launching script check box.
This is selected by default.
-
-
To support automatic reconnection without the need to provide credentials again, allow password caching.
-
Select the Allow Password Caching check box.
This check box is cleared by default.
The remaining settings on the screen become available.
-
From the Save Password Method list, select disk or memory.
If you select disk, Edge Client caches the user’s password (in encrypted form) securely on the disk where it is persisted even after the system is restarted or Edge Client is restarted.
If you select memory, Edge Client caches the user’s password within the BIG-IP Edge Client application for automatic reconnection purposes.
If you select memory, the Password Cache Expiration (minutes) field displays with a default value of 240.
-
If the Password Cache Expiration (minutes) field displays, retain the default value or type the number of minutes to save the password in memory. The valid value is between
0and4294967295.
-
-
To enable automatic download and update of client packages, from the Component Update list, select yes (default).
If you select yes, APM updates Edge Client software automatically on the client system when newer versions are available. This option applies to updates for these components only: BIG-IP Edge Client, component installer service, DNS relay proxy service, and user logon credentials access service.
-
To force the app to use a selected logon mode and prevent users from changing it:
-
Select the Enforce Logon Mode check box.
-
From the Logon Method list, select web or native.
The password caching is only supported with Native logon mode. In Web authentication mode, user will be prompted to enter username/password on the Web page.
Note: The F5 Access for Mac OS option is removed and the related settings are moved to the Desktop Client Settings option.
-
-
Beginning BIG-IP version 16.0.0, connectivity profile has optional OAuth Settings that Edge Client will use for authenticating Native Apps using OpenID Connect specification. When OAuth is configured, the end-users are required to authenticate via the OAuth authentication flow. This OIDC support provides consistent authentication experience by enabling two-factor verification and Single Sign-On across Browser and Edge Client.
Note: For security reasons, when configuring for OAuth settings, ensure that the BIG-IP local traffic policy enforces HTTPS by redirecting HTTP requests to HTTPS for a virtual server on the BIG-IP system. Refer OIDC RFC for details on OAuth 2.0 Authorization Framework.
-
From the left pane of the popup screen, select OAuth Settings.
-
Select the OAuth provider in the Provider list. If you select None, OAuth configuration is disabled.
-
Specify the OAuth Client ID identifier in the Client ID field. The client identifier is not a secret and is exposed by the BIG-IP APM virtual server. OAuth configuration is disabled if client ID is not specified.
-
Specify the OAuth client secret in the Client Secret (Public) field. The authorization server defines this string. All printable ASCII characters from 0x20 to 0x7E are allowed.
-
Specify the scopes that will be requested by the client in the Scopes field. The value of the scope parameter is expressed as a list of space-delimited, case-sensitive strings defined by the authorization server. When using multiple strings, the order does not matter. All printable ASCII characters are allowed excluding quote (") and backslash (\).
-
In the Complete Redirection URI field, enter the optional URI for OAuth client to be directed to when authentication completes or fails. The default APM page is used if this URI is not specified. The URI should start with “https://”, “http://” or “/”.
Note: Refer section Configuring policies for OAuth client and resource server in the BIG-IP Access Policy Manager: OAuth Concepts and Configuration for details on adding an OAuth Resource Server to the access policy.
-
-
Specify the list of APM servers to provide when the client connects.
The servers you add here display as connection options in the BIG-IP Edge Client.
Note: Users can select from these servers or they can type a hostname.
-
From the left pane of the popup screen, select Server List.
A table displays in the right pane.
-
Click Add.
A table row becomes available for update.
-
You must type a host name in the Host Name field.
Typing an alias in the Alias field is optional.
-
Click Update.
The new row is added at the top of the table.
-
Continue to add servers, and when you are done, click OK.
-
-
Specify DNS suffixes that are in the local network.
Providing a list of DNS suffixes for the download package enables Edge Client to support the autoconnect option. With Auto-Connect selected, Edge Client uses the DNS suffixes to automatically connect when a client is not on the local network (not on the list) and automatically disconnect when the client is on the local network.
DNS suffixes specified here are considered local network suffixes and conform to the rules specified for the local network. The BIG-IP Edge Client uses these suffixes when the user clicks the Auto-Connect option. The administrator configured DNS suffixes are compared with the DNS suffixes present on the system to detect the network access connection. When the BIG-IP Edge Client detects that it is on one of the specified internal networks, the client is idle and does not connect. When the BIG-IP Edge Client detects the network as a remote, the client attempts to establish a Network Access VPN connection.
-
From the left pane of the popup screen, select Location DNS List.
Location DNS list information is displayed in the right pane.
-
Click Add.
An update row becomes available.
-
Type a name and click Update.
Type a DNS suffix that conforms to the rules specified for the local network.
The new row displays at the top of the table.
-
Continue to add DNS names and when you are done, click OK.
-
-
Click OK.
The popup screen closes, and the Connectivity Profile List displays.
Update the connectivity profile in your Network Access configuration to configure Always Connected mode.
-
On the Main tab, click Access > Connectivity/VPN > Connectivity > Profiles.
-
Select the connectivity profile that you want to update and click Edit Profile.
The Edit Connectivity Profile popup screen opens and displays General Settings.
-
From the left pane of the popup screen, select Desktop Client Settings.
Edge Client settings for Mac and Windows-based systems display in the right pane.
-
Set Edge Client action settings:
-
Retain the default (selected) or clear the Save Servers Upon Exit check box.
Specifies whether Edge Client maintains a list of recently used user-entered APM servers. Edge Client always lists the servers that are defined in the connectivity profile, and sorts them by most recent access, whether this option is selected or not.
-
To enable the client to try to use the Windows logon session for an APM session also, select the Reuse Windows Logon Session check box.
This is cleared by default.
-
To enable the client to try to use the credentials that they typed for Windows logon in an APM session also, select the Reuse Windows Logon Credentials check box.
This is cleared by default.
Note: To support this option, you must also include the User Logon Credentials Access Service in the Windows client package for this connectivity profile and you must ensure that the access policy includes an uncustomized Logon Page action.
-
-
To support automatic reconnection without the need to provide credentials again, allow password caching.
-
Select the Allow Password Caching check box.
This check box is cleared by default.
The remaining settings on the screen become available.
-
From the Save Password Method list, select disk or memory.
If you select disk, Edge Client caches the user’s password (in encrypted form) securely on the disk where it is persisted even after the system is restarted or Edge Client is restarted.
If you select memory, Edge Client caches the user’s password within the BIG-IP Edge Client application for automatic reconnection purposes.
If you select memory, the Password Cache Expiration (minutes) field displays with a default value of 240.
-
If the Password Cache Expiration (minutes) field displays, retain the default value or type the number of minutes to save the password in memory.
-
-
To enable automatic download and update of client packages, from the Component Update list, select yes (default).
If you select yes, APM updates Edge Client software automatically on the client system when newer versions are available. This option applies to updates for these components only: BIG-IP Edge Client, component installer service, DNS relay proxy service, and user logon credentials access service.
-
Specify DNS suffixes that are in the local network.
Providing a list of DNS suffixes for the download package enables Edge Client to support the autoconnect option. With Auto-Connect selected, Edge Client uses the DNS suffixes to automatically connect when a client is not on the local network (not on the list) and automatically disconnect when the client is on the local network.
DNS suffixes specified here are considered local network suffixes and conform to the rules specified for the local network. The BIG-IP Edge Client uses these suffixes when the user clicks the Auto-Connect option. The administrator configured DNS suffixes are compared with the DNS suffixes present on the system to detect the network access connection. When the BIG-IP Edge Client detects that it is on one of the specified internal networks, the client is idle and does not connect. When the BIG-IP Edge Client detects the network as a remote, the client attempts to establish a Network Access VPN connection.
-
From the left pane of the popup screen, select Location DNS List.
Location DNS list information is displayed in the right pane.
-
Click Add.
An update row becomes available.
-
Type a name and click Update.
Type a DNS suffix that conforms to the rules specified for the local network.
The new row displays at the top of the table.
-
Continue to add DNS names and when you are done, click OK.
-
-
Click OK.
The popup screen closes, and the Connectivity Profile List displays.
Customize a Windows client package to specify the client components to install, and to customize settings for BIG-IP Edge Client and Dialup Settings components if you include them.
-
On the Main tab, click Access > Connectivity / VPN > Connectivity > Profiles.
A list of connectivity profiles displays.
-
Select a connectivity profile.
-
Click the Customize Package button or the arrow on the Customize Package button and select Windows Edge Client.
The Customize Windows Client Package popup screen displays with the Available Components tab displayed.
-
Make sure that only the components that you want to include in the package are selected.
-
To include the software service that allows the client to store encrypted Windows logon credentials and use those credentials to log on to APM, select the User Logon Credentials Access Service check box.
Note: For clients to use the service, you must also select the Reuse Windows Logon Credentials check box in the connectivity profile.
-
To include a service that can check the machine certificate on a client endpoint even when the user does not have the admin privilege, select the Machine Certificate Checker Service check box.
Without this service, a user running without admin privilege cannot pass the Machine Cert Auth endpoint security check.
-
If the BIG-IP Edge Client check box is selected, from the left pane select BIG-IP Edge Client.
BIG-IP Edge Client settings display in the right pane.
-
To enable the Edge Client to try to connect to VPN right after the user logs on to Windows and to prohibit the user from disconnecting VPN, select the Enable always connected mode check box. This setting is cleared by default.
-
The Ignore SSL Server Certificate Failures setting determines whether the client can bypass SSL/TLS certificate validation errors when establishing a secure connection to a server. When this option is enabled, the client ignores certificate issues such as expired certificates, untrusted certificate authorities (CAs), or mismatched domain names and allows connections to proceed. This option is disabled by default. F5 does not recommend enabling this option unless it cannot be avoided and specific additional security measures are employed to mitigate the risk introduced by allowing connections to untrusted servers.
-
Specify the traffic flow for this feature when the VPN is disconnected.
- Select Allow to allow all traffic when the VPN is disconnected.
- Select Allow-Only-In-Enterprise-LAN to allow LAN traffic only when the VPN is disconnected.
- Select Block to deny all traffic when the VPN is disconnected.
-
The Allow HTTP Connections setting specifies whether the client can establish VPN connections over HTTP instead of the more secure HTTPS protocol. This option is disabled by default. F5 does not recommend enabling this option unless it cannot be avoided and specific additional security measures are employed to mitigate the risk introduced by allowing the HTTP connections.
- When enabled, the Edge Client can initiate VPN connections over HTTP in environments where HTTPS cannot be used.
- When disabled, the client can establish connections only over HTTPS, ensuring encrypted and secure communication between the client and the BIG-IP Access Policy Manager (APM).
-
To add the virtual servers that are defined in the Windows/Mac Edge Client settings of the connectivity profile to the Windows Trusted sites list the first time the client starts, retain selection of the Add virtual server list to trusted sites check box. Otherwise, clear it.
Virtual servers added to the Trusted sites list with this option remain on the trusted sites list indefinitely. This works with the User Logon Credentials Access Service setting (available on the Available Components screen) to provide seamless logon with Edge Client if APM accepts the same credentials that users use to log on to Windows.
-
To automatically start the Edge Client after the user logs on to Windows, retain selection of the Auto launch after Windows Logon check box. Otherwise, clear it.
-
The existing behavior of Auto launch after Windows Logon is to launch Edge Client after the system user logs into Windows and initiates VPN connection automatically. Now, this behavior is changed, and introduced the Launch in Disconnected State option which controls automatic VPN connection. If you want the Edge Client to start in the disconnected state, select the Launch in Disconnected State option otherwise you can leave the option cleared which is its default state. This feature is only supported for Windows Edge Client. The Launch in Disconnected State option is programmatically always set to False when Edge Client is deployed with Always Connected mode.
In order to change the default settings, you can add below XML tags in config.f5c file until the BIG-IP 17.1.0 release which will have respective UI settings:
<LAUNCH_IN_DISCONNECTED_STATE>YES</LAUNCH_IN_DISCONNECTED_STATE>
-
For the Edge Client notifications, when the system is in sleep mode and certain scenarios like VPN connection session expiry or inactivity timeout, Edge Client tries to re-authenticate and prompts the user to enter the credentials. At this point, if the Edge Client is in minimised state it displays Action Required user notification for a period of time. A Maximise Edge Client When Credentials Required option is introduced to allow the Edge Client login window to maximise itself and prompts for user credentials if required. If you want Edge Client in maximised status while reconnecting or when credentials are required instead of showing Action Required notification, select this option otherwise you can leave the option cleared which is its default behavior. This feature is only supported for Windows Edge Client.
In order to change the default settings, you can add below XML tags in config.f5c file until the BIG-IP 17.1.0 release which will have respective UI settings:
<MAXIMISE_EDGE_CLIENT_WHEN_CREDENTIALS_REQUIRED>YES<MAXIMISE_EDGE_CLIENT_WHEN_CREDENTIALS_REQUIRED>
-
To add sites to the Exclusions list to be excluded from the traffic flow options action, click Add, and add the IP address or FQDN. You can add a total of 10 values to the whitelist. However, this list can be extended on client-side using the registry editor or group policy.
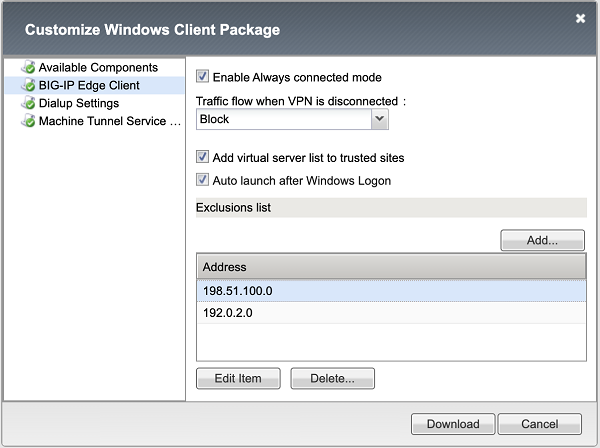
When you specify the port after the hostname (for both IPv4 or DNS names), then access will be granted only to specified ports for both TCP and UDP protocols as well as for ICMP. When the port is not specified, then full access is granted to a remote host.
-
-
To customize Dialup Settings (if selected on the Available Components screen), from the left pane select Dialup Settings.
Dialup Entry / Windows Logon Integration settings display in the right pane.
-
With Dialup Settings selected, you can specify how you want the user to authenticate to APM.
Note: Users must always type a user name and password to log on to Windows. Subsequently, clients authenticate to APM.
- If you want the access policy to run and display a screen where the user must click Logon, select the Enforce Access Policy in Custom Dialer check box and clear the Prompt Username and Password check box. (With these settings, username and password fields are prefilled and the access policy runs.)
- If you want the user to view a logon prompt and click Connect, clear the Enforce Access Policy in Custom Dialer check box and select the Prompt Username and Password check box. (With these settings, username and password fields are prefilled and the access policy does not run.)
- If you do not want the user to do anything to authenticate to APM, clear the Enforce Access Policy in Custom Dialer and Prompt Username and Password check boxes. (With these settings, the access policy does not run, and the logon prompt is suppressed.)
-
To customize the Machine Tunnel Service Config, select the Machine Tunnel Service in the Available Components screen from the Customize Windows Client Package window.
The machine tunnel service that supports the maintenance and remote troubleshooting are disabled on a corporate network. If the DNS Suffix matches, the connection is identified as a corporate network, and the client does not attempt to establish a Network Access connection. When the suffixes do not match, the connection is identified as a non-corporate network, and the client attempts to establish a Network Access VPN connection. The machine tunnel service is enabled on a non-corporate network.
- If you want to start the Network Location Awareness (NLA) for Machine Tunnel, select the Enable NLA for Machine Tunnel option. NLA compares the DNS suffixes present on the system against the administrator configured DNS list and detects whether a connection is corporate or remote. NLA on machine tunnel determines when a client should start a network access connection. This option enables the BIG-IP Edge Client to automatically terminate a VPN session on a corporate network and establish a VPN connection on a remote network.
-
Click Download.
The screen closes and the package,
BIGIPEdgeClient.exe, downloads.
The customized package, BIGIPEdgeClient.exe, is downloaded to your client. It is available for you to distribute.
The Network Location Awareness (NLA) on machine tunnel determines when a service should establish a Network Access connection with configured APM server.
During a network switch, based on the configured DNS Suffixes, NLA detects whether a network connection is in corporate or non-corporate. If the NLA detects current network connection as corporate network, it enables Machine tunnel service to automatically terminate a Network Access connection and establishes connection back on a non-corporate network.
To enable NLA for machine tunnels using registry editor or push the registry key using group policy, perform the following steps:
-
Navigate to the
HKEY_LOCAL_MACHINE\SYSTEM\CurrentControlSet\Services\F5MachineTunnelService\Parametersfolder. -
On the Edit menu, click New > String Value.
-
For String Value, type name as DNSSuffixes.
-
The type of the registry key is REG_SZ.
-
Edit the string value and enter the DNS Suffixes that you want to be detected as corporate network. Multiple DNS Suffixes are allowed and they must be separated by a comma without a space.
For example: testdomain.com,test.com
The exclusion addresses are stored as registry keys and not values in the registry in HKLM\SOFTWARE\WOW6432Node\F5 Networks\RemoteAccess\AlwaysConnected\Exclusions key. Any values in the key are ignored. You may manually add, edit or remove values under this key using the registry editor or group policy mechanisms. The always-connected service reads those values on start, restart and on network events.
The traffic to the exclusion list is never blocked until the VPN is established, so you can whitelist known identity providers (IdPs) and other sites that are deemed harmless, which improves the usability of locked client mode. After the VPN establishment, the client behaves according to the Network Access resource configuration.
You can download a Windows client package and distribute it to clients.
-
On the Main tab, click Access > Connectivity / VPN > Connectivity > Profiles.
A list of connectivity profiles displays.
-
Select a connectivity profile.
-
Click the Customize Package button or the arrow on the Customize Package button and select Windows Edge Client.
The Customize Windows Client Package popup screen displays with the Available Components tab displayed.
-
Click Download.
The screen closes and the package,
BIGIPEdgeClient.exe, downloads.
The customized package, BIGIPEdgeClient.exe, is downloaded to your client. It is available for you to distribute. Users must install the package, or, if Component Installer is available on the client, it can install the package for the user.
Access Policy Manager (APM®) supports all Network Access features with BIG-IP Edge Client® for Windows. For a complete list of Network Access features, refer to BIG-IP Access Policy Manager: Network Access on AskF5™ at http://support.f5.com/. For notes about endpoint security features, refer to BIG-IP APM® Client Compatibility Matrix on AskF5™ at http://support.f5.com/.
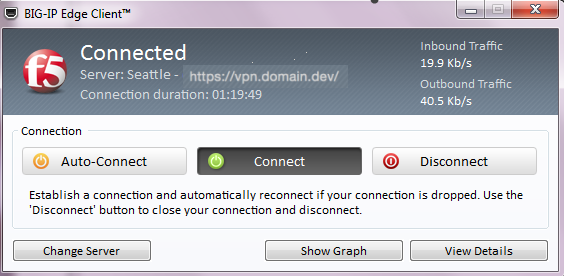
BIG-IP Edge Client® for Windows user interface displays these connection options.
- Auto-Connect
- Starts a secure access connection as it is needed. This option uses the DNS suffix information defined in the connectivity profile to determine when the computer is on a defined local network. When the computer is not on a defined local network, the secure access connection starts. When the computer is on a local network, the client disconnects, but remains active in the system tray. This option does not display if DNS suffixes were not defined.
- Connect
- Starts and maintains a secure access connection at all times, regardless of the network location.
- Disconnect
- Stops an active secure access connection, and prevents the client from connecting again until a user clicks Connect or Auto-Connect.
- Connect
- Starts and maintains a secure access connection at all times, regardless of the network location.
Edge Client for Windows supports authentication of Native Apps using OpenID Connect specification. When OAuth is configured, the end-users are required to authenticate via the OAuth authentication flow.

The Edge Client User Interface displays the VPN status while the OAuth authentication is in progress.
- Authenticating in Browser…
- Indicates that the user authentication using the OAuth 2.0 flow is in progress.
Edge Client for Windows supports authentication of Native Apps using OpenID Connect specification in an Always connected mode. When OAuth is configured, the end-users are required to authenticate via the OAuth authentication flow.
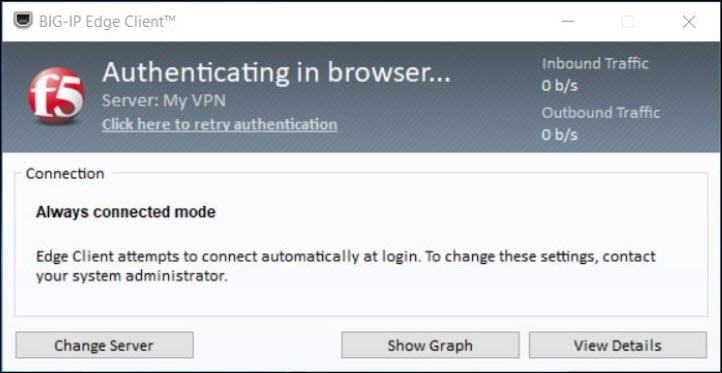
BIG-IP Edge Client for Windows user interface displays the following additional settings for an OAuth authorization flow in an Always connected mode:
- Authenticating in Browser…
- Indicates that the user authentication using the OAuth 2.0 flow is in progress.
- Click here to retry authentication
- This link allows the user to retry authentication manually if the browser window has accidentally closed before the user is authenticated using the OAuth 2.0 flow.
Edge Client for Windows supports authentication of Native Apps using OpenID Connect specification. When OAuth is configured, the end-users are required to authenticate via the OAuth authentication flow. The OAuth 2.0 Authorization Framework describes the method of authorization and defines client, resource server, and identity provider roles. OpenID Connect is built on top of OAuth 2.0 and complements the OAuth 2.0 Authorization framework.
The OIDC support provides consistent authentication experience by enabling two-factor verification and Single Sign-On across Browser and Edge Client. It provides:
- Ability to use security keys (Yubikey) as an additional factor of authentication for Edge Client (For example, U2F).
- Ability to support password-less authentication through public key registration and authentication.
- Single Sign-On for Edge Client and other enterprise apps that share a common IDP.
Beginning BIG-IP version 16.0.0, connectivity profile has optional OAuth Settings using which administrators can specify the OIDC authorization server discovery endpoint, Client ID, Scopes, and the Complete Redirection URI.
Note: For security reasons, when configuring for OAuth settings, ensure that the BIG-IP local traffic policy enforces HTTPS by redirecting HTTP requests to HTTPS for a virtual server on the BIG-IP system. Refer OIDC RFC for details on OAuth 2.0 Authorization Framework.
The OAuth authorization flow for Native Apps using the browser is as follows:
- The Edge Client queries the authorization server details from BIG-IP and opens the browser tab with the authorization request.
- The authorization endpoint receives the authorization request, authenticates the user, and obtains authorization.
- The authorization server then issues an authorization code to the redirect URI.
- The Edge Client receives the authorization code and responds with HTTP 302 redirect URI to the Complete Redirection URI page on the BIG-IP APM or external web server.
- The browser issues a request to the Complete Redirection URI page and receives a response from the BIG-IP APM or external web server.
- The Edge Client presents the authorization code at the token endpoint, which validates the authorization code and issues the tokens requested.
- The Edge Client provides a token in the session authorization request to BIG-IP APM.
- The BIG-IP system allows or denies access to the APM session.
When the Edge Client opens the browser for OAuth 2.0 authentication, the client displays the status as Authenticating in browser..., indicating that the browser has been opened for the authentication, and the Edge Client is waiting for the authorization code. In case of an error, a window with a BIG-IP logout page and an error message are displayed.
The following error codes might be displayed in the Edge Client logs in case of various failures.
The following error codes might be displayed in the Edge Client logs in case of various failures.
|
Error Code Hex Value |
Description |
|---|---|
|
0xA0040300 |
OAuth parameters are not configured. |
|
0xA0040301 |
Access Token was not retrieved. |
|
0xA0040302 |
Failure to initiate Async OAuth flow in the OAuth library. |
|
0xA0040303 |
API Client DLL is in the process of performing high level Async OAuth login and/or APM login. |
For Linux, Mac OS X, and Windows-based systems, the Network Access client component is available for automatic download from the BIG-IP system.
Note: The client component supports secure remote web-based access to the network. It is not the same as the customizable client package that is associated with the connectivity profile.
The first time a remote user starts Network Access, APM® downloads a client component. This client component is designed to be self-installing and self-configuring. If the browser does not meet certain requirements, APM prompts the user to download the client component and install it manually.
Machine Tunnels are a new Desktop Client feature for Windows only. When installed on client machines as a Windows Service, a machine tunnel starts during the machine boot sequence and establishes a VPN connection to the specified APM servers in the background. No user interaction or interactive Windows session is required. This can be used for several different scenarios.
- Off-premise or remote initial provisioning: Machine tunnels can provide connectivity to the corporate datacenter when the user logs in to a corporate laptop for the very first time.
- Remote computer maintenance: IT staff can manage the machine and update the software when the user is not logged in, but the device is on and idle.
- Remote troubleshooting: Support Staff are able to log into a user machine via a secure tunnel.
- Remote self-service: When users forget their passwords, IT staff can use machine tunnels to reset the user passwords.
Machine Tunnel works as a privileged, non-interactive process under the LocalSystem account and does not support BIG-IP proxy configuration. Machine Tunnels ignore proxy settings configured in APM network access resource and do not use Local Area Network (LAN) proxy settings on the client, instead, the machine tunnel leaves its per-VPN connection proxy settings empty.
If the network access resource has a network route to 0.0.0.0 and the VPN is connected, Windows tries to apply proxy settings from this connection. Because the connection does not have proxy settings, Windows applies empty proxy settings. If the network access resource does not have a route to 0.0.0.0, Windows does not override the system’s proxy settings.
Windows has separate proxy settings for the LAN adapter and each Dial-Up/VPN connection. It uses the proxy settings from the active internet connection which can be either LAN or a Dial-Up/VPN type. When Machine Tunnels are connected with the default full tunnel (0.0.0.0) routing, it is the Active Internet Connection, and Windows uses its empty proxy settings. This results in an effective configuration without proxy regardless of the current LAN settings.
To resolve this issue, split the VPN tunnel resource into multiple subnets. As a result, the machine tunnel VPN client does not create any 0.0.0.0 route.
For example:
1.0.0.0/255.0.0.0
2.0.0.0/254.0.0.0
4.0.0.0/252.0.0.0
8.0.0.0/248.0.0.0
16.0.0.0/240.0.0.0
32.0.0.0/224.0.0.0
64.0.0.0/192.0.0.0
128.0.0.0/128.0.0.0
After this routing change, Windows does not consider the machine tunnel VPN as the primary internet connection and uses the LAN proxy settings regardless of the VPN connection status.
The service establishes a machine tunnel connection on system boot. Once a user logs in to her machine, the user can establish a new VPN connection with the desktop client. A manual client VPN connection overrides the machine tunnel, effectively putting the machine tunnel connection “on hold”. The machine tunnel VPN connection pauses until one of the following events occurs:
- The user explicitly disconnects from the user-initiated VPN session.
- The user logs out of Windows.
- The user-initiated VPN session times out.
- The user’s VPN client is stopped, or the client crashes.
Once one of the interactions above occurs, the machine tunnel connection is resumed.
Edge Client 7.1.7 and later supports the ability to create a VPN based on machine credentials with BIG-IP versions 13.1 and above. However, the ability to create a Machine Tunnel installer package through the Connectivity/VPN > Profiles > Customize Windows Client Package utility is available for BIG-IP 14.x and above. For BIG-IP 13.x and earlier versions, you must set up the installer package manually and use the Powershell script to build the machine tunnel package.
This script can be used to create the machine tunnel installer on Windows.
These apps are installed to support machine tunnels on Windows.
These registry keys control configuration for machine tunnels on Windows.
This script can be used to create the machine tunnel installer on Windows.
param([Parameter(Mandatory=$true)][string] $client_iso)

$MountResult = Mount-DiskImage -ImagePath $client_iso -PassThru
$mountdrive = ($MountResult | Get-Volume).DriveLetter

$tempDirectoryBase = [System.IO.Path]::GetTempPath();
Do {
	$newTempDirPath = [String]::Empty;
	[string] $name = [System.Guid]::NewGuid();
$newTempDirPath = (Join-Path $tempDirectoryBase $name);
} While (Test-Path $newTempDirPath);

New-Item -ItemType Directory -Path $newTempDirPath;

$setupConfig = @"
<?xml version="1.0" encoding="UTF-8"?>
<CLIENT_CONFIGURATOR>
 <SETUP_CONFIGURATION>
  <PRODUCTNAME>BIG-IP Edge Client (TM) package</PRODUCTNAME>
  <DATABASE>f5fpclients.msi</DATABASE>
  <MINIMUM_MSI>150</MINIMUM_MSI>
  <PROPERTIES>STARTAPPWITHWINDOWS=1</PROPERTIES>
  <OPERATION>INSTALLUPD</OPERATION>
 </SETUP_CONFIGURATION>
 <FEATURES>
  <FEATURE>MachineTunnelService</FEATURE>
  <FEATURE>PortRedirector</FEATURE>
 </FEATURES>
<STONEWALL_EXCLUSIONS>
</STONEWALL_EXCLUSIONS>
</CLIENT_CONFIGURATOR>
"@

$setupConfig | Add-Content (-join ($newTempDirPath, "\_setup_configuration_.f5c"));
Copy-Item -Path (-join ($mountdrive, ":\sam\www\webtop\public\download\f5fpclients.msi")) -Destination (-join ($newTempDirPath, "\f5fpclients.msi"));
$F5_VPNPath = (Join-Path $newTempDirPath "F5 VPN");
$amd64Path = (Join-Path $F5_VPNPath "amd64");
$F5_TMPPath = (Join-Path $F5_VPNPath "F5_TMP");

New-Item -ItemType Directory -Path $F5_VPNPath;
New-Item -ItemType Directory -Path $amd64Path;
New-Item -ItemType Directory -Path $F5_TMPPath;

Copy-Item -Path (-join ($mountdrive, ":\sam\www\webtop\public\download\F5MachineTunnelService.exe")) -Destination (-join ($F5_VPNPath, "\F5MachineTunnelService.exe"));
Copy-Item -Path (-join ($mountdrive, ":\sam\www\webtop\public\download\scew_uls.dll")) -Destination (-join ($F5_VPNPath, "\scew_uls.dll"));
Copy-Item -Path (-join ($mountdrive, ":\sam\www\webtop\public\download\F5MachineTunnelInfo.exe")) -Destination (-join ($F5_VPNPath, "\F5MachineTunnelInfo.exe"));
Copy-Item -Path (-join ($mountdrive, ":\sam\www\webtop\public\download\F5FltSrv.exe")) -Destination (-join ($F5_VPNPath, "\F5FltSrv.exe"));
Copy-Item -Path (-join ($mountdrive, ":\sam\www\webtop\public\download\F5FltDrv.sys")) -Destination (-join ($F5_VPNPath, "\F5FltDrv.sys"));
Copy-Item -Path (-join ($mountdrive, ":\sam\www\webtop\public\download\F5FltSrvAMD64.exe")) -Destination (-join ($amd64Path, "\F5FltSrv.exe"));
Copy-Item -Path (-join ($mountdrive, ":\sam\www\webtop\public\download\F5FltDrvAMD64.sys")) -Destination (-join ($amd64Path, "\F5FltDrv.sys"));

Copy-Item -Path (-join ($mountdrive, ":\sam\www\webtop\public\download\urxvpn.cab")) -Destination (-join ($F5_TMPPath, "\urxvpn.cab"));

Set-Location $newTempDirPath;
$pkgPath = (Join-Path $tempDirectoryBase "MachineTunnelsSetup.exe")
zip -r  (-join ($newTempDirPath, ".zip")) "F5 VPN" _setup_configuration_.f5c f5fpclients.msi

gc (-join ($mountdrive, ":\sam\www\webtop\public\download\setupstub.exe")),(-join ($newTempDirPath, ".zip")) -Enc Byte -Read 512 | sc $pkgPath -Enc ByteFollowing are the prerequisites for creating an installer package on BIG-IP versions that do not include the machine tunnel installer:
- Desktop APM Clients ISO 7.1.7 or later, available from downloads.f5.com.
- GNU win32 zip package, installed and available in the path. Get this package from http://gnuwin32.sourceforge.net/downlinks/zip.php.
- A PowerShell script, createMachineTunnelsPgk.ps1, used to create machine tunnels. This script is included for reference. Download or create the PowerShell script to a user temp directory.
- Administrator privileges on a Windows 10 machine.
- Windows PowerShell with an unrestricted execution policy. If not already configured, you can set the unrestricted execution policy for PowerShell by starting power shell as an administrator, and executing the following command at the PowerShell prompt:
set-executionpolicy unrestricted
Use these steps to manually create the installer package.
-
Open a PowerShell window.
-
Run the PowerShell script
createMachineTunnelsPkg.ps1, with the path to the APM Desktop client 7.1.7 ISO as the parameter.C:\users\example_user\temp\createMachineTunnelsPkg.ps1 c:\Users\example_user\Downloads\apmclients-7166.2018.307.1909-2552.0.isoThe installer package is created and made available under the temp directory, as
MachineTunnelsSetup.exe.
You can use MachineTunnelsSetup.exe to install the Machine Tunnels service on Windows 10 client machines.
These apps are installed to support machine tunnels on Windows.
|
App |
Location |
Description |
|---|---|---|
|
f5MachineTunnelService.exe |
%WINDIR%\SysWOW64 (64-bit), %WINDIR%\System32 (32-bit) |
The machine tunnel service runs on the machine to provide machine tunnel functionality. |
|
f5MachineTunnelInfo.exe |
%WINDIR%\SysWOW64 (64-bit), %WINDIR%\System32 (32-bit) |
The console application for the machine tunnel, which provides configuration support and allows the user to get additional information about the service. |
These registry keys control configuration for machine tunnels on Windows.
This key should be created in HKLM\SYSTEM\CurrentControlSet\services\F5MachineTunnelService\Parameters\VPNServers.
|
Name |
Registry Type |
Type |
Description |
Default |
|---|---|---|---|---|
|
Server0 |
REG_SZ |
URL |
The URL to which the VPN connects. Only one VPN server URL is supported. For example, |
These keys should be created in HKLM\SYSTEM\CurrentControlSet\services\F5MachineTunnelService\Parameters. If the keys are not created, then the default values will be used for these parameters.
|
Name |
Registry Type |
Type |
Description |
Default |
|---|---|---|---|---|
|
LogonAttemptsInterval |
REG_DWORD |
DWORD |
Maximum delay between logon attempts in seconds. |
30 |
|
IgnoreSSLErrors |
REG_DWORD |
DWORD |
Allows access to a virtual server without a valid certificate. You can add this value for testing or debugging purposes.
|
N/A |
These keys should be created in HKEY_USERS\<Service_account_SID>\Software\F5 Networks\MachineTunnelService.
|
Name |
Registry Type |
Type |
Description |
Default |
|---|---|---|---|---|
|
username |
REG_SZ |
Base64 encoded binary data |
Base64 encoded encrypted user name for authentication. |
N/A |
|
password |
REG_SZ |
Base64 encoded binary data |
Base64 encoded encrypted password. |
N/A |
Configure an access policy to detect the machine tunnel client type.
-
On the Main tab, click Access > Profiles / Policies > Access Profiles (Per-Session Policies).
The Access Profiles (Per-Session Policies) screen displays.
-
Click the name of the access profile you want to edit.
-
On the menu bar, click Access Policy.
-
For the Visual Policy Editor setting, click the Edit access policy for Profile policy_name link.
The visual policy editor opens the access policy in a separate window or tab.
-
Click the (+) icon anywhere in the access policy to add a new item.
Note: Only an applicable subset of access policy items is available for selection in the visual policy editor for any access profile type.
A popup screen opens, listing predefined actions on tabs such as General Purpose, Authentication, and so on.
-
On the Endpoint Security (Server-Side) tab, select Client Type, and then click Add Item.
The Client Type action identifies clients and enables branching based on the client type.
A properties screen opens.
-
On the Machine Tunnel client branch, change the ending to Allowed.
-
Click Save.
The Access Policy screen reopens.
-
Set up the appropriate authentication and client-side checks required for application access at your company and click Add Item.
-
Change the Successful rule branch from Deny to Allow and click the Save button.
-
If needed, configure further actions on the successful and fallback rule branches of this access policy item, and save the changes.
-
At the top of the screen, click the Apply Access Policy link to apply and activate your changes to this access policy.
-
Click the Close button to close the visual policy editor.
To apply this access policy to network traffic, add the access profile to a virtual server.
Note: To ensure that logging is configured to meet your requirements, verify the log settings for the access profile.
This task requires that the f5MachineTunnelInfo.exe is installed on the client system on which you are configuring the machine tunnel.
Configure a username and password for the machine tunnel connection. This is recommended only for testing purposes. You must run f5MachineTunnelInfo.exe as an administrator.
- From a DOS command prompt in Windows, type
f5MachineTunnelInfo -s -u <*username*> -p <*password*>.
The machine tunnel username and password are set.
This task requires that f5MachineTunnelInfo.exe is installed on the client system on which you are configuring the machine tunnel. This task requires admin access and the ability to edit the Windows Registry.
-
Start the registry editor (Start > regedit).
-
Navigate to
HKEY_LOCAL_MACHINE\SYSTEM\CurrentControlSet\Services\F5MachineTunnelService\Parameters\VPNServers. -
In the right pane, right-click and select New > String Value.
-
In the Name field, type
Server0. -
Right-click the value and select Modify.
The Edit String dialog opens.
-
Type the VPN server FQDN or IP address and click OK.
-
Exit the Registry Editor.
The VPN server for the machine tunnel is now defined.
When you configure client certificates for the machine tunnel service, you specify the location where the certificates are stored. For on-demand certificate authentication, the F5 Machine Tunnel service can select client certificates present in the service account or from the local computer.
Service Account: To select a service account as the certificate store, the F5 Machine Tunnel service should be installed on the client system. This store is local to the f5MachineTunnelService on the device.
Local computer: Selecting a local machine store as the certificate store does not require the F5 Machine Tunnel service to be installed. You can specify the location of the client certificate on the local machine.
This task requires that the F5 Machine Tunnel service is installed on the client system on which you are configuring certificates.
Configure a client certificate for the F5 Machine Tunnel Service from the service account.
-
On a Windows client or administrative system, click Start > Run and type
mmc, then click OK. -
Click File > Add/Remove Snap-in and then click Add.
-
Under Snap-in, double-click Certificates, click Service account, then click Next.
-
Do one of the following.
- To manage certificates for services on your local computer, click Local computer, and then click Next.
- To manage certificates for a remote computer, click Another computer and type the name of the computer, or click Browse to select the computer name, and then click Next.
-
Click the service for which you are managing certificates. In this case, this is the F5MachineTunnelService Personal store.
-
Click Finish, and then click Close.
Certificates - Service (f5MachineTunnelService) on Computer Name appears on the list of selected snap-ins for the new console.
-
Click OK.
-
Click File > Save.
You have located the client certificate from the service account for the F5 Machine Tunnel Service.
Configure a client certificate for the F5 Machine Tunnel Service in the local computer store.
-
On a Windows client or administrative system, click Start > Run and type
mmc, then click OK. -
Click File > Add/Remove Snap-in.
-
Under Snap-in, double-click Certificates, click Computer account, then click Next.
-
To manage certificates for services on your local computer, click Local computer.
-
Click Finish.
Certificates - (Local Computer) appears on the list of selected snap-ins for the new console.
-
Click OK.
-
Click File > Save.
You have installed the client certificate in the local computer store.
You must now install and configure the F5 Machine Tunnel service on the client system to use this client certificate.
This task requires that the F5 Machine Tunnel service is installed on the client system on which you are configuring certificates.
You can configure the F5 Machine Tunnel service to select a client certificate from the local computer store or service store.
-
Using the Windows Registry:
-
Start the registry editor (Start > regedit).
-
Navigate to
HKEY_LOCAL_MACHINE\SYSTEM\CurrentControlSet\Services\F5MachineTunnelService\Parameters. -
Set string ClientCertStoreLocation to
systemorservice. The default store location isservice.system- for selecting client certificate from the Local Machine store.service- for selecting client certificate from the F5 Machine Tunnel service store.
-
Set string ClientCertStoreName to the store name. The default store name is
F5MachineTunnelService\MYand can be changed to a custom store.Note: When no registry setting is specified, then the machine tunnels service will pick the client certificate from the service store.
-
Using the F5MachineTunnelInfo utility:
-
From the command prompt that is run as an administrator.
- Type F5MachineTunnelInfo.exe –set_client_certstore system <store name> to set the client certificate store location as the Local Machine store.
- Type F5MachineTunnelInfo.exe –set_client_certstore service <store name> to set the client certificate store location as the F5MachineTunnelService store.
- Type F5MachineTunnelInfo.exe –remove_client_certstore to remove the client certificate store location and name configuration.
You have now configured the F5 Machine Tunnel service to select a client certificate from the local computer store or service store.
A troubleshooting report provides numerous details about the client and its functioning, such as log files and their contents, components and versions, and so on.
-
Open the BIG-IP Edge Client user interface.
On a client with a Start button, you can type BIG-IP in the search field and, in the results, click BIG-IP Edge Client.
-
Click the View Details button.
The Details popup screen displays.
-
Click the Diagnostics Report button.
A Save As popup screen opens.
-
Select a location, specify a file name, and click Save.
A Collecting data popup screen remains open until the report completes.
-
Navigate to the location with the downloaded file, extract the files to a folder, and click the HTML file in the folder.
The F5 Report displays in a browser screen.
-
Open the BIG-IP Edge Client user interface.
On a client with a Start button, you can type BIG-IP in the search field and, in the results, click BIG-IP Edge Client.
-
Click the View Details button.
The Details popup screen displays.
-
Click the Diagnostics Report button.
A Save As popup screen opens.
-
Select a location, specify a file name, and click Save.
A Collecting data popup screen remains open until the report completes.
-
Navigate to the location with the downloaded file, unzip it to a folder, and click the HTML file in the folder.
The report displays.
Access Policy Manager provides a client troubleshooting utility for Windows-based systems. Users can access the utility to check the availability and version information for Windows client components and run Network Access diagnostic tests. The utility is integrated into BIG-IP Edge Client® for Windows. To run Network Access diagnostics and troubleshooting reports on clients that have only the browser-based Network Access client component, you can download and install the client troubleshooting utility.
To run the client troubleshooting utility from the command line on a Windows-based system, you must first download the utility from the BIG-IP system.
-
On the Main screen, click the F5 logo to display the Welcome page.
-
Scroll to the Downloads area.
-
In the links for BIG-IP Edge Client Components, click Client Troubleshooting Utility for Windows.
The file f5wininfo.exe is saved to your local disk.
You can use the client troubleshooting utility to view client components on Windows-based systems.
-
Double-click
f5wininfo.exeto start the client troubleshooting utility.The F5 BIG-IP Edge Components Troubleshooting screen opens.
-
Use the navigation panel on the left to explore the component categories.
You can generate a client troubleshooting report on Windows-based systems and include several types of data and tests in the report. You can also capture OPSWAT Endpoint Inspection results that include checks for firewall, antivirus, peer-to-peer software, patch management, hard disk encryption status, anti-spyware status, and health agent.
-
Double-click
f5wininfo.exeto start the client troubleshooting utility.The F5 BIG-IP Edge Components Troubleshooting screen opens.
-
Click File > Generate Report.
The Report screen opens.
-
Under Type, select the types of reports that you want to run. Available options are:
-
F5 Components Log
-
Network Access Diagnostic
-
Command-Line Utilities
-
MS System Information Report
-
OPSWAT V3V4 Endpoint Inspection Report
-
OPSWAT V4 Endpoint Inspection Report
-
-
Under Format, select html or text for the report type.
-
To generate a compressed report, select the compressed option.
-
To view the report without saving the report, click View.
While the report runs, a Collecting Data popup screen opens, and a System Information popup screen opens if the system information report type runs; the popup screens close. If you selected html format, the report opens in a browser screen.
You can use the client troubleshooting utility to run a Network Access diagnostic test on Windows-based systems.
Note: If BIG-IP Edge Client for Windows is installed, you can run a Network Diagnostics test from the user interface.
-
Double-click
f5wininfo.exeto start the client troubleshooting utility.The F5 BIG-IP Edge Components Troubleshooting screen opens.
-
Click Tools > Network Access Diagnostic.
The Network Access Diagnostic popup screen opens.
You can use the client troubleshooting utility to change the logging level for Edge Client on Windows-based systems.
-
Double-click
f5wininfo.exeto start the client troubleshooting utility.The F5 BIG-IP Edge Components Troubleshooting screen opens.
-
Click Tools > Enable Logs.
-
Click File > Generate Report.
The Report screen opens.
-
Under Type, select the types of reports that you want to run.
-
Under Format, select html or text for the type of report.
-
To generate a compressed report, select the compressed option.
-
Click Save As to choose the path and filename for the report.
-
To view the report without saving the report, click View.
While the report runs, a Collecting Data popup screen opens and a System Information popup screen opens if the system information report type runs; the popup screens close. If you selected html format, the report opens in a browser screen.
You can use the client troubleshooting utility to examine logs in the Windows-based systems.
-
Double-click
f5wininfo.exeto start the client troubleshooting utility.The F5 BIG-IP Edge Components Troubleshooting screen opens.
-
Click Tools > View Logs.
The Log Viewer screen opens.
-
Click Export to download and export logs in HTML format.
The HTML file is saved to your local disk.
You can use the client troubleshooting utility to delete old log files.
-
Close and shut down BIG-IP Edge Client before you clear log files.
-
Double-click
f5wininfo.exeto start the client troubleshooting utility.The F5 BIG-IP Edge Components Troubleshooting screen opens.
-
Click Tools > Delete Logs.
The Log File Removal screen opens to confirm the removal.
-
To delete, both the user and system logs, select the Delete user logs and Delete system logs check boxes.
-
Select Delete.
The APM Client logs are deleted.
If you want users of BIG-IP Edge Client® for Windows to start a Network Access session with the credentials that they typed to log on to a Windows-based system, you must configure the connectivity profile, the client download package, and the access policy to support this.
Important: A client must be joined to a domain to reuse Windows logon credentials. This will not work if the client is standalone, and not joined to a domain.
-
Configuring a connectivity profile to reuse Windows logon credentials
-
Customizing the Edge Client package for Windows logon credentials reuse
-
Configuring an access policy for Windows logon credentials reuse
For users to reuse Windows credentials to start a Network Access session, you must select the Reuse Windows Logon Credentials check box in the connectivity profile.
Important: A client must be joined to a domain to reuse Windows logon credentials. This will not work if the client is standalone, and not joined to a domain.
-
On the Main tab, click Access > Connectivity / VPN > Connectivity > Profiles.
A list of connectivity profiles displays.
-
Select the connectivity profile that you want to update and click Edit Profile.
The Edit Connectivity Profile popup screen opens and displays General Settings.
-
From the left pane of the popup screen, select Desktop Client Settings.
Edge Client settings for Mac and Windows-based systems display in the right pane.
-
Select the Reuse Windows Logon Credentials check box.
-
Click OK.
The popup screen closes, and the Connectivity Profile List displays.
For users to reuse their Windows credentials to start a Network Access session, the Edge Client package must contain the user logon credentials access service.
Important: A client must be joined to a domain to reuse Windows logon credentials. This will not work if the client is standalone, and not joined to a domain.
-
On the Main tab, click Access > Connectivity / VPN > Connectivity > Profiles.
A list of connectivity profiles displays.
-
Select the connectivity profile for which you want to customize the client package.
-
Click the Customize Package button or the arrow on the Customize Package button and select Windows Edge Client.
The Customize Windows Client Package popup screen displays with the Available Components tab displayed.
-
Select the User Logon Credentials Access Service check box.
This software service allows the client to store encrypted Windows logon credentials and use those credentials to log on to Access Policy Manager.
-
Click Download.
The screen closes and the package,
BIGIPEdgeClient.exe, downloads.
You must make the downloaded package available to your users, as hosted content or through some other delivery mechanism. Users must install the package or, Component Installer, if present on user systems, can install it for them.
For users to reuse Windows credentials to start a Network Access session, you must ensure that the access policy includes a Logon Page action that has not been customized.
Important: A client must be joined to a domain to reuse Windows logon credentials. This will not work if the client is standalone, and not joined to a domain.
-
On the Main tab, click Access > Profiles / Policies > Access Profiles (Per-Session Policies).
The Access Profiles (Per-Session Policies) screen displays.
-
In the Per-Session Policy column, click the Edit link for the access profile you want to configure.
The visual policy editor opens the access policy in a separate screen.
-
Make any adjustments needed to the access policy to ensure that it includes a Logon Page action that has not been customized. (Other logon page actions do not support the reuse Windows logon credentials option.)
Note: The Logon Page action must contain only the default fields and the JavaScript cannot be removed or otherwise changed as can be done through Access Policy Manager Customization. If necessary, you can delete a Logon Page action and add it to the policy again to ensure that it is not customized.
-
Click Finished.
The popup screen closes.
-
Click the Apply Access Policy link to apply and activate the changes to the policy.
Microsoft registers the system adapter’s IP and hostname on the DNS Servers (Dynamic address registration) when the Register this connection’s addresses in DNS option is enabled for the adapter on Windows. However, users noticed that Microsoft registers the local connection address and PPP adapter (VPN) address on tunnel DNS servers when the Register this connection’s addresses in DNS option is enabled on the network adapter and full tunneling is used.
BIG-IP Edge client can intercept DNS traffic and decide whether DNS traffic should be routed to a tunnel DNS server or a local DNS server. To achieve this function, Edge Client uses two components such as service and driver. The driver is TDI-based (Intel platform) and captures DNS events and redirects them to a service that has listeners configured.
The DNS Relay proxy service has been enhanced to drop the registration of local adapters (non-PPP) on DNS Servers configured on Network Access settings.
Administrators can use the APM Variable Assign agent to enable or disable DNS Dynamic Update as per their preference. Following are the possible configuration options:
-
To disable DNS Dynamic Update, add the following entries to the Variable Assign agent in your policy::
-
Custom variable:
config.connectivity_resource_network_access./Common/F5Access_NetworkAccess.client.IPv6LAN
-
Custom expression:
“return {</IPv6LAN><dynamicUpdatePacketFilter0>0</dynamicUpdatePacketFilter0><IPv6LAN>}”
Note: By default, the configuration option value is set to 0 and the feature to intercept/filter DNS Dynamic Update packet is disabled.
-
-
For a deployment that uses a non-secure DNS Dynamic update and would like to filter registration calls, add the following entries to the Variable Assign agent in your policy:
-
Custom variable:
config.connectivity_resource_network_access./Common/F5Access_NetworkAccess.client.IPv6LAN
-
Custom expression:
“return {</IPv6LAN><dynamicUpdatePacketFilter0>1</dynamicUpdatePacketFilter0><IPv6LAN>}”
Note: System generated DNS Update packets are modified and sent to Network Access DNS server.
-
-
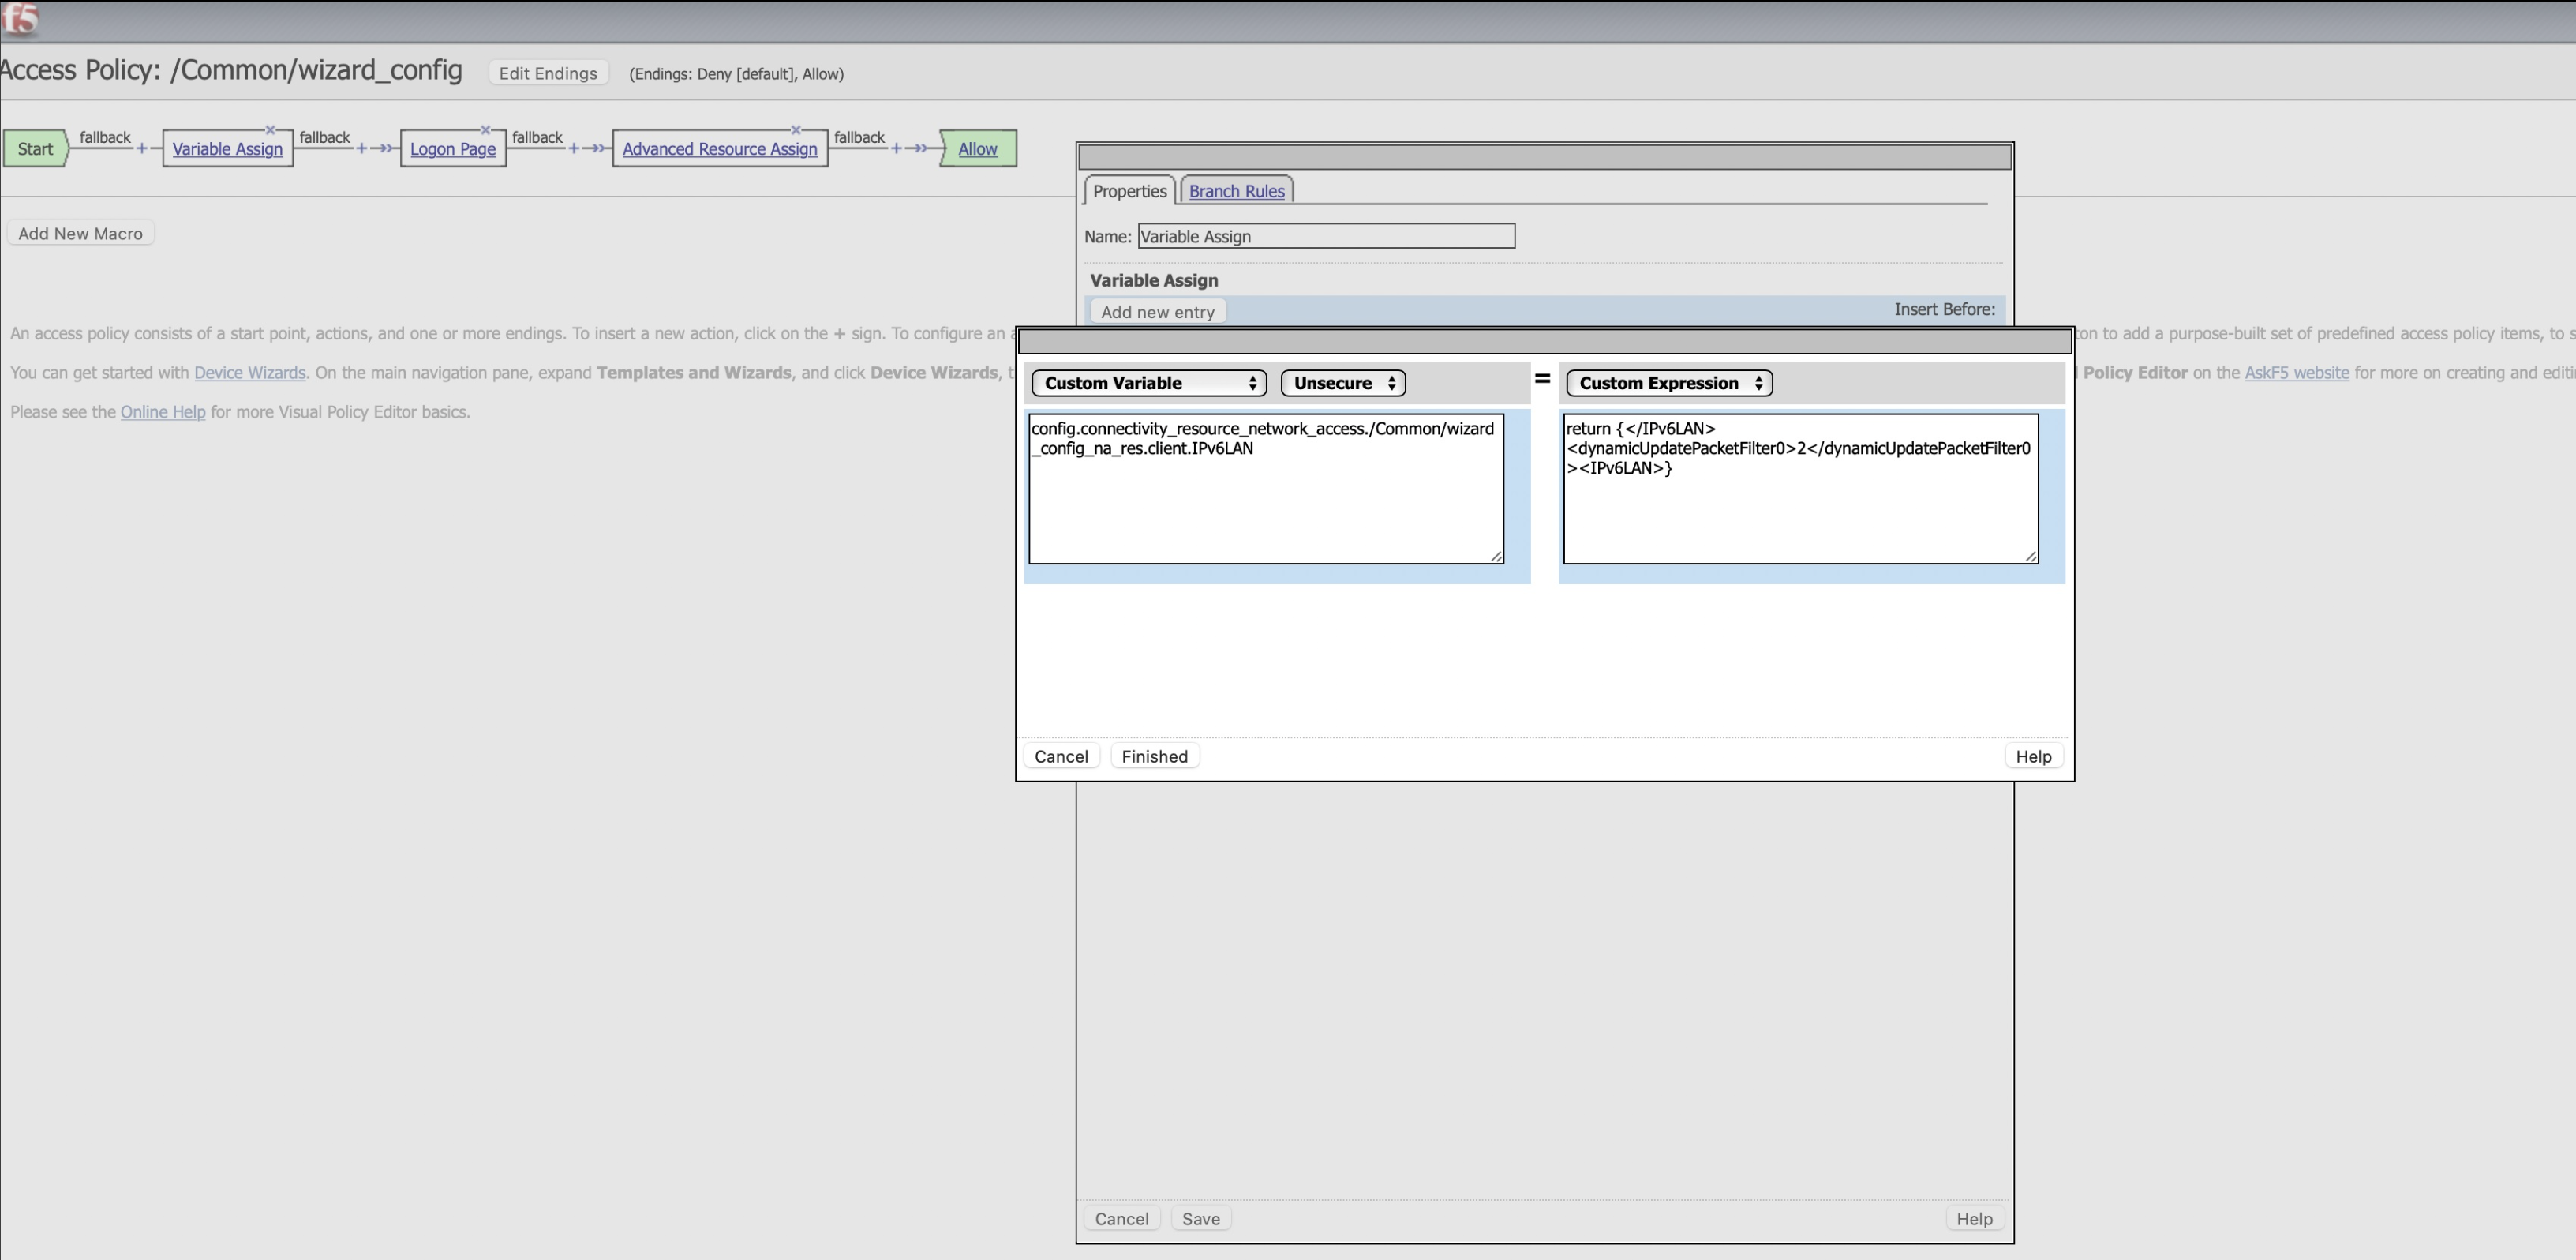
For a deployment that uses secured DNS Dynamic update and would like to filter registration calls., add the following entries to the Variable Assign agent in your policy:
-
Custom variable:
config.connectivity_resource_network_access./Common/<F5Access_NetworkAccess>.client.IPv6LAN
-
Custom expression:
“return {</IPv6LAN><dynamicUpdatePacketFilter0>2</dynamicUpdatePacketFilter0><IPv6LAN>}”
Note: System generated DNS Update packets are dropped and a new secured record is created by proxy code and sent to the DNS server.
-
-
For any value other than 0, 1, 2, the DNS relay proxy sets to 0.
Administrators can use the APM Variable Assign agent to enable or disable the DNS Dynamic Update. Follow the steps to configure the dynamicUpdatePacketFilter value from variable assignment in the BIG-IP.
-
On the Main tab, click Access > Profiles / Policies.
The Access Profiles (Per-Session Policies) screen displays.
-
In the Per-Session Policy column, click the Edit link for the access profile you want to configure.
The visual policy editor displays the access policy in a separate screen.
-
Click the (+) icon after the Start node in the access policy to add a new item.
Note: Only an applicable subset of access policy items is available for selection in the visual policy editor for any access profile type.
A popup screen appears, listing predefined actions on tabs such as Logon, Authentication, Assignment, and so on.
-
Click the Assignment tab and select the Variable Assign radio buttion.
-
Click Add Item.
A properties screen appears.
-
For the Variable assign action, click Add new entry.
-
Click the change link for the new entry created and add the required Custom variable and Custom Expression in the respective fields as detailed in the Overview: Discard non-VPN adapter registration on Network Access DNS server section. Keep the other settings unchanged.
-
Click Finished.
A custom varible assign is configured. For more information, refer to the BIG-IP Access Policy Manager: Visual Policy Editor.
The Windows Edge Client now includes custom logging preferences, enabling administrators to adjust log verbosity directly via the APM Client Log Level dropdown menu in BIG-IP, enhancing both security and debugging capabilities.
Note: The changes to ServerLogLevel are applied dynamically and do not require reinstalling the Edge Client. The updated settings will automatically reflect when the client connects to the APM Virtual Server with a connectivity profile that has the Custom Logging option enabled. However, the MachineLogLevel must be manually created in the Registry Editor if detailed debug-level logging is required on the client side.
Following are the prerequisites to configure custom logging preferences:
- BIG-IP version 21.1 or later.
- Edge Client version 7.2.7 or later.
To configure logging preferences and capture logs for the Windows Edge Client:
-
Set Log Level in BIG-IP Connectivity Profile
1.1 Navigate to Access > Connectivity / VPN > Connectivity > Profiles in the BIG-IP Management Console.
1.2 While creating or editing a connectivity profile, select the desired log level from the APM Client Log Level drop-down under General Settings. The default log level isInfo -
Enable Debugging Logs on the Client
2.1 To debug the Windows Edge Client and access detailed traces, create or configure the MachineLogLevel property in the Registry Editor.
2.2 Navigate to the following registry path: HKLM\Software\F5 Networks\RemoteAccess.
2.3 SetMachineLogLevelproperty toDEBUGto enable detailed client-side logs.Important:
This registry setting is necessary only for enabling debug logs. It ensures that detailed logging is captured only on the affected machines. -
Set Both ServerLogLevel and MachineLogLevel to DEBUG
For complete and detailed debug logs, configure the following:
3.1 Set the ServerLogLevel in the BIG-IP Connectivity Profile toDEBUG.
3.2 Set the MachineLogLevel in the Registry Editor toDEBUG. -
Capture Logs
To capture the logs:4.1 Start a System Trace
a. Open Command Prompt with administrative privileges.
b. Create or navigate to a folder where you want the logs to be stored, e.g.,c:\logs\main.
c. Run the following command to start trace logging:
logman start msF3 -p {8421B2D4-D4AB-42D7-94B7-C2B93158A6C5} 0xFFFFFFFF 255 -ets4.2 Connect the Edge Client
a. Open the Edge Client application.
b. Use the interface to connect and proceed with Access Policy evaluation.4.3 Stop the System Trace
a. Once the connection is established and the Access Policy evaluation is complete, navigate back to the Command Prompt.
b. Enter the following command to stop the trace:
c:\logs\main> logman stop msF3 -ets
After completing this procedure, the saved .etl file will contain debug-enabled logs. This file can be shared with the support team for further analysis.