Manual Chapter : Configuring Device-Specific Probing and Statistics Collection

Applies To:

Show Versions Show Versions

BIG-IP DNS

  • 12.1.5, 12.1.4, 12.1.3, 12.1.2, 12.1.1, 12.1.0
Manual Chapter

Configuring Device-Specific Probing and Statistics Collection

Overview: Configuring device-specific probing and statistics collection

BIG-IP® DNS performs intelligent probing of your network resources to determine whether the resources are up or down. In some circumstances, for example, if your network contains firewalls, you might want to set up device-specific probing to specify which BIG-IP® systems probe specific servers for health and performance data.

About Prober pools

A Prober pool is an ordered collection of one or more BIG-IP® systems. BIG-IP DNS can be a member of more than one Prober pool, and a Prober pool can be assigned to an individual server or a data center. When you assign a Prober pool to a data center, by default, the servers in that data center inherit that Prober pool.

The members of a Prober pool perform monitor probes of servers to gather data about the health and performance of the resources on the servers. BIG-IP DNS makes load balancing decisions based on the gathered data. If all of the members of a Prober pool are marked down, or if a server has no Prober pool assigned, BIG-IP DNS reverts to a default intelligent probing algorithm to gather data about the resources on the server.

This figure illustrates how Prober pools work. BIG-IP DNS contains two BIG-IP Local Traffic Manager™ (LTM™) systems that are assigned Prober pools and one BIG-IP LTM system that is not assigned a Prober pool:

Example illustration of how Prober pools work

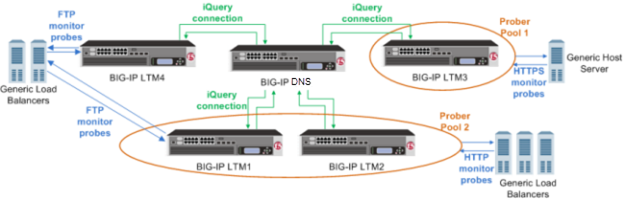
BIG-IP systems with prober pools

Prober Pool 1 is assigned to a generic host server
BIG-IP LTM3 is the only member of Prober Pool 1, and performs all HTTPS monitor probes of the server.
Prober Pool 2 is assigned to generic load balancers
BIG-IP LTM1 and BIG-IP LTM2 are members of Prober Pool 2. These two systems perform HTTP monitor probes of generic load balancers based on the load balancing method assigned to Prober Pool 2.
The generic load balancers on the left side of the graphic are not assigned a Prober pool
BIG-IP DNS can solicit any BIG-IP system to perform FTP monitor probes of these load balancers, including systems that are Prober pool members.

About Prober pool status

The status of a Prober pool also indicates the status of the members of the pool. If at least one member of a Prober pool has green status (Available), the Prober pool has green status.

The status of a Prober pool member indicates whether the BIG-IP DNS system, on which you are viewing status, can establish an iQuery connection with the member.

Note: If a Prober pool member has red status (Offline), no iQuery connection exists between the member and the BIG-IP DNS system on which you are viewing status. Therefore, that BIG-IP DNS system cannot request that member to perform probes, and the Prober pool will not select the member for load balancing.

About Prober pool statistics

You can view the number of successful and failed probe requests that the BIG-IP® DNS system (on which you are viewing statistics) made to the Prober pools. These statistics reflect only the number of Probe requests and their success or failure. These statistics do not reflect the actual probes that the pool members made to servers on your network.

Prober pool statistics are not aggregated among the BIG-IP DNS systems in a synchronization group. The statistics on one BIG-IP DNS include only the requests made from that BIG-IP DNS system.

Task summary

Perform these tasks to configure device-specific probing and statistics collection.

Defining a data center

On BIG-IP®DNS, create a data center to contain the servers that reside on a subnet of your network.
  1. On the Main tab, click DNS > GSLB > Data Centers .
    The Data Center List screen opens.
  2. Click Create.
    The New Data Center screen opens.
  3. In the Name field, type a name to identify the data center.
    Important: The data center name is limited to 63 characters.
  4. In the Location field, type the geographic location of the data center.
  5. In the Contact field, type the name of either the administrator or the department that manages the data center.
  6. From the State list, select Enabled.
  7. Click Finished.
Now you can create server objects and assign them to this data center.
Repeat these steps to create additional data centers.

Defining a server

Ensure that at least one data center exists in the configuration.
On BIG-IP® DNS, define a server that represents a physical server in your network. Repeat these steps for each server in your network, including the BIG-IP DNS itself, other BIG-IP systems, other load balancers, and third-party host servers.
Important: At a minimum, you must define two servers, one that represents BIG-IP DNS and one that represents another managed server (either a load balancing or host server).
  1. On the Main tab, click DNS > GSLB > Servers .
    The Server List screen opens.
  2. Click Create.
    The New Server screen opens.
  3. In the Name field, type a name for the server.
    Important: Server names are limited to 63 characters.
  4. From the Product list, select the server type.
    The server type determines the metrics that the system can collect from the server.
    Note: If your network uses a server that is not on this list, use the Generic Load Balancer or Generic Host option.
  5. In the Address List area, add the IP addresses of the server.
    1. Type an external (public) IP address in the Address field, and then click Add.
    2. If you use NAT, type an internal (private) IP address in the Translation field, and then click Add.
    You can add more than one IP address, depending on how the server interacts with the rest of your network.
  6. From the Data Center list, select the data center where the server resides.
  7. In the Health Monitors area, assign health monitors to the server by moving them from the Available list to the Selected list.
    Tip: If the server is a BIG-IP system, use the bigip monitor. If the server is a generic host, consider using the gateway_icmp monitor, because this monitor simply checks that the server responds to a ping.
  8. From the Virtual Server Discovery list, select how you want virtual servers to be added to the system.
    Option Description
    Disabled The system does not use the discovery feature to automatically add virtual servers. This is the default value. Use this option for a standalone BIG-IP DNS system or for a BIG-IP DNS/LTM® combo system when you plan to manually add virtual servers to the system, or if your network uses multiple route domains.
    Enabled The system uses the discovery feature to automatically add virtual servers. Use this option for a BIG-IP DNS/LTM combo system when you want the BIG-IP DNS system to discover LTM virtual servers.
    Enabled (No Delete) The system uses the discovery feature to automatically add virtual servers and does not delete any virtual servers that already exist. Use this option for a BIG-IP DNS/LTM combo system when you want the BIG-IP DNS system to discover LTM virtual servers.
  9. Click Create.
    The Server List screen opens displaying the new server in the list.

Creating a Prober pool

Obtain a list of the BIG-IP® systems in your network and ensure that a server object is configured on the BIG-IP DNS for each system.
Create a Prober pool that contains the BIG-IP systems that you want to perform monitor probes of a specific server or the servers in a data center.
  1. On the Main tab, click DNS > GSLB > Prober Pools .
    The Prober Pool List screen opens.
  2. Click Create.
    The New Prober Pool screen opens.
  3. In the Name field, type a name for the Prober pool.
    Important: Prober pool names are limited to 63 characters.
  4. Select a method from the Load Balancing Method list.
    Option Description
    Round Robin BIG-IP DNS load balances monitor probes among the members of a Prober pool in a circular and sequential pattern.
    Global Availability BIG-IP DNS selects the first available Prober pool member to perform a monitor probe.
  5. Assign members to the pool by moving servers from the Available list to the Selected list.
  6. To reorder the members in the Selected list, choose a server and use the Up and Down buttons to move the server to a different location in the list.
    The order of the servers in the list is important in relation to the load balancing method you selected.
  7. Click Finished.
Assign the Prober pool to a data center or a server.

Assigning a Prober pool to a data center

Ensure that a Prober pool is available on the system.
To make a specific collection of BIG-IP® systems available to probe the servers in a data center, assign a Prober pool to the data center.
  1. On the Main tab, click DNS > GSLB > Data Centers .
    The Data Center List screen opens.
  2. Click a data center name.
    The data center settings and values display.
  3. From the Prober Preference list, select the Prober pool that contains the BIG-IP® systems that you want to perform monitor probes of the servers in this data center.
    By default, all of the servers in the data center inherit this Prober pool.
  4. Click Update.

Assigning a Prober pool to a server

Ensure that a Prober pool is available on the system.
To specify which BIG-IP® systems perform monitor probes of a server, assign a Prober pool to the server.
  1. On the Main tab, click DNS > GSLB > Servers .
    The Server List screen opens.
  2. In the Server List, click a server name.
    The server settings and values display.
  3. From the Prober Preference list, select one of the following.
    Option Description
    Inside the Data Center By default, a server selects the Prober pool from within the existing data center.
    Outside the Data Center A server selects the Prober pool from outside the existing data center.
    Inherit from Data Center A server inherits the Prober pool assigned to the data center in which the server resides.
  4. From the Prober Fallback list, select one of the following.
    Option Description
    Any available By default, selects any available Prober pool.
    Inside the Data Center A server selects the Prober pool from within the existing data center.
    Outside the Data Center A server selects the Prober pool from outside the existing data center.
    Inherit from Data Center A server inherits the Prober pool assigned to the data center in which the server resides.
    None No Prober pool is used. Prober Fallback is disabled.
  5. Click Update.

Viewing Prober pool statistics and status

You can view status and statistics for Prober pools and the members of the pools.
  1. On the Main tab, click DNS > GSLB > Prober Pools .
    The Prober Pool List screen opens.
  2. On the menu bar, click Statistics.
    The Global Traffic Statistics screen opens.
  3. Click the Refresh button.
    The statistics are updated.
  4. To view additional information about the status of a Prober pool, place your cursor over the icon in the Status column.
  5. To view additional information about the status of a Prober pool member, click View in the Members column, and then place your cursor over the icon in the Status column of a specific member.

Determining which Prober pool member marked a resource down

When a resource is marked down, you can open the BIG-IP® DNS log to view the SNMP trap and determine which member of a Prober pool marked the resource down.
  1. On the Main tab, click System > Logs .
    The System logs screen opens.
  2. On the menu bar, click Local Traffic.
    The Local Traffic logs screen opens.
  3. You can either scroll through the log or search for a log entry about a specific event.

Implementation result

You now have an implementation in which a specific BIG-IP® system probes the resources on a specific server, or the servers in a specific data center.