Applies To:
Show Versions
BIG-IP APM
- 12.1.5, 12.1.4, 12.1.3, 12.1.2, 12.1.1, 12.1.0
Kerberos Authentication with End-User Logons
About basic authentication and Kerberos end-user logon
Access Policy Manager® (APM®) provides an alternative to a form-based login authentication method. This alternative method uses a browser login box that is triggered by an HTTP 401 response to collect credentials. A SPNEGO/Kerberos or basic authentication challenge can generate a HTTP 401 response.
This option is useful when a user is already logged in to the local domain and you want to avoid submitting an APM HTTP form for collecting user credentials. The browser automatically submits credentials to the server and bypasses the login box to collect the credentials again.
The benefits of this feature include:
- Provides flexible login mechanism instead of restricting you to use only the form-based login method.
- Eliminates the need for domain users to explicitly type login information again to log in to Access Policy Manager.
- Eliminates the need for user password transmission with Kerberos method.
How does end-user logon work?
To retrieve user credentials for end-user logon, you can use basic authentication or SPEGNO/Kerberos methods or both.
- Basic authentication
- Use this method to retrieve user credentials (user name and password) from a browser. You can think of this method as a replacement for form-based authentication used by the standard login screen. If you use basic authentication, the system populates the user name and password session variables, which can then be used by any other authentication actions, such as Active Directory or RADIUS.
- SPNEGO/Kerberos
- Use this method to retrieve user credentials through SPNEGO/Kerberos authentication header.
With the Kerberos method, the client system must first join a domain and a Kerberos action must
follow. The Kerberos action does not run immediately; it runs only when clients request
SPNEGO/Kerberos authentication. By default, Kerberos authentication runs not only on the first
request, but also on subsequent requests where authentication is needed, such as for new
connections. Access Policy Manager® ( APM®) validates
the request by confirming that a valid ticket is present. Note: You can disable Kerberos per request-based authentication in the Kerberos authentication access policy item configuration in APM. If you disable it, authentication occurs while the access policy runs and subsequent authentications do not occur. In that case, end-user logon does not occur.
Both methods require that an HTTP 401 Response action item be configured in the access policy and that the authentication method be specified in the action item. In cases where both methods are selected, the browser determines which method to perform based on whether the system has joined a domain. The HTTP 401 Response action has two default branches to indicate whether basic authentication or Kerberos method is performed.
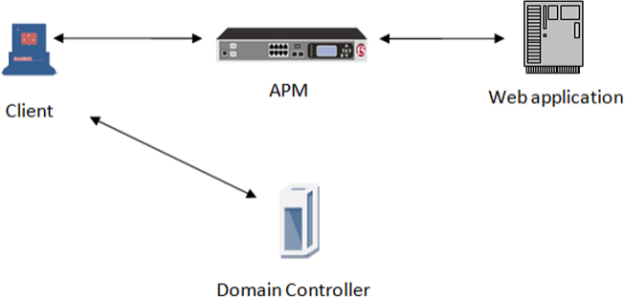
How SPNEGO/Kerberos end-user logon works
The end-user logon works with events happening in this order:
- The client becomes a member and connects to the domain.
- The client connects to a virtual server on the BIG-IP® system.
- The access policy runs and issues a 401 HTTP request action.
- If Kerberos is present, the browser forwards the Kerberos ticket along with the request when it receives the 401 HTTP request.
- Access Policy Manager validates the Kerberos ticket after the request is received and determines whether or not to permit the request.
About Kerberos authentication requirements
To configure Kerberos authentication, you must meet specific configuration requirements as described here.
- Virtual server
- The virtual server IP address and host name are necessary to configure DNS.
- DNS configuration
- Make sure you have the zone file and PTR record for the virtual server IP address. For
example:
testbed.lab.companynet 10.10.4.100
- Browser configuration
- Configure the browser to use Kerberos. Typically, Internet Explorer is already configured for Kerberos; however, you might need to configure it for trusted sites. To use Firefox, you must configure it for negotiate authentication.
Task summary for configuring end-user login support
To set up this configuration, perform the procedures in the task list.
Task list
Joining a Kerberos user account to a domain
Configuring an AAA server for Kerberos authentication
Creating an access profile
Verifying log settings for the access profile
Configuring an access policy for end-user logon support
Access policy example for end-user login
This is an example of an access policy with all the associated elements needed to successfully support the end-user login feature. Notice that separate branches are created automatically to support using either basic authentication or Kerberos method to retrieve user credentials.

Example access policy for end-user login
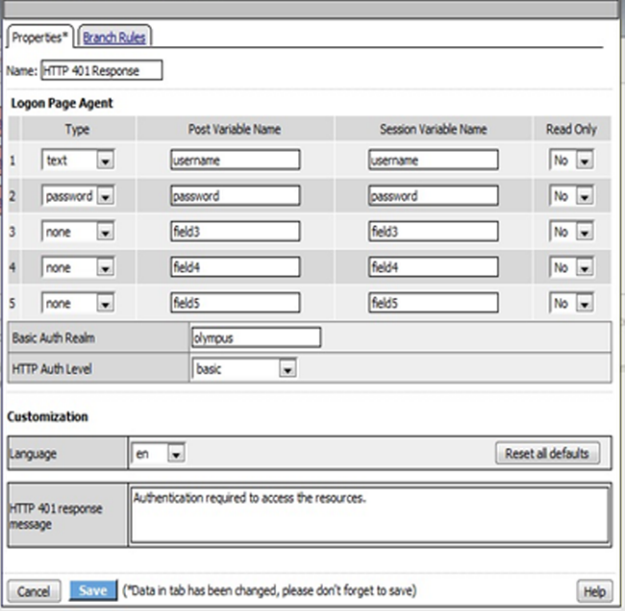
Example properties for an HTTP 401 response action
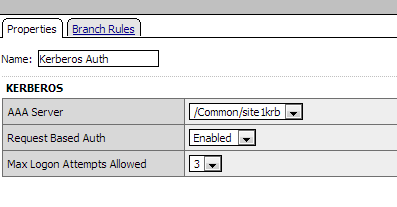
Example properties for a Kerberos Auth action on the Negotiate branch
Kerberos authentication troubleshooting tips
You might choose to verify Kerberos authentication configurations in some instances. Use these troubleshooting tips to help resolve any issues you might encounter.
Verify the keytab file
From the command line, use the klist command as shown in this example.
klist -ke WRFILE:/config/filestore/files_d/Common_d/kerberos_keytab_file_d/\:Common\:SUN-SPNEGO-APM106_key_file_2
The output for the example contains information like this.
Keytab name:
FILE:/config/filestore/files_d/Common_d/kerberos_keytab_file_d/:Common:SUN-SPNEGO-APM106_key_file_2
KVNO Principal
3    HTTP/apm106.labt.companynet.com@labt.companynet.com(arcfour-hmac)
Verify Kerberos delegation
kinit HTTP/apm106.labt.companynet.com@labt.companynet.comYou are prompted for a password and should receive a ticket (no output, no error).
Verify ticket
From the command line, type klist . Here is sample output: /etc/krb5.conf
Capture a TCP dump
Make sure the client sends the ticket to the BIG-IP® system; this verifies that the client setup is successful.


