Applies To:
Show Versions
BIG-IP APM
- 12.1.6, 12.1.5, 12.1.4, 12.1.3, 12.1.2, 12.1.1, 12.1.0
Smart Card Authentication for VMware View Clients
About APM configurations that support VMware smart card use
Access Policy Manager® (APM®) supports smart card SSO for VMware Horizon View 6.2 or later. APM also supports smart card authentication for VMware Horizon View 6.2 and other supported versions.
For the supported versions of VMware Horizon View, see BIG-IP® APM® Client Compatibility Matrix on the AskF5™ web site located at http://support.f5.com/.
To configure APM for smart card SSO, see Overview: Supporting smart card SSO for VMWare View in BIG-IP® Access Policy Manager®: Third-Party Integration on the AskF5™ web site located at http://support.f5.com/.
To configure APM for smart card authentication, see Overview: Supporting smart card authentication for VMWare View in BIG-IP® Access Policy Manager®: Third-Party Integration on the AskF5™ web site located at http://support.f5.com/.
Overview: Supporting smart card SSO for VMware View
On a BIG-IP® system configured as a SAML Identity Provider (IdP), Access Policy Manager® can support smart card single-sign on (SSO) to a VMware View Horizon Server.
The configuration uses SSL client certificate validation mechanisms. For a successful configuration, use these instructions and the settings specified in them.
Task summary
About standalone View Client on the webtop and smart card SSO
With Access Policy Manager® (APM®) configured to support smart card SSO for VMware Horizon View server, if you launch the standalone VMware View Client from the Access Policy Manager® (APM®) webtop, the VMware Horizon View server prompts for a PIN. This is expected behavior.
About Horizon HTML5 Client and smart card authentication
VMware Horizon HTML5 Client does not support smart card redirection. If a user authenticates to Access Policy Manager® with a smart card and then launches an HTML5 desktop, a screen prompts the user for domain credentials. The user cannot use the smart card and must supply credentials to log in to the desktop.
About virtual servers required for View Client traffic
A VMware View Client makes connections to support different types of traffic between it and a View Connection Server. For Access Policy Manager ® to support these connections, it requires two virtual servers that share the same destination IP address. One virtual server processes HTTPS traffic and performs authentication for the View Client. An addition virtual server processes PC over IP (PCoIP) traffic.
Creating a client SSL profile for certificate inspection
Creating a virtual server for a BIG-IP (as SAML IdP) system
Configuring IdP service for VMware View smart card SSO
Exporting unsigned SAML IdP metadata from APM
Adding an artifact resolution service to the IdP metadata
Creating an iRule to respond with IdP metadata to a URI
Establishing APM as a trusted SAML IdP for VMware Horizon View
-
Using the VMware software that you use to administer a VCS, create a new SAML
Authenticator with these properties:
- To apply the changes after choosing a new SAML Authenticator, you must restart the VCS.
Importing VMware VCS metadata to create an SP connector
Binding a SAML IdP service to one SP connector
Configuring a VMware View resource for smart card authentication
Creating an access profile
Example: Smart card authentication required for View clients
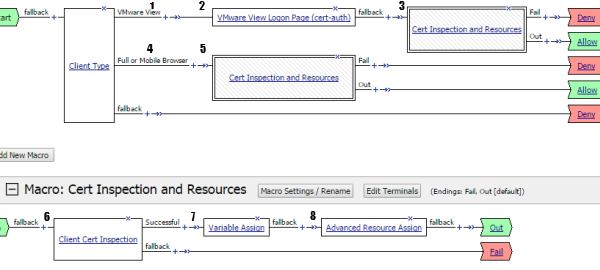
Access policy that requires smart card authentication
| 1 | Client Type detects a standalone VMware View Client. |
| 2 | In the properties for the agent, the VMware View Logon Screen property specifies Smart Card. |
| 3 | Macrocall to Cert Inspection and Resources. |
| 4 | Client Type detects a web-based client. |
| 5 | Macrocall to Cert Inspection and Resources. |
| 6 | Inspect certificate from the smart card. (Relies on LTM® to obtain certificate during initial SSL handshake based on specification in SSL client profile.) |
| 7 | Extracts the User Principal Name from SSL certificate information and stores it in a custom session variable. |
| 8 | Assign a full webtop and a VMware View remote desktop resource configured for SAML SSO. |
Example: Smart card authentication optional for View clients
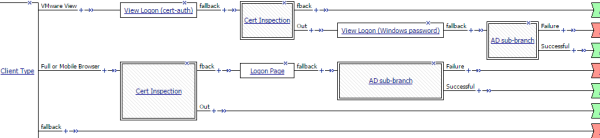
An access policy in which smart card authentication is optional for VMware View
Macros for password-based and certificate-based authentication
Example: Two-factor authentication with smart card for View clients
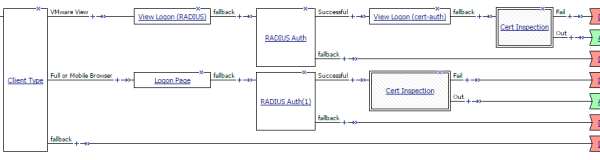
An access policy for two-factor authentication with smart card for VMware View

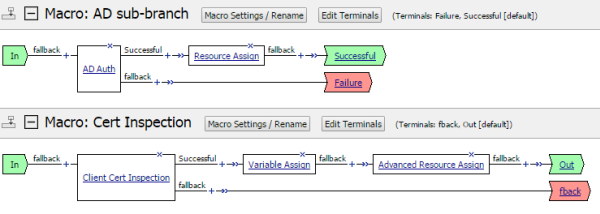
Macro for certificate-based authentication and resources
Creating an access policy for VMware View smartcard authentication
Using variable assign to extract the UPN from the SSL certificate
Updating the Access Policy settings and resources on the virtual server
Configuring a UDP virtual server for PCoIP traffic
Configuring virtual servers that use a private IP address
Overview: Supporting smart card authentication for VMware View
On a BIG-IP® system configured as a SAML Identity Provider (IdP), Access Policy Manager® (APM®) supports smart card authentication for VMware View Horizon Server browser-based clients and View Clients.
The configuration uses SSL client certificate validation mechanisms. For a successful configuration, use these instructions and the settings specified in them.
Task summary
About standalone View Client and smart card authentication
With Access Policy Manager® (APM®) configured to support smart card authentication for VMware Horizon View server, the user of a standalone VMware View Client must supply a smart card PIN more than once. When the user logs on to APM, APM displays a screen that prompts for a PIN. Whenever the user launches a desktop or application, the VMware Horizon View server prompts for a PIN.
About browser-based access and smart card authentication for VMware
Access Policy Manager® (APM®) supports smart card authentication for browser-based clients of VMware View Horizon server if the access policy is configured to use certificate-based authentication. Browser-based clients use the smart card first to authenticate to APM. Then, every time the user launches a desktop or application, the user must use the smart card again to authenticate to the VMware Horizon View server.
About Horizon HTML5 Client and smart card authentication
VMware Horizon HTML5 Client does not support smart card redirection. If a user authenticates to Access Policy Manager® with a smart card and then launches an HTML5 desktop, a screen prompts the user for domain credentials. The user cannot use the smart card and must supply credentials to log in to the desktop.
About virtual servers required for View Client traffic
A VMware View Client makes connections to support different types of traffic between it and a View Connection Server. For Access Policy Manager ® to support these connections, it requires two virtual servers that share the same destination IP address. One virtual server processes HTTPS traffic and performs authentication for the View Client. An addition virtual server processes PC over IP (PCoIP) traffic.
Creating a client SSL profile for certificate inspection
Creating a virtual server for a BIG-IP (as SAML IdP) system
Configuring IdP service for VMware View smart card authentication
Exporting unsigned SAML IdP metadata from APM
Adding an artifact resolution service to the IdP metadata
Creating an iRule to respond with IdP metadata to a URI
Establishing APM as a trusted SAML IdP for VMware Horizon View
-
Using the VMware software that you use to administer a VCS, create a new SAML
Authenticator with these properties:
- To apply the changes after choosing a new SAML Authenticator, you must restart the VCS.
Configuring a SAML SP connector for VMware VCS
Binding a SAML IdP service to one SP connector
Configuring a VMware View resource for smart card authentication
Creating an access profile
Example: Smart card authentication required for View clients
Access policy that requires smart card authentication
| 1 | Client Type detects a standalone VMware View Client. |
| 2 | In the properties for the agent, the VMware View Logon Screen property specifies Smart Card. |
| 3 | Macrocall to Cert Inspection and Resources. |
| 4 | Client Type detects a web-based client. |
| 5 | Macrocall to Cert Inspection and Resources. |
| 6 | Inspect certificate from the smart card. (Relies on LTM® to obtain certificate during initial SSL handshake based on specification in SSL client profile.) |
| 7 | Extracts the User Principal Name from SSL certificate information and stores it in a custom session variable. |
| 8 | Assign a full webtop and a VMware View remote desktop resource configured for SAML SSO. |
Creating an access policy for VMware View smart card authentication
Using variable assign to extract the UPN from the SSL certificate
Updating the Access Policy settings and resources on the virtual server
Configuring a UDP virtual server for PCoIP traffic
Configuring virtual servers that use a private IP address
Overview: Giving APM users time for smart card authentication
If you have configured Access Policy Manager® for smart card authentication and your users cannot enter a PIN and insert a smart card into a reader before the SSL handshake times out, they can experience problems such as browser failure or errors because the BIG-IP® system sends a TCP reset after the SSL handshake times out. You can mitigate this problem by increasing the handshake timeout in the client SSL profile.
Updating the handshake timeout in a Client SSL profile
By default, a client SSL profile provides a 10-second SSL handshake timeout. You might need to modify the timeout to give users who must authenticate using a smart card more time for the SSL handshake to complete.


