Manual Chapter : Using APM as a Gateway for RDP Clients

Applies To:

Show Versions Show Versions

BIG-IP APM

  • 12.1.6, 12.1.5, 12.1.4, 12.1.3, 12.1.2, 12.1.1, 12.1.0
Manual Chapter

Using APM as a Gateway for RDP Clients

Overview: Configuring APM as a gateway for Microsoft RDP clients

Access Policy Manager® (APM®) can act as a gateway for Microsoft RDP clients, authorizing them on initial access and authorizing access to resources that they request after that. The APM configuration includes these elements.

APM as gateway
From a configuration point of view, this is a virtual server that accepts SSL traffic from Microsoft RDP clients and is associated with an access policy that authorizes the client.
Client authorization access policy
This access policy runs when the RDP client initiates a session with the gateway (APM). Only NTLM authentication is supported. This access policy should verify that NTLM authentication is successful and must assign an additional access policy to use for resource authorization throughout the session.
Resource authorization access policy
This access policy runs when the authorized RDP client requests access to a resource. The access policy must contain logic to determine whether to allow or deny access to the target server and port.
Client authorization policy with NTLM auth and RDG Policy Assign

Sample client authorization policy

Notice the RDG Policy Assign item; it is used to specify the resource authorization policy.

Resource authorization policy with LDAP query

Sample resource authorization policy

Task summary

If you already have configured them, you can use existing configuration objects: a machine account, an NTLM authentication configuration, a VDI profile, a connectivity profile, and a client SSL profile.

Task list

About supported Microsoft RDP clients

Supported Microsoft RDP clients can use APM® as a gateway. The configuration supports Microsoft RDP clients on Windows, Mac, iOS, and Android.

Refer to BIG-IP® APM® Client Compatibility Matrix on the AskF5™ web site at http://support.f5.com/kb/en-us.html for the supported platforms and operating system versions for Microsoft RDP clients.

About Microsoft RDP client configuration

Before a supported Microsoft RDP client connects to Access Policy Manager® (APM®) as a gateway for RDP clients, installation of the BIG-IP®client SSL certificate (specified in the virtual server) is required.

Note: No APM software components are required or downloaded onto the client.

About Microsoft RDP client login to APM

On a Microsoft RDP client, a user types in settings for a gateway and a connection. The names for the settings vary depending on the Microsoft RDP client.

RDP client gateway settings
  1. Hostname setting: The hostname or IP address of the virtual server must be specified.
  2. Port setting: If requested, 443 must be specified.
  3. Credentials: Selection of specific logon method and entry of a user name and password should be avoided. In this implementation, APM® supports only NTLM authentication.
RDP client connection settings
Gateway setting: On some clients, you must configure a name and address for the gateway and at login type the gateway name. If requested, the gateway name must be specified as configured on the client.
  1. Hostname setting: Hostname of the target server.
  2. Port setting: Port on the target server.

Configuring an access profile for resource authorization

Configure an RDG-RAP type of access profile for Access Policy Manager® (APM®) before you create an access policy to authorize resource requests from Microsoft RDP clients.
Note: After APM authorizes a Microsoft RDP client, subsequent resource requests are sent to APM.
  1. On the Main tab, click Access Policy > Access Profiles .
    The Access Profiles List screen opens.
  2. Click Create.
    The New Profile screen opens.
  3. In the Name field, type a name for the access profile.
    Note: An access profile name must be unique among all access profile and any per-request policy names.
  4. From the Profile Type list, select RDG-RAP.
  5. Click Finished.
    The new access profile displays on the list.
The access profile displays in the Access Profiles List. Default-log-setting is assigned to the access profile.
You must configure an access policy that determines whether to deny or allow access to a resource.

Verifying log settings for the access profile

Confirm that the correct log settings are selected for the access profile to ensure that events are logged as you intend.
Note: Log settings are configured in the Access Policy Event Logs area of the product. They enable and disable logging for access system and URL request filtering events. Log settings also specify log publishers that send log messages to specified destinations.
  1. On the Main tab, click Access Policy > Access Profiles .
    The Access Profiles List screen opens.
  2. Click the name of the access profile that you want to edit.
    The properties screen opens.
  3. On the menu bar, click Logs.
    The access profile log settings display.
  4. Move log settings between the Available and Selected lists.
    You can assign up to three log settings that enable access system logging to an access profile. You can assign additional log settings to an access profile provided that they enable logging for URl request logging only.
    Note: Logging is disabled when the Selected list is empty.
  5. Click Update.
An access profile is in effect when it is assigned to a virtual server.

Configuring an access policy for resource authorization

Configure this access policy to perform resource authorization every time an RDP client requests access to a new resource.
Note: The requested resource is specified in these session variables: session.rdg.target.host and session.rdg.target.port.
  1. On the Main tab, click Access Policy > Access Profiles .
    The Access Profiles List screen opens.
  2. In the Access Policy column, click the Edit link for the RDG-RAP type access profile you want to configure.
    The visual policy editor opens the access policy in a separate screen.
  3. Click the (+) icon anywhere in the access policy to add a new action item.
    Note: Only an applicable subset of access policy items is available for selection in the visual policy editor for any access profile type.
    A popup screen opens, listing predefined actions on tabs such as General Purpose, Authentication, and so on.
  4. To restrict the target port to the RDP service only, perform these substeps:
    Note: F5® strongly recommends this action.
    1. In the search field, type emp, select Empty from the result list, and then click Add Item.
      A popup Properties screen opens.
    2. Click the Branch Rule tab.
    3. Click Add Branch Rule.
      A new entry with Name and Expression settings displays.
    4. In the Name field, replace the default name by typing a new name.
      The name appears on the branch in the access policy.
    5. Click the change link in the new entry.
      A popup screen opens.
    6. Click the Advanced tab.
    7. In the field, type this expression: expr { [mcget {session.rdg.target.port}] == 3389 }
    8. Click Finished.
      The popup screen closes.
    9. Click Save.
      The properties screen closes and the visual policy editor displays.
  5. To verify group membership for the requested host, add an LDAP Query to the access policy and configure properties for it:
    Adding an LDAP Query is one option. The visual policy editor provides additional items that you can use to determine whether to allow the client to access the resource.
    1. From the Server list, select an AAA LDAP server.
      An LDAP Query uses SSL connections when you select an LDAP AAA server that is configured for LDAPS.
    2. Type queries in the SearchFilter field.
      This query matches hosts with the fully qualified domain name (FQDN) of the host. (DNSHostName=%{session.rdg.target.host}) When clients request a connection, they must specify the FQDN.
      This query matches hosts with the host name or with the FQDN of the host. (|(name=%{session.rdg.target.host})(DNSHostName=%{session.rdg.target.host})) When clients request a connection, they can specify a host name or an FQDN.
    3. Click Save.
      The properties screen closes and the visual policy editor displays.
  6. To verify that the target host is a member of an Active Directory group, add a branch rule to the LDAP query item:
    1. In the visual policy editor, click the LDAP Query item that you want to update.
      A popup Properties screen displays.
    2. Click the Branch Rules tab, click Add Branch Rule, and type a descriptive name for the branch in the Name field.
    3. Click the change link in the new entry.
      A popup screen displays.
    4. Click the Advanced tab.
    5. Type an expression in the field.
      This expression matches the last LDAP memberOf attribute with an Active Directory group, RDTestGroup. expr { [mcget {session.ldap.last.attr.memberOf}] contains "CN=RDTestGroup" } The hypothetical members of the group in this example are the hosts to which access is allowed.
    6. Click Finished.
      The popup screen closes.
    7. Click Save.
      The properties screen closes and the visual policy editor displays.
  7. Click Save.
    The properties screen closes and the visual policy editor displays.
  8. Add any other items to the access policy and change any appropriate branch ending to Allow.
  9. Click Apply Access Policy to save your configuration.
Important: Do not specify this access policy in a virtual server definition. Select it from an RDG Policy Assign item in an access policy that authorizes Microsoft RDP clients.

Creating an access profile for RDP client authorization

You create an access profile to provide the access policy configuration for a virtual server that establishes a secured session.
  1. On the Main tab, click Access Policy > Access Profiles .
    The Access Profiles List screen opens.
  2. Click Create.
    The New Profile screen opens.
  3. In the Name field, type a name for the access profile.
    Note: An access profile name must be unique among all access profile and any per-request policy names.
  4. From the Profile Type list, select one of these options.
    • LTM-APM: Select for a web access management configuration.
    • SSL-VPN: Select to configure network access, portal access, or application access. (Most access policy items are available for this type.)
    • ALL: Select to support LTM-APM and SSL-VPN access types.
    Additional settings display.
  5. Select the Custom check box.
  6. In the Access Policy Timeout field, type the number of seconds that should pass before the access profile times out because of inactivity.
    The timeout needs to be at least 15 minutes long because an RDP client sends a keepalive to the gateway every 15 minutes.
    Important: To prevent a timeout, type 0 to set no timeout or type 900 or greater. 900 indicates a 15-minute timeout, which is enough time for the keepalive to prevent the timeout.
  7. Click Finished.

Verifying log settings for the access profile

Confirm that the correct log settings are selected for the access profile to ensure that events are logged as you intend.
Note: Log settings are configured in the Access Policy Event Logs area of the product. They enable and disable logging for access system and URL request filtering events. Log settings also specify log publishers that send log messages to specified destinations.
  1. On the Main tab, click Access Policy > Access Profiles .
    The Access Profiles List screen opens.
  2. Click the name of the access profile that you want to edit.
    The properties screen opens.
  3. On the menu bar, click Logs.
    The access profile log settings display.
  4. Move log settings between the Available and Selected lists.
    You can assign up to three log settings that enable access system logging to an access profile. You can assign additional log settings to an access profile provided that they enable logging for URl request logging only.
    Note: Logging is disabled when the Selected list is empty.
  5. Click Update.
An access profile is in effect when it is assigned to a virtual server.

Configuring an access policy for an RDP client

Configure an access policy to authorize Microsoft RDP clients and to specify the access policy that APM® should use to authorize access to resources as the client requests them.
Note: NTLM authentication occurs before an access policy runs. If NTLM authentication fails, an error displays and the access policy does not run.
  1. On the Main tab, click Access Policy > Access Profiles .
    The Access Profiles List screen opens.
  2. In the Access Policy column, click the Edit link for the access profile you want to configure.
    The visual policy editor opens the access policy in a separate screen.
  3. Click the (+) icon anywhere in the access policy to add a new action item.
    Note: Only an applicable subset of access policy items is available for selection in the visual policy editor for any access profile type.
    A popup screen opens, listing predefined actions on tabs such as General Purpose, Authentication, and so on.
  4. Optional: On the Endpoint Security (Server-Side) tab, select Client Type, and click Add Item.
    The Client Type action identifies clients and enables branching based on the client type.
    A properties screen opens.
  5. Click Save.
    The properties screen closes; the Client Type item displays in the visual policy editor with a Microsoft Client RDP branch and branches for other client types.
  6. On an access policy branch, click the (+) icon to add an item to the access policy.
  7. To verify the result of client authentication:
    1. Type NTLM in the search field.
    2. Select NTLM Auth Result.
    3. Click Add Item.
    A properties screen opens.
  8. Click Save.
    The properties screen closes and the visual policy editor displays.
  9. Select the RDG-RAP access policy you configured earlier:
    1. Click the [+] sign on the successful branch after the authentication action.
    2. Type RDG in the search field.
    3. Select RDG Policy Assign and click Add Item.
    4. To display available policies, click the Add/Delete link.
    5. Select a policy and click Save.
    Without an RDG policy, APM denies access to each resource request.
  10. Click the Apply Access Policy link to apply and activate the changes to the access policy.
To apply this access policy to network traffic, add the access profile to a virtual server.
Note: To ensure that logging is configured to meet your requirements, verify the log settings for the access profile.

Configuring a machine account

You configure a machine account so that Access Policy Manager® (APM®) can establish a secure channel to a domain controller.
  1. On the Main tab, click Access Policy > Access Profiles > NTLM > Machine Account .
    A new Machine Account screen opens.
  2. In the Configuration area, in the Machine Account Name field, type a name.
  3. In the Domain FQDN field, type the fully qualified domain name (FQDN) for the domain that you want the machine account to join.
  4. Optional: In the Domain Controller FQDN field, type the FQDN for a domain controller.
  5. In the Admin User field, type the name of a user who has administrator privilege.
  6. In the Admin Password field, type the password for the admin user.
    APM uses these credentials to create the machine account on the domain controller. However, APM does not store the credentials and you do not need them to update an existing machine account configuration later.
  7. Click Join.
This creates a machine account and joins it to the specified domain. This also creates a non-editable NetBIOS Domain Name field that is automatically populated.
Note: If the NetBIOS Domain Name field on the machine account is empty, delete the configuration and recreate it. The field populates.

Creating an NTLM Auth configuration

Create an NTLM Auth configuration to specify the domain controllers that a machine account can use to log in.
  1. On the Main tab, click Access Policy > Access Profiles > NTLM > NTLM Auth Configuration .
    A new NTLM Auth Configuration screen opens.
  2. In the Name field, type a name.
  3. From the Machine Account Name list, select the machine account configuration to which this NTLM Auth configuration applies.
    You can assign the same machine account to multiple NTLM authentication configurations.
  4. For each domain controller, type a fully qualified domain name (FQDN) and click Add.
    Note: You should add only domain controllers that belong to one domain.
    By specifying more than one domain controller, you enable high availability. If the first domain controller on the list is not available, Access Policy Manager® tries the next domain controller on the list, successively.
  5. Click Finished.
This specifies the domain controllers that a machine account can use to log in.

Maintaining a machine account

In some networks, administrators run scripts to find and delete outdated machine accounts on the domain controllers. To keep the machine account up-to-date, you can renew the password periodically.
  1. On the Main tab, click Access Policy > Access Profiles > NTLM > Machine Account .
    The Machine Account screen opens.
  2. Click the name of a machine account.
    The properties screen opens and displays the date and time of the last update to the machine account password.
  3. Click the Renew Machine Password button.
    The screen refreshes and displays the updated date and time.
This changes the machine account last modified time.

Configuring a VDI profile

Configure a VDI profile to specify NTLM authentication for Microsoft RDP clients that use APM® as a gateway.
  1. On the Main tab, click Access Policy > Application Access > Remote Desktops > VDI Profiles .
    The VDI Profiles list opens.
  2. Click Create.
    A popup screen opens with General Information selected in the left pane and settings displayed in the right pane.
  3. In the Profile Name field, type a name.
  4. From the Parent Profile field, select an existing VDI profile.
    A VDI profile inherits properties from the parent profile. You can override them in this profile.
  5. In the left pane, click MSRDP Settings.
    Settings in the right pane change.
  6. From the MSRDP NTLM Configuration list, select an NTLM authentication configuration.
  7. Click OK.
    The popup screen closes.
The VDI profile displays on the screen.
To apply the VDI profile, you must specify it in a virtual server.

Creating a connectivity profile

You create a connectivity profile to configure client connections.
  1. On the Main tab, click Access Policy > Secure Connectivity .
    A list of connectivity profiles displays.
  2. Click Add.
    The Create New Connectivity Profile popup screen opens and displays General Settings.
  3. Type a Profile Name for the connectivity profile.
  4. Select a Parent Profile from the list.
    APM® provides a default profile, connectivity.
  5. Click OK.
    The popup screen closes, and the Connectivity Profile List displays.
The connectivity profile displays in the list.
To provide functionality with a connectivity profile, you must add the connectivity profile and an access profile to a virtual server.

Creating a custom Client SSL profile

You create a custom Client SSL profile when you want the BIG-IP® system to terminate client-side SSL traffic for the purpose of:
  • Authenticating and decrypting ingress client-side SSL traffic
  • Re-encrypting egress client-side traffic
By terminating client-side SSL traffic, the BIG-IP system offloads these authentication and decryption/encryption functions from the destination server.
  1. On the Main tab, click Local Traffic > Profiles > SSL > Client .
    The Client profile list screen opens.
  2. Click Create.
    The New Client SSL Profile screen opens.
  3. In the Name field, type a unique name for the profile.
  4. Select clientssl in the Parent Profile list.
  5. From the Configuration list, select Advanced.
  6. Select the Custom check box.
    The settings become available for change.
  7. Select the Custom check box for Client Authentication.
    The settings become available.
  8. From the Configuration list, select Advanced.
  9. Modify the settings, as required.
  10. Click Finished.

Creating a virtual server for SSL traffic

Define a virtual server to process SSL traffic from Microsoft RDP clients that use APM® as a gateway.
Note: Users must specify the IP address of this virtual server as the gateway or RDG gateway from the RDP client that they use.
  1. On the Main tab, click Local Traffic > Virtual Servers .
    The Virtual Server List screen opens.
  2. Click the Create button.
    The New Virtual Server screen opens.
  3. In the Name field, type a unique name for the virtual server.
  4. In the Destination Address/Mask field, type the IP address for a host virtual server.
    This field accepts an address in CIDR format (IP address/prefix). However, when you type the complete IP address for a host, you do not need to type a prefix after the address.
  5. For the Service Port, do one of the following:
    • Type 443 in the field.
    • Select HTTPS from the list.
  6. In the SSL Profile (Client) list, select an SSL profile.
  7. In the Access Policy area, from the Access Profile list, select the access profile for RDP client authorization that you configured earlier.
  8. From the Connectivity Profile list, select a profile.
  9. From the VDI Profile list, select the VDI profile you configured earlier.
  10. Click Finished.

Implementation result

Supported Microsoft RDP clients can specify a virtual server on the BIG-IP® system to use as a remote desktop gateway. Access Policy Manager® (APM®) can authorize the clients and authorize access to target servers as the clients request them.

Overview: Processing RDP traffic on a device with SWG

If you configure Access Policy Manager® APM® as a gateway for RDP clients and configure Secure Web Gateway (SWG) explicit forward proxy on the same BIG-IP® system, you need to complete an additional configuration step to ensure that APM can process the RDP client traffic. The recommended SWG configuration for explicit forward proxy includes a catch-all virtual server, which listens on all IP addresses and all ports, on an HTTP tunnel interface.

When a programmatic API queries listeners for a specific IP and port, the query covers all interfaces and tunnels. As a result, the catch-all virtual server will always match. Sending traffic using this tunnel results in all packets being dropped because this virtual server is configured as a reject type of virtual server.

To prevent RDP client traffic from being dropped, add an additional wildcard port-specific virtual server on the HTTP tunnel interface.

Note: Removing the catch-all virtual server from the HTTP tunnel interface is not recommended because doing so is counterproductive for security.

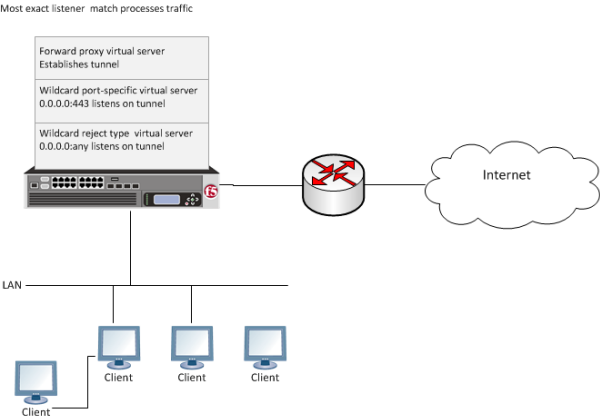
About wildcard virtual servers on the HTTP tunnel interface

In the recommended Secure Web Gateway explicit forward proxy configuration, client browsers point to a forward proxy server that establishes a tunnel for SSL traffic. Additional wildcard virtual servers listen on the HTTP tunnel interface. The listener that best matches the web traffic directed to the forward proxy server handles the traffic.

clients on LAN

Explicit forward proxy configuration

Creating a virtual server for RDP client traffic

You specify a port-specific wildcard virtual server to match RDP client traffic on the HTTP tunnel interface for the Secure Web Gateway (SWG) explicit forward proxy configuration.
  1. On the Main tab, click Local Traffic > Virtual Servers .
    The Virtual Server List screen opens.
  2. Click the Create button.
    The New Virtual Server screen opens.
  3. In the Name field, type a unique name for the virtual server.
  4. In the Destination Address/Mask field, type 0.0.0.0/0 to accept any IPv4 traffic.
  5. In the Service Port field, type 3389.
  6. From the Configuration list, select Advanced.
  7. From the VLAN and Tunnel Traffic list, select Enabled on.
  8. For the VLANs and Tunnels setting, move the HTTP tunnel interface used in the SWG explicit forward proxy configuration to the Selected list.
    The default tunnel is http-tunnel.
    This must be the same tunnel specified in the HTTP profile for the virtual server for forward proxy.
  9. For the Address Translation setting, clear the Enabled check box.
  10. Click Finished.
The virtual server now appears in the Virtual Server List screen.