Manual Chapter : Presenting a View Desktop on an APM Webtop

Applies To:

Show Versions Show Versions

BIG-IP APM

  • 11.5.1
Manual Chapter

Overview: Accessing a View Desktop from an APM webtop

In this implementation, you integrate Access Policy Manager (APM) with View Connection Servers and present View Desktops on an APM dynamic webtop. APM authenticates to a View Connection Server and renders the View Desktops. APM load balances the View Connection Servers for high availability.

APM supports the necessary connections with two virtual servers that share the same destination IP address.

Task summary

About client requirements to launch View Client from a webtop

If you want to use Access Policy Manager (APM) to launch a View Client from an APM webtop, you must install the standalone View Client on your client. The standalone View Client is available from VMware.

Creating a pool of View Connection Servers

You create a pool of View Connection Servers to provide load-balancing and high-availability functions.
  1. On the Main tab, click Local Traffic > Pools. The Pool List screen opens.
  2. Click Create. The New Pool screen opens.
  3. In the Name field, type a unique name for the pool.
  4. In the Resources area, using the New Members setting, add each View Connection Server that you want to include in the pool:
    1. Type an IP address in the Address field, or select a node address from the Node List.
    2. In the Service Port field, type 443 (if your View Connection Servers use HTTPS), or type 80 (if your View Connection Servers use HTTP). By default, View Connection Servers use HTTPS. However, if you configure your View Connection Servers for SSL offloading, they use HTTP.
    3. Click Add.
  5. Click Finished.
The new pool appears in the Pools list.

Configuring a VMware View remote desktop resource

Configure a VMware View remote desktop resource so that you can log on to a View Connection Server and gain access to a standalone View Client, or launch a View desktop from an APM webtop, depending on the access policy.
  1. On the Main tab, click Access Policy > Application Access > Remote Desktops. The Remote Desktops list opens.
  2. Click Create. The New Resource screen opens.
  3. For the Type setting, select VMware View.
  4. For the Destination setting, select Pool and from the Pool Name list, select a pool of View Connection Servers that you configured previously.
  5. For the Server Side SSL setting:
    • Select the Enable check box if your View Connection Servers use HTTPS (default).
    • Clear the Enable check box if your View Connection Servers use HTTP; that is, they are configured for SSL offloading.
  6. In the Auto Logon area, select the Enable check box, so that a user can automatically log on to a View Connection Server after logging in to APM. If you enable auto logon, you must also configure credential sources.
    1. In the Username Source field, accept the default or type the session variable to use as the source for the auto logon user name.
    2. In the Password Source field, accept the default or type the session variable to use as the source for the auto logon user password.
    3. In the Domain Source field, accept the default or type the session variable to use as the source for the auto logon user domain.
  7. In the Customization Settings for language_name area, type a Caption. The caption is the display name of the VMware View resource on the APM full webtop.
  8. Click Finished. All other parameters are optional.
This creates the VMware View remote desktop resource. To use it, you must assign it along with a full webtop in an access policy.

Configuring a full webtop

You can use a full webtop to provide web-based access to VMware View and other resources.
  1. On the Main tab, click Access Policy > Webtops. The Webtops screen opens.
  2. Click Create. The New Webtop screen opens.
  3. Type a name for the webtop.
  4. From the Type list, select Full. The Configuration area displays with additional settings configured at default values.
  5. Click Finished.
The webtop is now configured and appears in the webtop list.

Creating an access profile

You create an access profile to provide the access policy configuration for a virtual server that establishes a secured session.
  1. On the Main tab, click Access Policy > Access Profiles. The Access Profiles List screen opens.
  2. Click Create. The New Profile screen opens.
  3. Type a name for the access profile.
  4. From the Profile Type list, select one:
    • APM-LTM - Select for a web access management configuration.
    • SSO - Select only when you do not need to configure an access policy.
    • SWG - Explicit - Select to configure access using Secure Web Gateway explicit forward proxy.
    • SWG - Transparent - Select to configure access using Secure Web Gateway transparent forward proxy.
    • SSL-VPN - Select for other types of access, such as network access, portal access, application access. (Most access policy items are available for this type.)
    • ALL - Select for any type of access.
    Additional settings display.
  5. In the Language Settings area, add and remove accepted languages, and set the default language. A browser uses the highest priority accepted language. If no browser language matches the accepted languages list, the browser uses the default language.
  6. Click Finished.
This creates an access profile with a default access policy.

Creating an access policy for a dynamic webtop

Before you can create an access policy for an Access Policy Manager (APM) dynamic webtop, you must configure AAA server objects in APM to use for authentication. (You can use any type of authentication.)
Note: An Active Directory AAA server must include the IP address of the domain controller and the FQDN of the Windows domain name. If anonymous binding to Active Directory is not allowed in your environment, you must provide the admin name and password for the Active Directory AAA server.
Configure an access policy to authenticate a user and enable APM dynamic webtop.
Note: This example access policy shows how to use RSA SecurID and Active Directory authentication. However, you can use any type of authentication.
  1. On the Main tab, click Access Policy > Access Profiles. The Access Profiles List screen opens.
  2. In the Access Policy column, click the Edit link for the access profile you want to configure. The visual policy editor opens the access policy in a separate screen.
  3. Click the (+) icon anywhere in the access policy to add a new action item. A popup screen opens, listing predefined actions on tabs such as General Purpose, Authentication, and so on.
  4. From the Logon Page tab, select Logon Page, and click Add Item. A properties screen displays.
  5. Configure the Logon Page properties. To support Active Directory authentication only, no changes are required. To support both Active Directory and RSA SecurID authentication, an additional password field is required and the labels for the password fields require change.
    1. In the Logon Page Agent table row 3, for Type, select password.
    2. In the Post Variable Name field, type password1.
    3. In the Session Variable Name field, type password1.
    4. In the Customization Area in Logon Page Input Field #2, type RSA Tokencode. RSA Tokencode replaces the default label, Password.
    5. In the Customization Area in Logon Page Input Field #3, type AD Password.
    6. Click Save.
    The properties screen closes.

    The Logon Page is configured to display Username, RSA Tokencode, and AD Password. Logon Page Input Field #2 accepts the RSA Tokencode into the session.logon.last.password variable (from which authentication agents read it). Logon Page Input Field #3 saves the AD password into the session.logon.last.password1 variable.

  6. Optional: To add RSA SecurID authentication, click the plus (+) icon between Logon Page and Deny:
    1. From the Authentication tab, select RSA SecurID, and click Add Item.
    2. In the properties screen from the Server list, select the AAA server that you created previously and click Save. The properties screen closes.
    3. After the RSA SecurID action, add a Variable Assign action. Use the Variable Assign action to move the AD password into the session.logon.last.password variable.
    4. Click Add new entry. An empty entry appears in the Assignment table.
    5. Click the change link next to the empty entry. A popup screen displays, where you can enter a variable and an expression.
    6. From the left-side list, select Custom Variable (the default), and type session.logon.last.password.
    7. From the right-side list, select Custom Expression (the default), and type expr { "[mcget -secure session.logon.last.password1]" }. Variable Assign add entry screenshot 
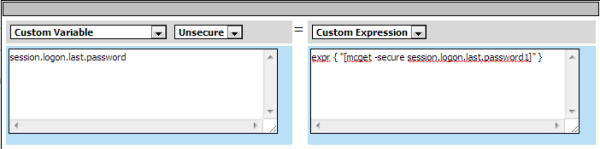
The AD password is now available for use in Active Directory authentication.
    8. Click Finished to save the variable and expression, and return to the Variable Assign action screen.
  7. Add the AD Auth action after one of these actions:
    • Variable Assign - This action is present only if you added RSA SecurID authentication.
    • Logon Page - Add here if you did not add RSA SecurID authentication.
    A properties screen for the AD Auth action opens.
  8. Configure the properties for the AD Auth action:
    1. From the AAA Server list, select the AAA server that you created previously.
    2. Configure the rest of the properties as applicable to your configuration and click Save.
  9. On the fallback path between the last action and Deny, click the Deny link, and then click Allow and Save.
  10. Click Close.

You have an access policy that is configured to enable APM dynamic webtop after the appropriate authentication checks.

Assigning resources to the access policy

Before you start, open the existing access policy for edit.
Assign the full webtop and VMware View remote desktop resource that you configured previously to a session so that users can log into View Connection Servers and launch a View Desktop from the webtop.
Note: This access policy shows how to use the Advanced Resource Assign action item to assign the resources. Alternatively, you can use the Resource Assign and Webtop and Links Assign action items.
  1. Click the (+) icon anywhere in the access policy to add a new action item. A popup screen opens, listing predefined actions on tabs such as General Purpose, Authentication, and so on.
  2. On the Assignment tab, select Advanced Resource Assign and click Add Item. The properties screen opens.
  3. Click Add new entry. An Empty entry displays.
  4. Click the Add/Delete link below the entry. The screen changes to display resources that you can add and delete.
  5. Select the Remote Desktop tab. A list of remote desktop resources is displayed.
  6. Select VMware View remote desktop resources and click Update. You are returned to the properties screen where Remote Desktop and the names of the selected resources are displayed.
  7. Click Add new entry. An Empty entry displays.
  8. Click the Add/Delete link below the entry. The screen changes to display resources that you can add and delete.
  9. Select the Webtop tab. A list of webtops is displayed.
  10. Select a webtop and click Update. The screen changes to display properties and the name of the selected webtop is displayed.
  11. Select Save to save any changes and return to the access policy.
A VMware View remote desktop resource and an Access Policy Manager dynamic webtop are assigned to the session when the access policy runs.

Creating a connectivity profile

You create a connectivity profile to configure client connections.
  1. On the Main tab, click Access Policy > Secure Connectivity. A list of connectivity profiles displays.
  2. Click Add. The Create New Connectivity Profile popup screen opens and displays General Settings.
  3. Type a Profile Name for the connectivity profile.
  4. Select a Parent Profile from the list. APM provides a default profile, connectivity.
  5. Click OK. The popup screen closes, and the Connectivity Profile List displays.
The connectivity profile appears in the list.
To provide functionality with a connectivity profile, you must add the connectivity profile to a virtual server.

Creating a custom server SSL profile

With a server SSL profile, the BIG-IP system can perform decryption and encryption for server-side SSL traffic.
  1. On the Main tab, click Local Traffic > Profiles > SSL > Server. The SSL Server profile list screen opens.
  2. Click Create. The New Server SSL Profile screen opens.
  3. In the Name field, type a unique name for the profile.
  4. From the Parent Profile list, select serverssl.
  5. In the Configuration area, select Advanced and select the Custom check box. Additional settings display. All settings in the Configuration area become available.
  6. Scroll down to the Server Name field and type pcoip-default-sni.
  7. Click Finished.
The custom server SSL profile is listed in the SSL Server list.

Verifying the certificate on a View Connection Server

Before you start, obtain the CA certificate that was used to sign the SSL certificate on View Connection Servers and obtain a Certificate Revocation List (CRL).
You install the CA certificate and CRL, then update the server SSL profile to use them only if you want the BIG-IP system to check the validity of the certificate on the View Connection Server.
  1. On the Main tab, click System > File Management > SSL Certificate List. The SSL Certificate List screen opens.
  2. Click Import.
  3. From the Import Type list, select Certificate.
  4. For the Certificate Name setting, do one of the following:
    • Select the Create New option, and type a unique name in the field.
    • Select the Overwrite Existing option, and select a certificate name from the list.
  5. For the Certificate Source setting, select Upload File and browse to select the certificate signed by the CA server.
  6. Click Import. The SSL Certificate List screen displays. The certificate is installed.
  7. Click Import.
  8. From Import Type list, select Certificate Revocation List.
  9. For Certificate Revocation List Name, type a name.
  10. For Certificate Revocation List Source, select Upload File and browse to select the CRL you obtained earlier.
  11. Click Import. The SSL Certificate List screen displays. The CRL is installed.
  12. On the Main tab, click Local Traffic > Profiles > SSL > Server. The SSL Server profile list screen opens.
  13. Click the name of the server SSL profile you created previously. The Properties screen displays.
  14. Scroll down to the Server Authentication area.
  15. From the Server Certificate list, select require.
  16. From the Trusted Certificate Authorities list, select the name of the certificate you installed previously.
  17. From the Certificate Revocation List (CRL) list, select the name of the CRL you installed previously.
  18. Click Update.
The BIG-IP system is configured to check the validity of the certificate on the View Connection Server.

Configuring an HTTPS virtual server for a dynamic webtop

Before you start this task, create a connectivity profile in Access Policy Manager. (Default settings are acceptable.)
Create this virtual server to support launching a View Desktop from an APM dynamic webtop. This is the virtual server that users will specify in the browser.
Note: This is one of two virtual servers that you must configure. Use the same destination IP address for each one.
  1. On the Main tab, click Local Traffic > Virtual Servers. The Virtual Server List screen opens.
  2. Click the Create button. The New Virtual Server screen opens.
  3. In the Name field, type a unique name for the virtual server.
  4. For the Destination setting, select Host and in the Address field, type the IP address for the virtual server.
  5. In the Service Port field, type 443 or select HTTPS from the list.
  6. From the HTTP Profile list, select http.
  7. For the SSL Profile (Client) setting, in the Available box, select a profile name, and using the Move button, move the name to the Selected box.
  8. For the SSL Profile (Server) setting, from the Available list, select the name of the Server SSL profile you previously created, and using the Move button, move the name to the Selected list.
  9. From the Source Address Translation list, select Auto Map.
  10. In the Access Policy area, from the Access Profile list, select the access profile.
  11. From the Connectivity Profile list, select the connectivity profile.
  12. Select the VDI & Java Support check box.
  13. Locate the Resources area of the screen and from the Default Persistence Profile list, select one of these profiles:
    • cookie - This is the default cookie persistence profile. Cookie persistence is recommended.
    • source_addr - This is the default source address translation persistence profile. Select it only when the cookie persistence type is not available.
  14. Click Finished.
This virtual server handles access and handles XML protocol data.

Configuring a UDP virtual server for PCoIP traffic

Create this virtual server to support a PC over IP (PCoIP) data channel for View Client traffic.
  1. On the Main tab, click Local Traffic > Virtual Servers. The Virtual Server List screen opens.
  2. Click the Create button. The New Virtual Server screen opens.
  3. In the Name field, type a unique name for the virtual server.
  4. For the Destination setting, select Host and in the Address field, type the IP address for the virtual server. Type the same IP address as the one for the View Client authentication virtual server.
  5. In the Service Port field, type 4172.
  6. From the Protocol list, select UDP.
  7. From the Source Address Translation list, select Auto Map.
  8. From the Access Policy area, select the VDI & Java Support check box.
  9. Click Finished.
This virtual server is configured to support PCoIP transport protocol traffic for VMware View Clients.

Configuring virtual servers that use a private IP address

If you configured the HTTPS and UDP virtual servers with a private IP address that is not reachable from the Internet, but instead a publicly available device (typically a firewall or a router) performs NAT for it, you need to perform these steps.
You update the access policy by assigning the variable view.proxy_addr to the IP address that the client uses to reach the virtual server. Otherwise, a View Client cannot connect when the virtual servers have a private IP address.
  1. On the Main tab, click Access Policy > Access Profiles. The Access Profiles List screen opens.
  2. In the Access Policy column, click the Edit link for the access profile you want to configure. The visual policy editor opens the access policy in a separate screen.
  3. Click the (+) icon anywhere in the access policy to add a new action item. A popup screen opens, listing predefined actions on tabs such as General Purpose, Authentication, and so on.
  4. Type var in the search field, select Variable Assign from the results list, and click Add Item. The Variable Assign properties screen opens.
  5. Click the change link next to the empty entry. A popup screen displays two panes, with Custom Variable selected on the left and Custom Expression selected on the right.
  6. In the Custom Variable field, type view.proxy_addr.
  7. In the Custom Expression field, type expr {"proxy address"} where proxy address is the IP address that the client uses to reach the virtual server.
  8. Click Finished to save the variable and expression and return to the Variable Assign action popup screen.
  9. Click Save. The properties screen closes and the visual policy editor displays.
  10. Click the Apply Access Policy link to apply and activate the changes to the access policy.