Applies To:
Show Versions
BIG-IP LTM
- 13.1.5, 13.1.4, 13.1.3, 13.1.1, 13.1.0
BIG-IP DNS
- 13.1.5, 13.1.4, 13.1.3, 13.1.1, 13.1.0
Overview: Configuring BIG-IP to load balance zone transfer requests to a pool of DNS servers
Within your network, the BIG-IP® system can act as a proxy for a pool of DNS servers hosting a zone. In this case, when a DNS nameserver (client) in a specified list of servers sends a zone transfer request, the BIG-IP system load balances the request to a pool of DNS servers that host the zone. A pool member responds with a zone transfer, and the BIG-IP system sends the zone transfer to the client that made the zone transfer request. Optionally, the BIG-IP system can use transaction signature (TSIG) keys to validate the identity of the pool member sending a zone transfer and the DNS nameservers (clients) sending zone transfer requests.
Example of load balancing zone transfer requests with client-side TSIG authentication to a pool
In this figure, an administrator at Site Request configures the BIG-IP system to load balance zone transfer requests for siterequest.com to a pool of DNS servers and uses TSIG key authentication only on the client-side.
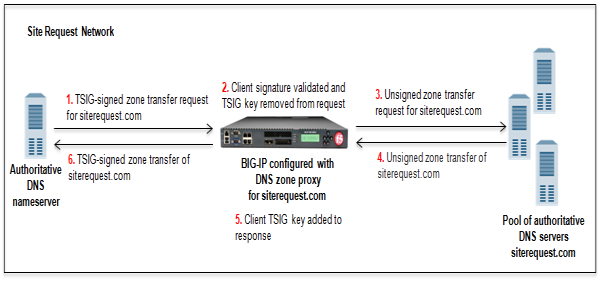
BIG-IP system load balancing zone transfer requests to a pool of DNS servers with client-side TSIG authentication
- DNS nameserver (client) sends TSIG-signed zone transfer request.
- BIG-IP system validates the signature and removes the client TSIG key from the request.
- BIG-IP system sends unsigned zone transfer request to a member of a pool of DNS servers that host the zone.
- Pool member answers with an unsigned zone transfer to the BIG-IP system.
- BIG-IP system signs the response with the client TSIG key.
- BIG-IP system sends the TSIG-signed zone transfer to the DNS nameserver (client).
Example of load balancing zone transfer requests with client-side and server-side TSIG authentication to a pool
In this figure, an administrator at Site Request configures the BIG-IP® system to load balance zone transfer requests for siterequest.com to a pool of DNS servers, and uses TSIG key authentication on both the client- and server-sides.
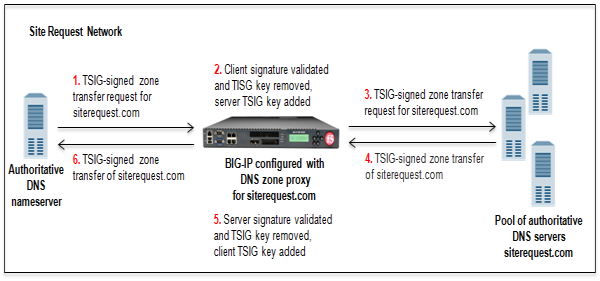
BIG-IP system load balancing zone transfer requests to a pool of DNS servers using client-side TSIG authentication
- DNS nameserver (client) sends TSIG-signed zone transfer request.
- BIG-IP system validates the signature, removes the client TSIG key from the request, and then adds the server TSIG key to the request.
- BIG-IP system sends the TSIG-signed request to a member of the pool of DNS servers that host the zone.
- Pool member answers with a TSIG-signed zone transfer to the BIG-IP system.
- BIG-IP system validates the signature, removes the server TSIG key from the response, and signs the response with the client TSIG key.
- BIG-IP system sends the TSIG-signed zone transfer to the DNS nameserver (client).
About TSIG key authentication
The BIG-IP® system can use transaction signature (TSIG) keys to authenticate communications about zone transfers between the BIG-IP system and authoritative DNS servers, and between the BIG-IP system and DNS nameservers (clients). TSIG keys are generated by a third party tool such as BIND's keygen utility. Using TSIG keys is optional.
- TSIG key configured on authoritative DNS server
- You can add a TSIG key to a nameserver object that represents an authoritative DNS server. With this configuration, when the DNS server sends a NOTIFY message to the BIG-IP system, DNS Express™ responds with a TSIG-signed zone transfer request. Then the DNS server returns a TSIG-signed zone transfer. If required, you can disable the Verify Notify TSIG option on the DNS zone. With this configuration, DNS Express can process a NOTIFY message without a TSIG key, even when a subsequent zone transfer requires a TSIG key.
- TSIG key configured on DNS nameserver (client)
- You can add a TSIG key to a nameserver object that represents a DNS nameserver (client). When the client sends a TSIG-signed zone transfer request, DNS Express returns a TSIG-signed zone transfer.
- TSIG key configured on DNS zone
- You can add a server TSIG key to a DNS zone on the BIG-IP system. With this configuration,
the system uses this TSIG key when the zone on the BIG-IP system is a proxy for the zone on the
server. There are two possible scenarios:
- Client sends TSIG-signed zone transfer request
When the BIG-IP system receives a TSIG-signed zone transfer request from a client for a DNS zone for which it is a proxy, the system validates the client TSIG key and removes the key from the request. The system then adds the server TSIG key to the request and forwards the TSIG-signed request to the DNS server or load balances the TSIG-signed request to a pool of DNS servers. The DNS server responds with a TSIG-signed zone transfer. The BIG-IP system validates the server TSIG key and removes the key. Then the system adds the client TSIG key and returns a TSIG-signed signed zone transfer to the client.
- Client sends unsigned zone transfer request
When the BIG-IP system receives an unsigned zone transfer request from a client for a DNS zone for which it is a proxy, the system adds the server TSIG key to the request. The system then forwards the TSIG-signed request to the DNS server or load balances the TSIG-signed request to a pool of DNS servers. The DNS server responds with a TSIG-signed zone transfer. The BIG-IP system validates the server TSIG key and removes the key. Then the system returns an unsigned zone transfer to the client.
- Client sends TSIG-signed zone transfer request
About listeners
A listener is a specialized virtual server that passively checks for DNS packets on port 53 and the IP address you assign to the listener. When a DNS request is sent to the IP address of the listener, the BIG-IP® system either handles the request or forwards the request to the appropriate resource.
Task summary
Perform these tasks to configure a DNS zone on the BIG-IP system that is a proxy for a pool of DNS servers hosting a DNS zone in your network:
Configuring BIND servers to allow zone transfers
When you want the BIG-IP® system to act as a proxy for a DNS zone configured on a BIND server, you must add an allow-transfer statement to named.conf on the BIND server that hosts the zone.
allow-transfer { localhost; 10.10.10.1 ; };
Adding TSIG keys
When you want the BIG-IP system to validate zone transfers from a pool DNS servers, add the server TSIG key to the BIG-IP system configuration. Optionally, if you want the BIG-IP system to validate the DNS nameservers (clients) sending zone transfer requests, add the client TSIG keys.
Adding DNS nameserver (client) objects
Enabling zone transfers
Creating a custom DNS monitor
Creating a pool of local DNS servers for load balancing zone transfer requests
Creating a DNS zone
- Ensure that the TSIG key on the DNS server is available on the BIG-IP® system.
- Optionally, ensure that TSIG keys on the DNS nameservers (clients) that can request zone transfers are available on the BIG-IP system.
- Determine the name you want to use for the DNS zone. The name must exactly match the name of
the zone on the members of the pool of DNS servers that host the zone. Note: Zone names are case insensitive.


