Applies To:
Show Versions
BIG-IP AAM
- 13.1.5, 13.1.4, 13.1.3, 13.1.1, 13.1.0
BIG-IP APM
- 13.1.5, 13.1.4, 13.1.3, 13.1.1, 13.1.0
BIG-IP Link Controller
- 13.1.5, 13.1.4, 13.1.3, 13.1.1, 13.1.0
BIG-IP Analytics
- 13.1.5, 13.1.4, 13.1.3, 13.1.1, 13.1.0
BIG-IP LTM
- 13.1.5, 13.1.4, 13.1.3, 13.1.1, 13.1.0
BIG-IP AFM
- 13.1.5, 13.1.4, 13.1.3, 13.1.1, 13.1.0
BIG-IP PEM
- 13.1.5, 13.1.4, 13.1.3, 13.1.1, 13.1.0
BIG-IP DNS
- 13.1.5, 13.1.4, 13.1.3, 13.1.1, 13.1.0
BIG-IP ASM
- 13.1.5, 13.1.4, 13.1.3, 13.1.1, 13.1.0
About SSL offload
When you want the BIG-IP system to process application traffic over SSL, you can configure the system to perform the SSL handshake that destination servers normally perform. This ability for the BIG-IP system to offload SSL processing from a destination server is an important feature of the BIG-IP system.
The most common way to configure the BIG-IP system is to create a Client SSL profile, which makes it possible for the BIG-IP system to decrypt client requests before sending them on to a server, and encrypt server responses before sending them back to the client.
Within a Client SSL profile specifically, you can specify multiple certificate/key pairs, one per key type. This enables the system to accept all types of cipher suites that a client might support as part of creating a secure connection. The system then decrypts the client data, manipulates any headers or payload according to the way that you configured the Client SSL profile, and by default, sends the request in clear text to the target server for processing.
For those sites that require enhanced security on their internal network, you can configure a Server SSL profile. With a Server SSL profile, the BIG-IP system re-encrypts the request before sending it to the destination server. When the server returns an encrypted response, the BIG-IP system decrypts and then re-encrypts the response, before sending the response back to the client.
About client-side and server-side SSL profiles
You can manage the way that the BIG-IP system processes SSL application traffic by configuring two types of SSL profiles: A Client SSL profile, a Server SSL profile, or both. These profiles affect the way that the system manages SSL traffic passing through the system.
When you configure Client SSL or Server SSL profiles and assign them to a virtual server, the BIG-IP system offloads SSL processing from the destination server. This offloading not only conserves resource on destination servers, but enables the BIG-IP system to customize SSL traffic processing according to your configuration specifications.
About client certificate constrained delegation
The BIG-IP® system uses Client Certificate Constrained Delegation (C3D) to support complete end-to-end encryption when interception of SSL traffic in a reverse proxy environment is required and when client certificates are used for mutual authentication.
When the BIG-IP receives a client certificate request from a backend server, the BIG-IP sends a forged copy of the client certificate. This maintains a full proxy approach and allows complete end-to-end encryption when intercepting SSL traffic in reverse proxy scenarios.
- Make sure you have a certificate authority bundle that will contain the root or intermediate CA certificates needed to validate any expected clients.
- Make sure you have the normal server certificate(s) and key(s) needed for the reverse proxy virtual server.
- Make sure you have a certificate authority and key that has been enabled to create new certificates (must be RSA and allow certificate creation). This will be used to forge the client certificates.
- The server certificate and key (and chain, if needed) should be configured in the profile. See Step 8 in Creating a custom Client SSL profile.
- Client certificate authentication must be set to either request or require so to ensure you are receiving that certificate from the client. See Step 13 in Creating a custom Client SSL profile.
- Make sure to configure the certificate authority list that you will send to the client and defines the trusted root and intermediate CAs that are accepted and validated against. See Step 14 in Creating a custom Client SSL profile.
- Enable the C3D feature. See Step 15 and 16 in Creating a custom Client SSL profile.
- If you are using OCSP, you can select the OCSP object. See Step 17 in Creating a custom Client SSL profile.
- If you are using OCSP and the OCSP response is unknown, you can select to either drop or ignore it in the Unknown OCSP Response Control field. If you select ignore, the unknown response will still be sent to the server (which may decide to drop it as well). See Step 18 in Creating a custom Client SSL profile.
- Make sure you have set up and enabled a certificate and key for the server (these certificates can be the default ones, if necessary). See Steps 6 through 8 in Creating a custom Server SSL profile.
- Set the server authentication frequency to always. This ensures that a new client certificate is used for each conversation. See Step 13 in Creating a custom Server SSL profile.
- Enable the C3D feature. See Steps 15 through 17 in Creating a custom Server SSL profile.
- Specify the certificate authority and key used to forge the certificates. See Step 18 and Step 19 in Creating a custom Server SSL profile.
- Define the certificate lifespan of the forged certificates. See Step 22 in Creating a
custom Server SSL profile.Note: Because the system does not cache forged certificates, you can set the Certificate Lifespan fields to the expected duration of any single connection.
- Select the certificate extensions you want to carry over from the original client certificate. Any extensions that are not defined in either the enabled or available extension fields will be stripped from the forged certificate. See Step 23 and Step 24 in Creating a custom Server SSL profile.
- If you want to add extensions that are not listed above, you can add the object identifier as a custom extension. See Step 24 in Creating a custom Server SSL profile.
Creating a custom Client SSL profile
-
For the Ciphers setting, specify a cipher group or
cipher string by choosing one of these options.
Note: If you specified an ECDSA certificate key chain in the Certificate Key Chain setting, you must include the cipher string ECDHE_ECDSA in the cipher group or cipher string that you specify in the Ciphers setting. (At a minimum, you should specify a cipher group or string such as DEFAULT:ECDHE_ECDSA.) This is necessary to ensure successful cipher negotiation when the BIG-IP system is offered an ECDSA-based certificate only.
Option Description Cipher Group Select an existing cipher group from the list when you want to use a system-defined or custom cipher group to define the ciphers that the BIG-IP system uses for negotiating SSL connections. Here's an example of the Ciphers setting where we've selected a custom cipher group that we created earlier.

Cipher String Type a cipher string in the box if you want to manually specify a cipher string instead of selecting a cipher group. For security and performance reasons, consider following these recommendations:
- Always append ciphers to the DEFAULT cipher string.
- Type a cipher string that includes the ECC key type, because its shorter length speeds up encryption and decryption while still offering virtually the same level of security.
- Disable ADH ciphers but also include the keyword HIGH. To do this, just include both !ADH and :HIGH in your cipher string.
- For AES, DES, and RC4 encryption types, make sure you specify the DHE key exchange method. DHE uses Forward Privacy, which creates a key that it throws away after each session so that the same session key never gets used twice. When you use DHE, make sure that the SSL private key isn't being shared with a monitoring system or a security device like an intrusion detection or prevention system. Also, diagnostic tools like ssldump won't work when you're using Forward Secrecy.
- Disable EXPORT ciphers by including !EXPORT in the cipher string.
- If you can live with removing support for the SSLv3 protocol version, do it. This protocol version is not secure. Simply include :!SSLv3 in any cipher string you type.
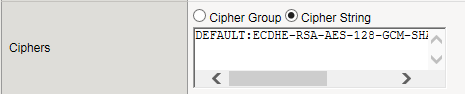
Here's an example of the Ciphers setting where we have opted to manually type the cipher string DEFAULT:ECDHE-RSA-AES-128-GCM-SHA256:!ADH:!EXPORT:HIGH:
Creating a custom Server SSL profile
-
For the Ciphers setting, specify a cipher group or
cipher string by choosing one of these options.
Note: If you specified an ECDSA certificate key chain in the Certificate Key Chain setting, you must include the cipher string ECDHE_ECDSA in the cipher group or cipher string that you specify in the Ciphers setting. (At a minimum, you should specify a cipher group or string such as DEFAULT:ECDHE_ECDSA.) This is necessary to ensure successful cipher negotiation when the BIG-IP system is offered an ECDSA-based certificate only.
Option Description Cipher Group Select an existing cipher group from the list when you want to use a system-defined or custom cipher group to define the ciphers that the BIG-IP system uses for negotiating SSL connections. Here's an example of the Ciphers setting where we've selected a custom cipher group that we created earlier.
Cipher String Type a cipher string in the box if you want to manually specify a cipher string instead of selecting a cipher group. For security and performance reasons, consider following these recommendations:
- Always append ciphers to the DEFAULT cipher string.
- Type a cipher string that includes the ECC key type, because its shorter length speeds up encryption and decryption while still offering virtually the same level of security.
- Disable ADH ciphers but also include the keyword HIGH. To do this, just include both !ADH and :HIGH in your cipher string.
- For AES, DES, and RC4 encryption types, make sure you specify the DHE key exchange method. DHE uses Forward Privacy, which creates a key that it throws away after each session so that the same session key never gets used twice. When you use DHE, make sure that the SSL private key isn't being shared with a monitoring system or a security device like an intrusion detection or prevention system. Also, diagnostic tools like ssldump won't work when you're using Forward Secrecy.
- Disable EXPORT ciphers by including !EXPORT in the cipher string.
- If you can live with removing support for the SSLv3 protocol version, do it. This protocol version is not secure. Simply include :!SSLv3 in any cipher string you type.
Here's an example of the Ciphers setting where we have opted to manually type the cipher string DEFAULT:ECDHE-RSA-AES-128-GCM-SHA256:!ADH:!EXPORT:HIGH:
Assigning SSL profiles to a virtual server
Support for multiple key types
For client-side traffic specifically, you can configure a Client SSL profile to specify multiple certificate key chains on the BIG-IP® system, one for each key type: RSA, DSA, and ECDSA. By configuring a Client SSL profile with different digital certificates and keys, the system can accept all types of cipher suites that clients might request as part of creating a secure connection. The system supports OCSP stapling for all certificate and key types.
About OCSP stapling
When you create a Client SSL profile, you can specify Online Certificate Status Protocol (OCSP) stapling to improve the certification response time. OCSP stapling is when a TLS server (acting as OCSP client) asks the OCSP server for a valid revocation status of its TLS certificate ahead of time and "staples" the signed OCSP response to the TLS handshake. The TLS client sees the stapled OCSP response and verifies the signature, thus validating the TLS server’s certificate and eliminating the round trip at the client for fetching the certificate status. It also helps protect the identity of the client.
By default, OCSP stapling is disabled. You can can create an OCSP stapling profile and then enable it from within a Client SSL profile. There is no default OCSP Stapling profile, so you must create one that specifies the parameters you want to use. For example, the default OCSP stapling profile setting is to use a DNS resolver to fetch the OCSP response, and you must specify the DNS resolver to use. Alternatively, you can choose to use a proxy server to fetch the OCSP response, and then you must specify the proxy server pool.
Creating an OCSP stapling profile
Viewing OCSP stapling statistics
About BIG-IP cipher support
The BIG-IP® system supports a large set of cipher suites that you can choose from to build the cipher string used for security negotiation.
Supported cipher suites include various combinations of encryption algorithms and authentication mechanisms, including RSA (Rivest Shamir Adleman), DSA (Digital Signature Algorithm), and ECDSA (Elliptic Curve Digital signature Algorithm).
The system includes a default cipher string represented by the keyword DEFAULT, which contains a subset of the cipher suites that the BIG-IP system supports.
Glossary of cipher-related terms
This list defines terms for cipher-related features that the BIG-IP ® system supports.
- Cipher suite
- A combination of authentication, encryption, message authentication code (MAC), and key exchange algorithms that the BIG-IP system can offer to a client and server system when negotiating security for an SSL network connection.
- Cipher string
- A string that contains the cipher suite or suites that the BIG-IP system can use to negotiate security for an SSL connection.
- Cipher rule
- A named BIG-IP configuration object that contains a cipher string. The BIG-IP system offers several pre-built cipher rules. Examples are f5-default, f5-ecc, and f5-secure, which represent the cipher strings DEFAULT, ECDHE:ECDHE_ECDSA, and ECDHE:RSA:!SSLV3:!RC4:!EXP:!DES, respectively.
- Cipher group
- A named BIG-IP configuration object that specifies one or more cipher rules, with instructions for how you want the BIG-IP system to apply those rules to an SSL connection. The BIG-IP system offers several pre-built cipher groups, such as f5-default, f5-ecc, and f5-secure, where each cipher group includes one corresponding pre-built cipher rule. You can use a pre-built cipher group, or you create a custom cipher group.
- Cipher audit
- The actual cipher suites that the BIG-IP system can offer to a client or server system as part of negotiating an SSL connection, after resolving any mismatches.
About the DEFAULT cipher suite
Some of the cipher suites that the BIG-IP system supports are included in a default cipher string that you can specify using the keyword DEFAULT. The keyword DEFAULT represents a set of ciphers that are suitable for most SSL connections.
The DEFAULT keyword appears as the default value in the Ciphers setting of the Client SSL and Server SSL profiles.
View cipher suites in cipher string DEFAULT
Follow these steps to display the list of cipher suites currently included in the cipher string represented by the keyword DEFAULT, for both client-side and server-side SSL connections.
- Using an SSH client application such as PuTTY, access the advanced shell on the BIG-IP system.
- At the system prompt, for client-side negotiation, type the command tmm --clientciphers DEFAULT. For server-side negotiation, type tmm --serverciphers DEFAULT.
About the COMPAT, SSLv2, and RC2 keywords
BIG-IP® system version 14.0 does not support the OpenSSL cipher stack. As a result, the keyword NATIVE represents the only TLS stack in use and is equivalent to the keyword ALL.
Invalid keywords in BIG-IP cipher strings
When configuring a cipher string on the BIG-IP system, you cannot use these keywords because they are invalid:
- COMPAT
- SSLV2 (subset of COMPAT)
- RC2 (subset of COMPAT)
- Any other subsets of COMPAT or SSLv2
In BIG-IP version 14.0 and higher, if you attempt to specify these keywords within a cipher string, the system displays an error message and prevents you from creating the relevant SSL profile.
Changes to cipher keywords during a BIG-IP system upgrade
During a BIG-IP software upgrade to version 14.0, the system takes these actions:
- If the system detects the keywords COMPAT, SSLv2, RC2, or any subset of these in an existing cipher string, the system logs a message in the file /var/log/ltm and changes any of these keywords to None.
- The system treats the keyword NATIVE as being equivalent to keyword ALL.
- If a cipher string evaluates to an empty set, the system remaps the string to the default cipher string, represented by the keyword DEFAULT. The default cipher string contains a subset of cipher suites that are suitable for most SSL connections.
Unsupported cipher suites
These cipher suites are unavailable in BIG-IP version 14.0:
- EXP-EDH-RSA-DES-CBC-SHA
- EXP-ADH-DES-CBC-SHA
- EXP-RC2-CBC-MD5
- EXP-ADH-RC4-MD5
What is a cipher group?
A cipher group contains a list of cipher rules, and the instructions that the BIG-IP® system needs for building the cipher string it will use for security negotiation. The instructions tell the system which cipher rules to include in the string, and how to apply them (allow, disallow, and so on, and in what order).
Pre-built cipher groups
The BIG-IP system offers a few pre-built cipher groups that you can choose from to use as is to build your final cipher string, However, it's common to create your own custom cipher group instead.
Custom cipher groups
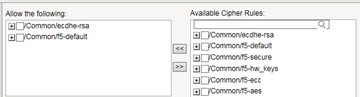
This illustration shows an example of a custom cipher group. Using this cipher group, the BIG-IP system builds the final cipher string using a user-created custom cipher rule named /Common/my_ecdhe_rsa and the pre-built cipher rule /Common/f5-default.
Notice that the system will exclude from the string any cipher suites defined in the pre-built cipher rule /Common/f5-hw_keys.
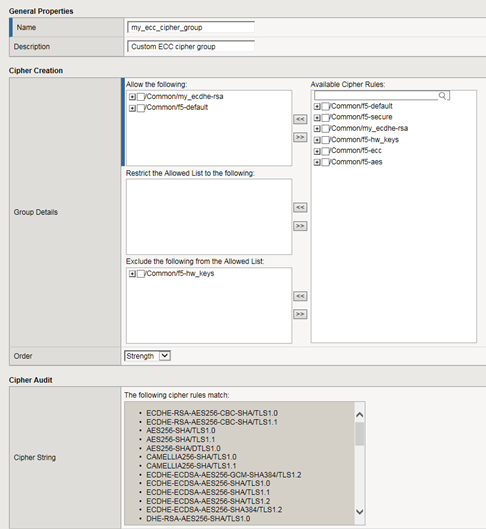
Also notice that the cipher group displays a preview of the final cipher string after the instructions are applied.
What is a cipher rule?
A cipher rule is an object that contains cipher-related information such as an encryption algorithm and a key exchange method. The BIG-IP system will use one or more cipher rules within a cipher group, to build the cipher string that the system will use to negotiate SSL security parameters with a client or server system.
You can use pre-defined cipher rules that the BIG-IP system provides, or you can create your own. In either case, after you decide which cipher rules you want to use, you then specify the cipher rules within a cipher group, which is the object that builds the actual cipher string that the system will use during SSL negotiation. Then you just need to specify the cipher group within a Client SSL or Server SSL profile, and assign the profile to a virtual server.
An example of a cipher rule might be one that specifies only ciphers that use a particular bulk encryption algorithm and a key exchange method.
Best practices for BIG-IP cipher strings
For security and performance reasons, consider the following recommendations:
- Always append cipher suites to the default cipher string, respresented by the keyword DEFAULT.
- Don't use any of the keywords COMPAT, SSLv2, and RC2 in a cipher string. These keywords are invalid and resolve to a value of None.
- Instead of using the keyword NATIVE, use ALL. These keywords are equivalent, so use of NATIVE is unecessary.
- Include a cipher string that specifies the ECC key type, because its shorter length speeds up encryption and decryption while still offering virtually the same level of security.
- Disable ADH ciphers but also include the keyword HIGH. To do this, just include both !ADH and :HIGH in your cipher string.
- For AES, DES, and RC4 encryption types, make sure you specify the DHE key exchange method. DHE uses Forward Secrecy, which creates a key that it throws away after each session so that the same session key never gets used twice. When you use DHE, make sure that the SSL private key isn't being shared with a monitoring system or a security device like an intrusion detection or prevention system. And by the way, diagnostic tools like ssldump won't work when you're using Forward Secrecy.
- Disable EXPORT ciphers by including !EXPORT in the cipher string.
- If you can live with removing support for the SSLv3 protocol version, do it. This protocol version is unsecure. Simply include :!SSLv3 in any cipher string you build.
Create partial cipher strings to include in a custom cipher string
When you create your own cipher rules for a custom cipher group, the BIG-IP® system can build a cipher string that includes or excludes the cipher suites you need for negotiating SSL connections.
-
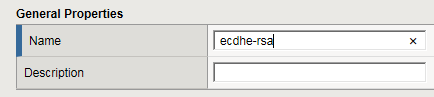
In the Name field, type a name for the cipher rule.
Note: Never include the prefix f5- in a cipher rule name. This prefix is reserved for pre-built cipher rules only.
For example:
-
In the Cipher String field, type a cipher string that represents one or more cipher suites.
For example:

Build a custom cipher string
You build a final, custom cipher string by creating a cipher group. A cipher group contains the cipher rules and instructions that the BIG-IP® system needs for building the cipher string it will use for security negotiation with a client or server system.
-
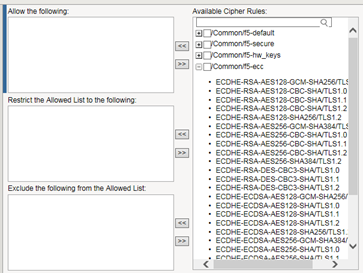
For each cipher rule in the Available Cipher Rules list, click the plus sign to view the cipher suites included in the rule.
For example, this shows the cipher suites included in the pre-built cipher rule named /Common/f5-ecc.
-
In the Available Cipher Rules list, select the boxes for the cipher rules you want to allow for negotiating security for SSL connections.
Important: We strongly recommend that you select the cipher rule /Common/f5-default, and for added security, select other cipher rules, too.
Here's an example of a list of available cipher rules that you might see within a cipher group. Notice that we've selected both a pre-built cipher rule and a custom cipher rule:
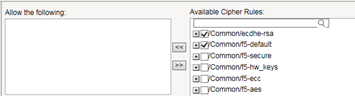
-
Move the selected cipher rules to the Allow
the following
box.
Here we see that we're instructing the BIG-IP system to allow, during security negotiation, the cipher suites contained in the selected cipher rules:
About Elliptic Curve encryption
The BIG-IP system supports Elliptic Curve Cryptography (ECC). Because Elliptic Curve key sizes are significantly smaller than those of other key types, ECC is ideally suited for smaller, mobile devices for which key storage is an issue. On the BIG-IP system, ECC works with the SSL offload feature.
About Elliptic Curve cipher support
The BIG-IP system supports multiple ciphers that use Elliptic Curve Cryptography (ECC) encryption with Diffie-Hellman key exchange. On the BIG-IP system, EC is used with DHE to establish the shared secret; however, the subsequent bulk encryption of data cannot be done with any ECC-based algorithm and must be done using conventional crypto algorithms such as AES and 3DES. For example, a typical Elliptic Curve cipher is: ECDHE-RSA-AES128-CBC-SHA.
The specific ECC ciphers that the BIG-IP system supports are:
- ECDHE-RSA-*
- ECDHE-ECDSA-*
- ECDH-ECDSA-*
Because ECC with Diffie-Hellman does not include a mechanism for digitally signing handshake messages, the RSA or DSA algorithms are used to digitally sign the handshake messages to thwart Man-in-the-Middle attacks. For example, an ECDHE-ECDSA-* cipher suite uses the ECC DSA certificate specified in the Client SSL profile to digitally sign the handshake messages.
Specifying the use of Elliptic Curve ciphers
Viewing ECDH key exchange statistics
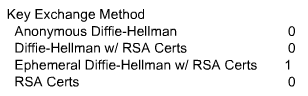
Sample profile statistics for key exchange method
About Diffie-Hellman Ephemeral key exchange
The BIG-IP® system supports the Diffie-Hellman Ephemeral key exchange method, as well as other Diffie-Hellman variations. A Diffie–Hellman key exchange method is an alternative to RSA key exchange and allows the client and the BIG-IP system to establish a shared secret session key to use for communication.
About DHE cipher support
Because Diffie-Hellman key exchange methods do not include authentication, use of Diffie-Hellman Ephemeral (DHE) requires that it be paired with an authentication mechanism. The DHE ciphers that the BIG-IP system supports are:
- DHE-RSA-* (Diffie-Hellman Ephemeral-RSA)
- DHE-DSS-* (Diffie-Hellman Ephemeral-DSS)
- ECDHE-RSA-* (Elliptic Curve Diffie-Hellman Ephemeral-RSA)
- ECDHE-ECDSA-* (Elliptic Curve Diffie-Hellman Ephemeral-DSA)
Viewing a list of supported DHE ciphers
- Access the advanced shell on the BIG-IP system.
-
At the system prompt, type the command tmm --clientciphers
ciphers
.
-
For example, to see a list of DHE+DES ciphers, type tmm
--clientciphers DHE:DHE_DSS
The BIG-IP system displays the list of all DHE+DES ciphers that the BIG-IP system supports:

Supported DHE+DES ciphers on the BIG-IP system
-
To see a list of ECDHE ciphers, type tmm --clientciphers
ECDHE:ECDHE_ECDSA.
The BIG-IP system displays the list of all ECDHE ciphers that the BIG-IP system supports:
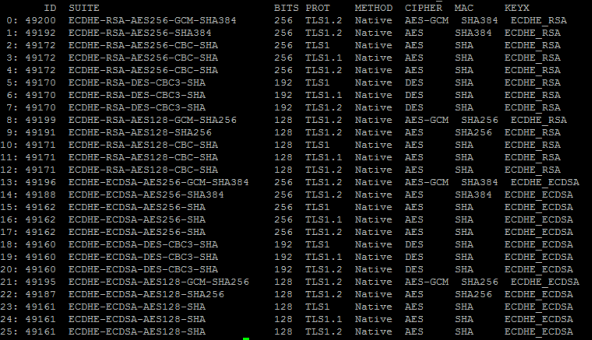
Supported ECDHE ciphers on the BIG-IP system
-
For example, to see a list of DHE+DES ciphers, type tmm
--clientciphers DHE:DHE_DSS
Specifying the use of Diffie-Hellman ciphers
Viewing DHE key exchange statistics
Sample profile statistics for key exchange method
About Perfect-Forward-Privacy
The Diffie-Hellman Ephemeral (DHE) key exchange method provides Perfect Forward Privacy (PFP). With standard Diffie-Hellman, multiple key exchanges all use the same session key, which can compromise security. By contrast, DHE uses PFP, which generates a disposable key per session and thereby ensures that the same session key is never used twice. No key remains to be disclosed, and if the private key of the server is discovered, past communication remains secure.
Supported Diffie-Hellman variations
The BIG-IP system supports all three Diffie-Hellman key exchange methods. They are:
- Diffie-Hellman Ephemeral (DHE)
- Diffie-Hellman Ephemeral uses temporary public keys. The authenticity of a temporary key can be verified by checking the digital signature included in the key exchange messages. The key exchange messages are signed using either the RSA or DSA algorithms, depending on the cipher being used. For example, DHE-RSA uses RSA to sign the key exchange messages. DHE includes Perfect Forward Secrecy (PFS), which means that a compromise of the system's long-term signing key does not affect the privacy of past sessions. Like FIPS, DHE prevents private key disclosure.
- Diffie-Hellman (DH)
- Diffie-Hellman embeds the system's public parameter in the certificate, and the CA then signs the certificate. That is, the certificate contains the Diffie-Hellman public-key parameters, and those parameters never change.
- Anonymous Diffie-Hellman (ADH)
- Anonymous Diffie-Hellman uses DH, but without authentication. The keys used in the exchange are not authenticated, resulting in keys being susceptible to security attacks.
Client and server certificate authentication
There are several settings that you can configure on an SSL profile to manage client-side SSL authentication.
Requirement for a client certificate
You can cause Local Traffic Manager™ to handle authentication of clients or servers in certain ways. For client-side processing, the possible behaviors are:
- Ignore
- Ignore a certificate (or lack of one) and therefore never authenticate the client. The Ignore option is the default, and when used, causes any per-session authentication setting to be ignored.
- Require
- Require a client to present a valid and trusted certificate before granting access.
- Request
- Request and verify a client certificate. In this case, the SSL profile always grants access regardless of the status or absence of the certificate.
For server-side processing, the possible behaviors are:
Frequency of authentication
You can configure an SSL profile to require authentication either once per SSL session (once), or once upon each subsequent re-use of an SSL session (always). The default setting for this option is once.
Whether you set this value to once or always depends on your application. A well-designed web application should need to verify a certificate only once per session. F5 recommends for performance reasons that you use the default setting (once) whenever possible.
You can modify the SSL profile to require authentication not only once per session, but also upon each subsequent re-use of an SSL session.
Certificate chain traversal depth
You can use the Certificate Chain Traversal Depth setting of an SSL profile to configure the maximum number of CA certificates (intermediate CA certificates and/or root CA certificates) that can be traversed in the certificate chain. The default value is 9. If a longer chain is provided, and the client has not been authenticated within this number of traversals, client or server certificate verification fails.
Any certificates installed as part of a CA certificate bundle are trusted. All certificates sent by the peer are not trusted, and the BIG-IP system rejects v1/v2 intermediate certificates presented by the peer. The process of certificate chain building starts from a leaf certificate and ends when the issuer CA certificate is trusted.
Trusted certificate authorities
For client-side and server-side SSL processing, you can use the Trusted Certificate Authorities setting on an SSL profile to configure an SSL profile to verify certificates presented by a client or a server. You can specify a client trusted CAs file name, which the BIG-IP® system then uses to verify client or server certificates. If you do not configure a trusted CAs file, the system uses a default file.
The trusted CAs file that you specify for certificate verification contains one or more certificates, in Privacy Enhanced Mail (PEM) format. Built manually, this file contains a list of the client or server certificates that the SSL profile will trust. If you do not specify a trusted CAs file, or the specified trusted CAs file is not accessible to the BIG-IP system, the system uses the default file name.
Advertised certificate authorities
For client-side profiles only, if you intend to configure the SSL profile to require or request client certificates for authentication, you will want the profile to send to clients a list of CAs that the BIG-IP® system is likely to trust.
This list, known as the Client Certificate CA file, is different from the client Trusted CAs file. This is because, in some cases, you might have a client that does not possess a valid client certificate, in which case you might not want to reveal the actual list of CAs that the BIG-IP system trusts. The client certificate CA file solves this problem by allowing the BIG-IP system to advertise a list of CAs that is different from the actual client trusted CAs file configured as part of certificate verification.
Although the contents of the Client Certificate CA file can differ from that of the Client Trusted CAs file, it is best, for compatibility reasons, to set the Advertised Certificate Authorities setting to match the Trusted Certificate Authorities setting. This is because modern browsers might not permit SSL session negotiation to proceed if the peer that requests the client certificate does not provide a list of trusted CAs.
Name-based authentication
For server-side profiles only, Local Traffic Manager™ supports name-based authentication, which guards against man-in-the-middle attacks. When you configure the Authenticate Name setting for a server-side profile, Local Traffic Manager checks the name against the Common Name (CN) listed in the certificate that the target server presents to the BIG-IP® system. If the name attribute that you specify does not match the CN in the server certificate, Local Traffic Manager closes the connection. An example of a CN is www.f5.com.
Certificate revocation
The Certificate Revocation List (CRL) setting of an SSL profile allows Local Traffic Manager™ to use CRLs to check revocation status of a certificate prior to authenticating a client or server.
As an alternative to using CRLs, you can use the Online Certificate Status Protocol (OCSP) feature, which ensures up-to-date information on certificate revocation status.


