Manual Chapter :
Managing Client- and Server-Side HTTP Traffic Using a CA-Signed Certificate
Applies To:
Show Versions
BIG-IP AAM
- 12.1.5, 12.1.4, 12.1.3, 12.1.2, 12.1.1
BIG-IP APM
- 12.1.6, 12.1.5, 12.1.4, 12.1.3, 12.1.2, 12.1.1
BIG-IP Analytics
- 12.1.6, 12.1.5, 12.1.4, 12.1.3, 12.1.2, 12.1.1
BIG-IP Link Controller
- 12.1.6, 12.1.5, 12.1.4, 12.1.3, 12.1.2, 12.1.1
BIG-IP LTM
- 12.1.6, 12.1.5, 12.1.4, 12.1.3, 12.1.2, 12.1.1
BIG-IP AFM
- 12.1.6, 12.1.5, 12.1.4, 12.1.3, 12.1.2, 12.1.1
BIG-IP PEM
- 12.1.6, 12.1.5, 12.1.4, 12.1.3, 12.1.2, 12.1.1
BIG-IP DNS
- 12.1.6, 12.1.5, 12.1.4, 12.1.3, 12.1.2, 12.1.1
BIG-IP ASM
- 12.1.6, 12.1.5, 12.1.4, 12.1.3, 12.1.2, 12.1.1
Managing Client- and Server-Side HTTP Traffic Using a CA-Signed Certificate
Overview: Managing client and server HTTP traffic using a CA-signed certificate
One of the ways to configure the BIG-IP system to manage SSL traffic is to enable both client-side and server-side SSL termination:
- Client-side SSL termination makes it possible for the system to decrypt client requests before sending them on to a server, and encrypt server responses before sending them back to the client. This ensures that client-side HTTP traffic is encrypted. In this case, you need to install only one SSL key/certificate pair on the BIG-IP system.
- Server-side SSL termination makes it possible for the system to decrypt and then re-encrypt client requests before sending them on to a server. Server-side SSL termination also decrypts server responses and then re-encrypts them before sending them back to the client. This ensures security for both client- and server-side HTTP traffic. In this case, you need to install two SSL key/certificate pairs on the BIG-IP system. The system uses the first certificate/key pair to authenticate the client, and uses the second pair to request authentication from the server.
This implementation uses a CA-signed certificate to manage HTTP traffic.
Task summary
To implement client-side and server-side authentication using HTTP and SSL with a CA-signed certificate, you perform a few basic configuration tasks.
Task list
Requesting a certificate from a certificate authority
You perform this task to generate a certificate signing request (CSR) that can then be submitted to a third-party trusted certificate authority (CA).
Note: F5 Networks recommends that you consult the CA to determine the specific information required for each step in this task.
The generated certificate signing request is submitted to a trusted certificate
authority for signature.
Creating a custom HTTP profile
An HTTP profile defines the way that you want the BIG-IP®system to manage HTTP traffic.
The custom HTTP profile now appears in the HTTP profile list screen.
Creating a custom Client SSL profile
You create a custom Client SSL profile when you want the BIG-IP® system to terminate client-side SSL traffic for the purpose of
decrypting client-side ingress traffic and encrypting client-side egress traffic. By
terminating client-side SSL traffic, the BIG-IP system offloads these
decryption/encryption functions from the destination server. When you perform this task,
you can specify multiple certificate key chains, one for each key type (RSA, DSA, and
ECDSA). This allows the BIG-IP system to negotiate secure client connections using
different cipher suites based on the client's preference.
Note: At a minimum,
you must specify a certificate key chain that includes an RSA key pair. Specifying
certificate key chains for DSA and ECDSA key pairs is optional, although highly
recommended.
-
Using the Certificate Key Chain setting, specify one or
more certificate key chains:
-
Click Add and repeat the process for all
certificate key chains that you want to specify.
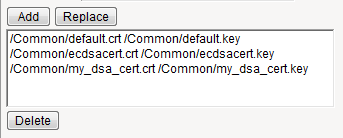
Sample configuration with three key types specified
The result is that all specified key chains appear in the text box.
-
Click Add and repeat the process for all
certificate key chains that you want to specify.
After performing this task, you can see the custom Client SSL profile in the list of Client SSL profiles on the system.
You must also assign the profile to a virtual server.
Creating a custom Server SSL profile
With a Server SSL profile, the BIG-IP® system can
perform decryption and encryption for server-side SSL traffic.
To use this profile, you must assign it to a virtual server.
Creating a pool to manage HTTPS traffic
You can create a pool (a logical set of devices, such as web servers, that you
group together to receive and process HTTPS traffic) to efficiently distribute the load
on your server resources.
The HTTPS load balancing pool now appears in the Pool List screen.
Creating a virtual server for client-side and server-side HTTPS traffic
You can specify a virtual server to be either a host virtual server or a network
virtual server to manage HTTP traffic over SSL.
The virtual server now appears in the Virtual Server List screen.
Implementation results
After you complete the tasks in this implementation, the BIG-IP® system ensures that SSL authentication and encryption occurs for both client-side and server-side HTTP traffic. The system performs this authentication and encryption according to the values you specify in the Client SSL and Server SSL profiles.


