Manual Chapter :
Creating a Basic Web Site and E-commerce Configuration
Applies To:
Show Versions
BIG-IP LTM
- 12.1.6, 12.1.5, 12.1.4, 12.1.3, 12.1.2, 12.1.1, 12.1.0
Creating a Basic Web Site and E-commerce Configuration
Overview: Basic web site and eCommerce configuration
The most common use for the BIG-IP® system is distributing traffic across an array of web servers that host standard web traffic, including eCommerce traffic. The following illustration shows a configuration where a BIG-IP system load balances two sites: www.siterequest.com and store.siterequest.com. The www.siterequest.com site provides standard web content, and the store.siterequest.com site is the e-commerce site that sells items to www.siterequest.com customers.
Illustration of basic web site and eCommerce configuration
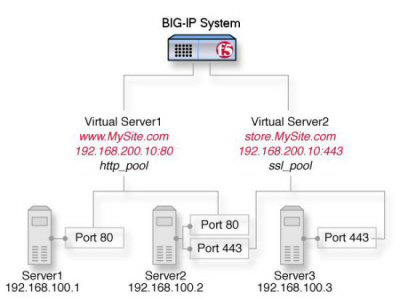
Basic web site and eCommerce configuration
Task summary
You can implement a basic configuration for load balancing application traffic to a web site, as well as load balancing secure traffic to an eCommerce site.
Before you use this implementation:
- Verify that you have created two VLANs on the BIG-IP® system. One VLAN should reside on the external network and another on the internal network.
- Verify that you have created a self IP address for each VLAN.
Task list
Creating a pool to process HTTP traffic
You can create a pool of web servers to process HTTP requests.
The new pool appears in the Pools list.
Creating a pool to manage HTTPS traffic
You can create a pool (a logical set of devices, such as web servers, that you
group together to receive and process HTTPS traffic) to efficiently distribute the load
on your server resources.
The HTTPS load balancing pool now appears in the Pool List screen.
Creating a virtual server to manage HTTP traffic
You can create a virtual server to manage HTTP traffic as either a host virtual
server or a network virtual server.
The HTTP virtual server appears in the list of existing virtual servers on the
Virtual Server List screen.
Creating a virtual server to manage HTTPS traffic
You can specify a virtual server to be either a host virtual server or a network
virtual server to manage HTTPS traffic.
The HTTPS virtual server appears in the Virtual Server List screen.


