Applies To:
Show Versions
Deploying BIG-IQ Virtual Edition
Amazon EC2 deployment overview
The tasks you perform to deploy the BIG-IQ Virtual Edition (VE) system on Amazon EC2, depend on what you plan to do with the Amazon EC2:
| If you plan to manage BIG-IP devices with the BIG-IQ system | If you plan to manage applications in a service scaling group housed in the AWS cloud |
|---|---|
|
|
Task summary for BIG-IQ VE EC2 deployment
To deploy BIG-IQ® CM 6.0.0, you perform a series of tasks using Amazon Web Services (AWS) to create an elastic compute cloud (EC2) that runs a public cloud virtual machine management service.
When you complete these tasks, your cloud environment will be similar to the basic cloud topology depicted here.
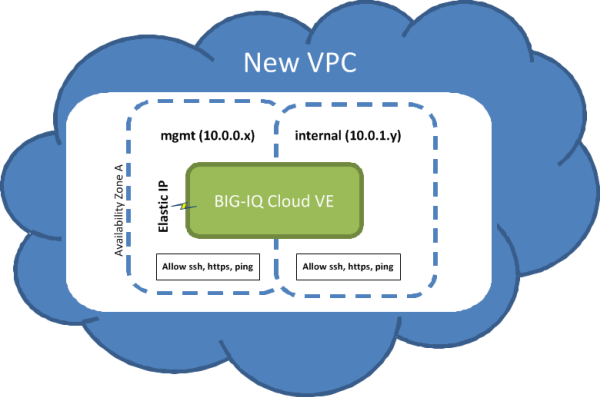
Basic Cloud Topology
Task list
Create an Amazon Identity and Access Management (IAM) user account
An Amazon Identity and Access Management (IAM) user account provides access to specific Amazon Web Services (AWS) resources. Creating an IAM account provides you with more granular control of the AWS resources your users access.
For this task, you must create a group and two IAM user accounts. For the most current instructions for performing these steps, refer to the IAM documentation web site, http://aws.amazon.com/documentation/iam/.
Create a key pair
To create a virtual private cloud (VPC) on which you can deploy the BIG-IQ system, you need a (private-public encryption) key pair to authenticate your sessions. Key pairs are reusable, so if you have a key pair, you do not need to repeat this task.
Create a Virtual Private Cloud
You need an Amazon Virtual Private Cloud (VPC) to deploy the BIG-IQ Cloud system, because AWS provides only multiple network interface card (NIC) support for instances that reside within a VPC.
You create a virtual network topology according to your networking needs. The standard network topology used for BIG-IQ Cloud integration includes three subnets. These subnets provide virtual private address spaces used to interconnect your machines and applications. You can use elastic self IP addresses for public internet accessibility.
For the most current instructions for creating a VPC, refer to the VPC Documentation web site, http://aws.amazon.com/documentation/vpc/.
Add an additional subnet
When you create a VPC, Amazon Web Services creates two subnets for it. The first subnet is the management subnet (10.0.0.0/24) and the second subnet is external (10.0.1.0/24). Many network topologies require three or more subnets (Management, External, and Internal). You can use this task to create an internal subnet (10.0.2.0/24).
- a Management subnet on 10.0.0.0/24
- an External subnet on 10.0.1.0/24
- an Internal subnet on 10.0.2.0/24
Create new security groups
To use your virtual private cloud (VPC) to deploy your virtual machine, the VPC needs two security groups; each with its own set of rules that govern the security behavior for the traffic that routes through it. The table details the rules required for each group to function properly.
| Group Name | Group Description | Rule Name | Source | Rule Type |
|---|---|---|---|---|
| allow-only-ssh-https-ping | Allow only SSH HTTPS or PING | Inbound SSH | 0.0.0.0/0 | |
| Inbound HTTPS | 0.0.0.0/0 | |||
| Inbound Custom ICMP | 0.0.0.0/0 | Echo Request | ||
| Outbound Custom ICMP | 0.0.0.0/0 | Echo Request | ||
| Outbound Custom ICMP | 0.0.0.0/0 | Echo Reply | ||
| allow-all-traffic | Allow all traffic | Inbound All Traffic | 0.0.0.0/0 | |
| Outbound All Traffic | 0.0.0.0/0 |
It is a good idea to test connectivity before proceeding. You should be able to communicate with your VPC NAT server at this point.
F5 recommends enhancing your security by using the security group source fields to restrict the subnets to allow only management access; however, we recognize that this does not complete your security solution. For enhanced security, you might want to deploy a topology with limited management network access.
Add a route for external subnet accessibility
Most network topologies require an Amazon Web Services route to the virtual private cloud (VPC) that makes the external subnet used by the virtual machine accessible to the Internet.
Launch a virtual server with an Amazon Machine Image (AMI)
You launch an EC2 Amazon Machine Image (AMI) so that you can deploy the virtual machine.
Add a third network interface
When you first create a virtual private cloud (VPC), there are typically only two network interfaces associated with it. F5 Networks recommends adding a third network interface to the VPC before you use it to deploy the virtual machine.
Make the virtual machine management port accessible
The management port for your virtual machine might require accessibility over the Internet. However, there are alternative topologies that do not require exposing the management port to the Internet.
F5 Networks recommends, at a minimum, adding restrictions to your source addresses in the allow-only-ssh-https-ping security group.
Alternatively, you might find the Amazon Web Services EC2 VPN sufficiently effective so that you do not need to associate an Internet-accessible Elastic IP with the management port.
Log in and set the admin password
- Created a key pair.
- Created and configured a VPC.
- Instantiated and launched a BIG-IQ Virtual Edition (VE) AMI.
- Made the virtual machine management port accessible through the Internet.
To access your BIG-IQ instance with a browser, you must create an admin user password. You can create an admin password using an SSH session and a set of tmsh commands.


