Manual Chapter : Upgrading BIG-IQ Centralized Management with Logging Nodes to Version 5.2

Applies To:

Show Versions Show Versions

BIG-IQ Centralized Management

  • 5.1.0, 5.0.0
Manual Chapter

How do I upgrade my Logging Node cluster to the latest version?

A Logging Node cluster is made up of all of your Logging Nodes, the BIG-IQ® you use to manage them and any BIG-IQ peer devices. If you use a Logging Node cluster to store and manage your event or alerts, there are additional steps in the upgrade process. Watch the following video for a quick walk-through of the Logging Node update process.

Watch how to upgrade a BIG-IQ Logging Node

Important: Upgrading the Logging Node cluster requires taking the cluster offline. To prevent losing event or alert log data, you must perform this process during a maintenance window.

The diagram illustrates the process workflow:

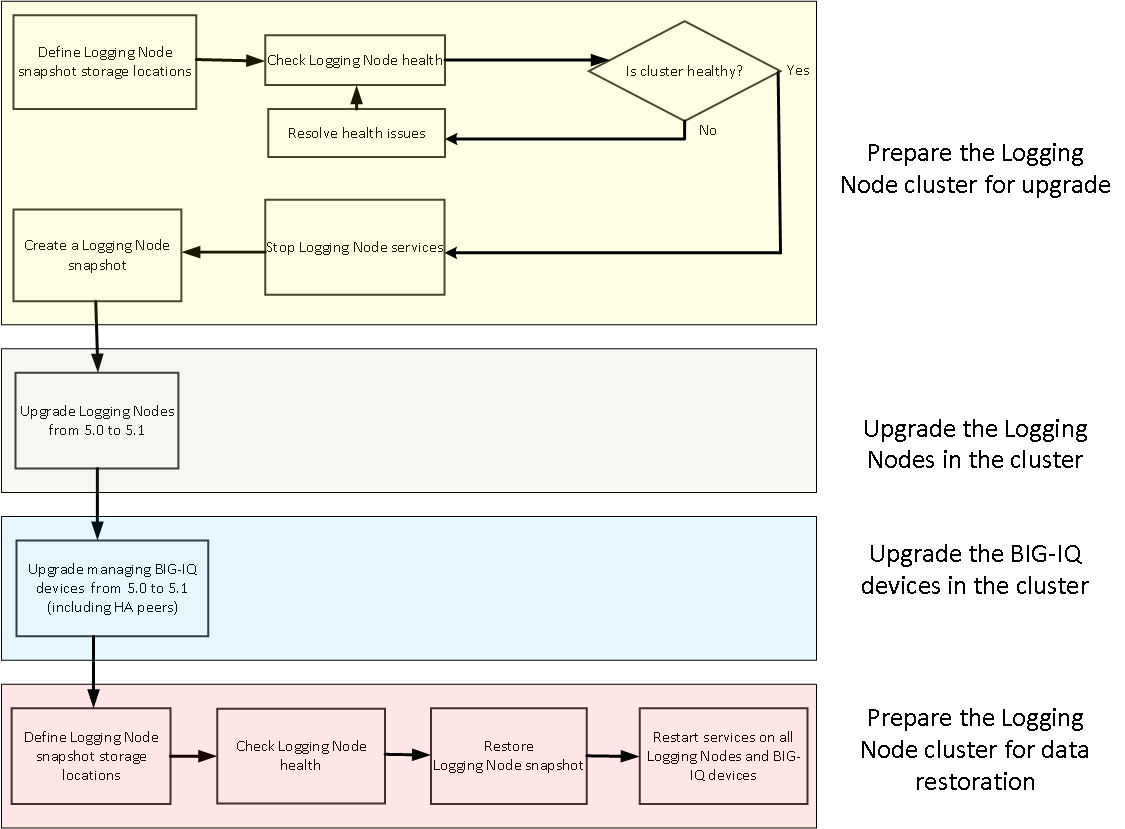
Logging Node upgrade workflow

Task summary

Logging Node cluster update requirements

There are a number of items that you need to have ready access to, before you can successfully complete the Logging Node cluster update. It might be helpful to use the following table to record the values so you have them at hand when needed.

Device Information needed Information Recorded
Primary BIG-IQ device Management IP address

admin user name and password

 
  root access password  
HA BIG-IQ device Management IP address  
  root access password  
Logging Nodes Management IP address  
  root access password  
Storage Machine IP-address  
  storage file path  
  Read/Write permissions for the storage file path  
  root access password  

Logging Node preparation options

Before you start the upgrade there are a few tasks to do. To ensure this process goes smoothly, we have created a script that automates the preparation process. You can either download and run this script, or perform the preparation tasks youself.

The diagram illustrates the these two workflows:

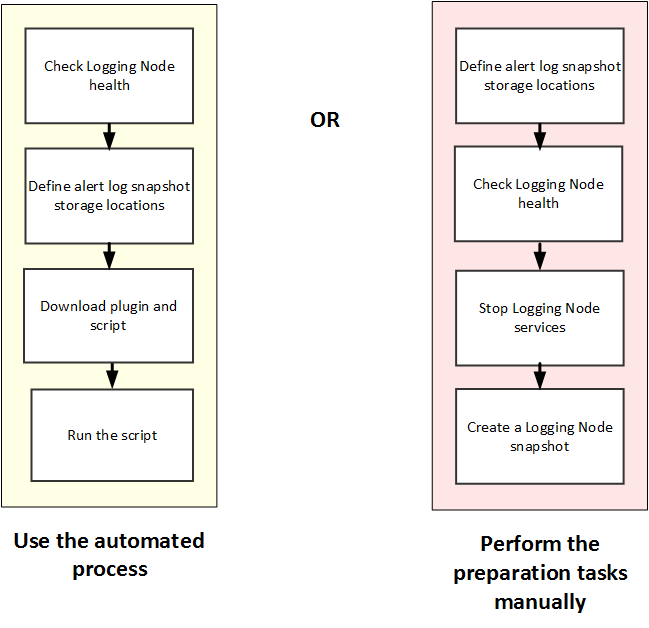
Prepare the Logging Node cluster for upgrade (CLI method)

If you choose this method, you perform the upgrade using a script. This method requires that you download and install a script, but makes it much more likely that the upgrade process goes smoothly.

Define external storage snapshot locations

Before you can configure the external snapshot storage location, you need the following information on the machine you will use to store the snapshots:
  • Storage-machine-IP-address
  • Storage-file-path
  • User name, password, and (optionally) the domain for the storage file path
  • Read/Write permissions for the storage file path

You need snapshots so you can restore the Logging Node data, especially after performing software upgrades.

When snapshots are created, they need to be stored on a machine other than the Logging Node that stores the data. You define the location for the snapshot by editing the fstab file on each device in your Logging Node cluster.

Important: You must perform this task on each Logging Node device, on the BIG-IQ® Centralized Management device, and on the BIG-IQ HA peer.
  1. On the device, in the folder /var/config/rest/elasticsearch/data/, create a new folder named essnapshot.
    mkdir /var/config/rest/elasticsearch/data/essnapshot
  2. Edit the /etc/fstab file.
    • If there is a valid domain available, add the following entry: //<storage machine ip-address>/<storage-filepath> /var/config/rest/elasticsearch/data/essnapshot cifs iocharset=utf8,rw,noauto,uid=elasticsearch,gid=elasticsearch,user=<username>,domain=<domain name> 0 0
    • If there is no valid domain available, add the following entry: //<storage machine ip-address>/<storage-filepath> /var/config/rest/elasticsearch/data/essnapshot cifs iocharset=utf8,rw,noauto,uid=elasticsearch,gid=elasticsearch,user=<username> 0 0
  3. Run the following command sequence to mount the snapshot storage location to the essnapshot folder. Type the password when prompted.
    • # cd /var/config/rest/elasticsearch/data
    • # mount essnapshot
    • Password:
  4. Confirm that the essnapshot folder has full read, write, and execute permissions, (specifically chmod 777 essnapshot), and that the owner and group are elasticsearch for this folder.
    For example, ls-l yields: drwxrwxrwx 3 elasticsearch elasticsearch 0 Apr 25 11:27 essnapshot.
  5. Create a test file to confirm that the storage file path has been successfully mounted.
    For example: touch testfile.
    The test file should be created on the storage machine at the location storage file path.
  6. Repeat these five steps for each Logging Node, the BIG-IQ Centralized Management, and the BIG-IQ HA peer device.
The storage location should now be accessible to all of the devices in the Logging Node cluster.

Check Logging Node health

You can use the Logging Configuration screen to review the overall health and status of the Logging Nodes you've configured. You can use the data displayed on this screen both before and after an upgrade to verify that your Logging Node cluster configuration is as you expect it to be.
Note: Perform this check on the BIG-IQ® Centralized Management device; not on the Logging Node.
  1. At the top of the screen, click System Management.
  2. At the top of the screen, click Inventory.
  3. On the left, expand BIG-IQ LOGGING and then select Logging Configuration.
    The Logging Configuration screen opens to display the current state of the logging node cluster defined for this device.
  4. Record these Logging Node cluster details as listed in the Summary area.
    • Logging Nodes in Cluster
    • Nodes in Cluster
    • Total Document Count
    • Total Document Size
    This information provides a fairly detailed overview that describes the Logging Node cluster you have created to store alert or event data. After you complete an upgrade, you can check the health again, and use this information to verify that the cluster restored successfully.
  5. If there are any cluster health issues, resolve those issues and then repeat the process until the cluster health is as expected.

Downloading the upgrade preparation script from F5 Networks

You need to download the upgrade preparation script from F5 Networks before you can use the automated method to prepare your Logging Node cluster for upgrade. You also need to download a plug-in that script need,s so that it can run properly.

Note: If you choose to prepare your Logging Node cluster for upgrade manually, do not perform this task.
  1. Log in to the F5 Downloads site, https://downloads.f5.com, and click the Find a Download button.
  2. Under Select a Product Line, click Centralized Management.
  3. Under Select a product container, click version 5.1.0.
  4. Read the End User License Agreement, and click the I Accept button if you agree with the terms.
  5. Click the plug-in file <rpm-file> to download it.
  6. Click the name of the closest geographical location to you.
    The screen refreshes to display the progress of your download.
  7. Repeat the process, but this time select the script file upgradeprep.sh for download.
After you download the upgrade preparation files, you need to copy them to the /shared directory so you can run them.

Run the upgrade preparation script

Before you can run the script you need to download it along with a plug-in that allows it to run successfully.

Running the upgrade preparation script is the safest way to prepare for the Logging Node upgrade. Using the automated script eliminates the chance of either omitting a step, or typing in an incorrect value, either of which could lead to failure for the entire upgrade process.

Important: You must perform this task for each Logging Node device in your cluster.
  1. On the first device, copy the plug-in file to the folder /shared.
    cp <rpm-file> /shared
  2. On the first device, run the plug-in file.
    rpm –Uvl /shared/<rpm-file>
  3. On the first device, copy the script file to the folder /shared.
    cp upgradeprep.sh /shared
  4. On BIG-IQ® Centralized Management, run the script file, and respond to the username and password prompts with the admin user name and password.
    sh /shared/upgradeprep.sh

When the script completes, you see the name of the snapshot it created. Once the script runs successfully, you can proceed with the upgrade process.

Prepare the Logging Node cluster for upgrade (manual method)

If you choose this method, you perform the upgrade without using a script. This method requires a little more attention to detail on your part to ensure that the upgrade process goes smoothly.

Define external storage snapshot locations

Before you can configure the external snapshot storage location, you need the following information on the machine you will use to store the snapshots:
  • Storage-machine-IP-address
  • Storage-file-path
  • User name, password, and (optionally) the domain for the storage file path
  • Read/Write permissions for the storage file path

You need snapshots so you can restore the Logging Node data, especially after performing software upgrades.

When snapshots are created, they need to be stored on a machine other than the Logging Node that stores the data. You define the location for the snapshot by editing the fstab file on each device in your Logging Node cluster.

Important: You must perform this task on each Logging Node device, on the BIG-IQ® Centralized Management device, and on the BIG-IQ HA peer.
  1. On the device, in the folder /var/config/rest/elasticsearch/data/, create a new folder named essnapshot.
    mkdir /var/config/rest/elasticsearch/data/essnapshot
  2. Edit the /etc/fstab file.
    • If there is a valid domain available, add the following entry: //<storage machine ip-address>/<storage-filepath> /var/config/rest/elasticsearch/data/essnapshot cifs iocharset=utf8,rw,noauto,uid=elasticsearch,gid=elasticsearch,user=<username>,domain=<domain name> 0 0
    • If there is no valid domain available, add the following entry: //<storage machine ip-address>/<storage-filepath> /var/config/rest/elasticsearch/data/essnapshot cifs iocharset=utf8,rw,noauto,uid=elasticsearch,gid=elasticsearch,user=<username> 0 0
  3. Run the following command sequence to mount the snapshot storage location to the essnapshot folder. Type the password when prompted.
    • # cd /var/config/rest/elasticsearch/data
    • # mount essnapshot
    • Password:
  4. Confirm that the essnapshot folder has full read, write, and execute permissions, (specifically chmod 777 essnapshot), and that the owner and group are elasticsearch for this folder.
    For example, ls-l yields: drwxrwxrwx 3 elasticsearch elasticsearch 0 Apr 25 11:27 essnapshot.
  5. Create a test file to confirm that the storage file path has been successfully mounted.
    For example: touch testfile.
    The test file should be created on the storage machine at the location storage file path.
  6. Repeat these five steps for each Logging Node, the BIG-IQ Centralized Management, and the BIG-IQ HA peer device.
The storage location should now be accessible to all of the devices in the Logging Node cluster.

Check Logging Node health

You can use the Logging Configuration screen to review the overall health and status of the Logging Nodes you've configured. You can use the data displayed on this screen both before and after an upgrade to verify that your Logging Node cluster configuration is as you expect it to be.
Note: Perform this check on the BIG-IQ® Centralized Management device; not on the Logging Node.
  1. At the top of the screen, click System Management.
  2. At the top of the screen, click Inventory.
  3. On the left, expand BIG-IQ LOGGING and then select Logging Configuration.
    The Logging Configuration screen opens to display the current state of the logging node cluster defined for this device.
  4. Record these Logging Node cluster details as listed in the Summary area.
    • Logging Nodes in Cluster
    • Nodes in Cluster
    • Total Document Count
    • Total Document Size
    This information provides a fairly detailed overview that describes the Logging Node cluster you have created to store alert or event data. After you complete an upgrade, you can check the health again, and use this information to verify that the cluster restored successfully.
  5. If there are any cluster health issues, resolve those issues and then repeat the process until the cluster health is as expected.

Stop Logging Nodes services

Before you can successfully upgrade your Logging Node devices, you must stop the active services that send alerts or events to the Logging Node.
  1. Log in to BIG-IQ® Centralized Management with your administrator user name and password.
  2. At the top left of the screen, select System Management from the BIG-IQ menu.
  3. On the left, expand BIG-IQ LOGGING.
  4. Under BIG-IQ LOGGING, select Logging Nodes.
  5. Click the name of a Logging Node.
    The Properties screen for the selected device opens.
  6. On the left, click Services.
  7. For each active service, click Deactivate.
  8. Click Close.
  9. Repeat the steps for each Logging Node in the cluster.
The services on your Logging Nodes stop. Consequently, the Logging Nodes stop accepting alerts or events from the BIG-IP®.

Create a Logging Node snapshot

Snapshots of the event logs sent to your Logging Nodes are an essential safeguard for your data. If the machine that stores the event logs fails, you can use these snapshots to restore the data. You define schedules for creating these snapshots.
  1. Log in to F5® BIG-IQ® Centralized Management with your user name and password.
  2. At the top of the screen, click System.
  3. On the left, expand BIG-IQ LOGGING.
  4. On the left, select Logging Configuration.
    The Logging Configuration screen opens to display the current state of the logging node cluster defined for this device.
  5. Next to Snapshot Schedules, click Create.
    The New Logging Snapshot screen opens.
  6. For the Snapshot Name Prefix, type the string that you want to use to identify this snapshot.
    We recommend you choose a name that identifies the snapshot as the backup of your Logging Node data (for example lg_backup).
  7. For Snapshots to Keep, select 1.
  8. For the Schedule Type, select Days of the Week.
  9. For the Days of the Week select the current day of the week.
  10. For the Start Date, select the current day and time.
  11. Click Save to save the new schedule.
When you click Save, the snapshot is created.
When the Snapshot Count increments, and the Last Snapshot/Time updates to show the snapshot you created, you can proceed to the next task, upgrading the Logging Nodes in your cluster.

Upgrade version 5.0 Logging Nodes to version 5.1

After you prepare the Logging Node cluster for upgrade, use these procedures to upgrade the Logging Nodes in your cluster.

Download the BIG-IQ version 5.1 software image from F5 Networks

Downloading a software image from F5 Networks is the first step to making it available to install on BIG-IQ® Centralized Management.
  1. Log in to the F5 Downloads site, https://downloads.f5.com.
  2. Click the Find a Download button.
  3. Click the name of the product line.
  4. Click the product name, Centralized Management.
  5. Click V5.1.0.
  6. Read the End User Software License agreement and click the I Accept button if you agree with the terms.
  7. Click the BIG-IQ version 5.1 .iso file name.
  8. Click the name of the closest geographical location to you.
    The software image downloads to your local system
The software image is now available for you to upload to BIG-IQ.

Upload the BIG-IQ version 5.1 software image to BIG-IQ version 5.0

Before you can upload the software image to BIG-IQ®Centralized Management, you must have first downloaded it from the F5 Downloads site.

Upload the BIG-IQ version 5.1 software image to make it available for this upgrade.

  1. Log in to F5® BIG-IQ® Centralized Management with your user name and password.
  2. At the top of the screen, click System.
  3. On the left, click SOFTWARE MANAGEMENT.
  4. On the left, click THIS DEVICE > SOFTWARE MANAGEMENT > Available Images .
  5. Click the Upload Image button.
  6. Click the Choose File button and go to the location to which you downloaded the image, and click the Open button to upload it to BIG-IQ.
  7. Click the Upload button.
    The screen refreshes to display the progress of the upload.
When the image is done uploading, it shows in the Available Images list.

Upgrade the Logging Node to version 5.2

The default size of the /var file system in a newly installed Logging Node is 10 GB. That may be insufficient to store logging data. Extending this file system to a larger size is explained in SOL 17406. Because upgrading a Logging Node installation requires at least two volumes, you must ensure that both volumes can have their /var file system extended to the same size, or upgrades may fail. If you are running BIG-IQ Virtual Edition and don't have two volumes, refer to: SOL17406: Using the tmsh utility to create a new software volume for installing a new image or hotfix on the BIG-IQ system at support.f5.com/kb/en-us/solutions/public/17000/400/sol17406.html

Before upgrading Logging Node, you must have downloaded the BIG-IQ version 5.2 .iso image from the F5 downloads site.

The upgrade process involves installing the new version of the software, booting into that new version, and reviewing the settings on the setup screens.

  1. Log in to the Logging Node with your admin user name and password.
  2. At the top of the screen, click System Management.
  3. At the top of the screen, click Inventory.
  4. On the left, click BIG-IQ HA.
  5. Click the name of the Logging Node.
  6. On the left, click Software Version.
  7. Click the Update button.
  8. From the Software Image list, select the image you want to install.
  9. From the Target Volume list, select the volume you want to install the image on.
  10. To prompt the data collection device to reboot into the new software installation volume, select the Reboot into Target Volume check box.
  11. Click the Apply button.
    A popup screen opens, prompting you to confirm the installation.
  12. Click the Continue button.
  13. Wait while the logging node loads the new software and reboots.
    Depending on your configuration and the number of devices you are managing, this could take up to 15 minutes. During this time, it is important that you do not interrupt the installation process by restarting services or the server.
  14. Log back in to the Logging Node.
  15. If needed, extend the /var partition.
    The default size of the /var file system in a newly installed or upgraded node is 10 GB. This amount of available storage might not be enough to store your data. If you previously extended your disk space, you'll need to do it again after you upgrade. For information about how to do that, refer to: K16103: Extending disk space on BIG-IQ Virtual Edition And remember, upgrading a node requires at least two volumes, so be sure you can extend the /var file system on both volumes to the same size, or upgrades might fail.
Important: In the unlikely event that you are unable to log in to a BIG-IQ® 7000 series platform after you upgraded it, refer to SOL40338232: The BIG-IQ system interface might be inaccessible after the BIG-IQ system is upgraded from BIG-IQ Centralized Management version to 5.2.0 at support.f5.com/kb/en-us/solutions/public/k/40/sol40338232.html for more information.

After you upgrade to BIG-IQ version 5.1

Some settings and configurations are not compatible between F5® BIG-IQ® Centralized Management version 4.5 or 4.6, and version 5.1. After you upgrade to BIG-IQ version 5.1, you need to re-specify configuration settings for any of the (following, listed) functionality that you were using before you upgraded.

System Management

  • SMTP server settings, except for email recipients, which persist after upgrading.
  • Backup Schedules, including retention policies, when upgrading from BIG-IQ version 4.5 directly to version 5.1.
    Note: If you upgrade from BIG-IQ version 4.6 to version 5.1, the Backup Schedules and retention policies are retained. Refer to the BIG-IQ version 5.1 release notes for more information.
  • BIG-IQ Logging, logging nodes, and logging configuration

Device Management

  • Backup Schedules, including retention policies, when upgrading from BIG-IQ version 4.5 directly to version 5.1.
    Note: If you upgrade from BIG-IQ version 4.6 to version 5.1, the Backup Schedules and retention policies are retained. Refer to the BIG-IQ version 5.1 release notes for more information.

Audit Logging:

  • Archive Settings

Change Management:

  • Configuration Snapshots
  • Evaluate & Deploy

Network Security:

  • Notification Rules and Notification Schedules
  • Change Verification Reports
  • Web Application Security event logs created in a previous version of BIG-IQ are not compatible with BIG-IQ version 5.1.

Global User Settings

  • Reverts to default settings

Upgrade version 5.0 BIG-IQ systems to version 5.1

After you mount the storage drives, use these procedures to upgrade the managing BIG-IQ® Centralized Management devices in your cluster.

What you need to do before you upgrade to BIG-IQ version 5.1

Before you can upgrade F5® BIG-IQ® Centralized Management, you must perform each of the following procedures:

  • Re-activate the BIG-IQ system license. You must do this on both the active and the standby BIG-IQ if they are running in an HA pair.
  • Create a UCS backup of the BIG-IQ system's current configuration, and store it on a remote server.
  • Decide which disk volume you want to install the upgrade on. Make sure that the /var filesystem on the target disk partition is at least as large as the /var filesystem on the source partition. You can check this by running the lvs command. You must have at least two volumes to upgrade BIG-IQ and the volume on which you install the upgrade must be empty before you begin the installation. If you are running BIG-IQ Virtual Edition and you don't have two volumes, refer to: SOL17406: Using the tmsh utility to create a new software volume for installing a new image or hotfix on the BIG-IQ system at support.f5.com/kb/en-us/solutions/public/17000/400/sol17406.html
  • Upgrade all managed BIG-IP® devices to version 11.5.2 or later. For version-specific BIG-IQ and BIG-IP product compatibility information, refer to SOL14592: Compatibility between BIG-IQ and BIG-IP releases at support.f5.com/kb/en-us/solutions/public/14000/500/sol14592.html

How to upgrade from BIG-IQ version 5.0 to BIG-IQ version 5.1

To upgrade F5® BIG-IQ® Centralized Management from BIG-IQ version 5.0 to version 5.1, perform these procedures.

Note: It is important that you follow these procedures in the order stated.
  1. Complete all of the pre-requisites outlined in the topic titled, What you need to do before you upgrade to BIG-IQ version 5.1.
  2. Download the BIG-IQ version 5.1 iso file from the F5 Downloads site to your desktop.
  3. Upload the software image to BIG-IQ.
  4. Remove the secondary BIG-IQ system from the primary BIG-IQ system, if they are configured in an HA pair.
  5. Upgrade the primary BIG-IQ system, if they are configured in an HA pair.
  6. Upgrade the secondary BIG-IQ system, if they are configured in an HA pair.
  7. Re-establish the HA configuration, if they are configured in an HA pair.

Download the BIG-IQ version 5.1 software image from F5 Networks

Downloading a software image from F5 Networks is the first step to making it available to install on BIG-IQ® Centralized Management.
  1. Log in to the F5 Downloads site, https://downloads.f5.com.
  2. Click the Find a Download button.
  3. Click the name of the product line.
  4. Click the product name, Centralized Management.
  5. Click V5.1.0.
  6. Read the End User Software License agreement and click the I Accept button if you agree with the terms.
  7. Click the BIG-IQ version 5.1 .iso file name.
  8. Click the name of the closest geographical location to you.
    The software image downloads to your local system
The software image is now available for you to upload to BIG-IQ.

Upload the BIG-IQ version 5.1 software image to BIG-IQ version 5.0

Before you can upload the software image to BIG-IQ®Centralized Management, you must have first downloaded it from the F5 Downloads site.

Upload the BIG-IQ version 5.1 software image to make it available for this upgrade.

  1. Log in to F5® BIG-IQ® Centralized Management with your user name and password.
  2. At the top of the screen, click System.
  3. On the left, click SOFTWARE MANAGEMENT.
  4. On the left, click THIS DEVICE > SOFTWARE MANAGEMENT > Available Images .
  5. Click the Upload Image button.
  6. Click the Choose File button and go to the location to which you downloaded the image, and click the Open button to upload it to BIG-IQ.
  7. Click the Upload button.
    The screen refreshes to display the progress of the upload.
When the image is done uploading, it shows in the Available Images list.

Remove the secondary BIG-IQ version 5.0 from an HA pair

If the F5®BIG-IQ® Centralized Management system version 5.0 is configured in an HA pair, you must remove the secondary BIG-IQ® system before you upgrade the primary BIG-IQ.
  1. Log in to the primary BIG-IQ system with your administrator user name and password.
  2. At the top left of the screen, select System Management from the BIG-IQ menu.
  3. At the top of the screen, click Inventory.
  4. On the left, click BIG-IQ HA.
  5. Select the check box next to the secondary BIG-IQ, and click the Remove Device button.
    A dialog box opens, prompting you to confirm that you want to remove the peer device from this group.
  6. Click Delete in the dialog box to confirm the removal.
You can now upgrade the primary BIG-IQ.

Upgrade the primary BIG-IQ version 5.0 to BIG-IQ version 5.1

You need at least two volumes to upgrade F5® BIG-IQ® Centralized Management. If you are running BIG-IQ Virtual Edition and don't have two volumes, refer to: SOL17406: Using the tmsh utility to create a new software volume for installing a new image or hotfix on the BIG-IQ system at support.f5.com/kb/en-us/solutions/public/17000/400/sol17406.html

Before upgrading BIG-IQ, download the BIG-IQ version 5.1 .iso image from the F5 downloads site.
Warning: These procedures require that the BIG-IQ system is temporarily unavailable and unable to manage BIG-IP® devices until the upgrade is complete. BIG-IP devices can continue to manage traffic during this time.

The upgrade process involves installing the new version of the software, booting into that new version, and reviewing the settings on the setup screens.

  1. Log in to the primary BIG-IQ with your admin user name and password.
  2. At the top of the screen, click System.
  3. At the top of the screen, click Inventory.
  4. On the left, click BIG-IQ HA.
  5. Click the name of the primary BIG-IQ.
  6. On the left, click Software Version.
  7. Click the Update button.
  8. From the Software Image list, select the image you want to install.
  9. From the Target Volume list, select the volume you want to install the image on.
  10. To prompt BIG-IQ to reboot into the new software installation volume, select the Reboot into Target Volume check box.
  11. Click the Apply button.
  12. Click the Continue button.
  13. Wait while BIG-IQ loads the new software and reboots.
    Depending on your configuration and the number of devices you are managing, this could take up to an hour. During this time, it is important that you not interrupt the installation process by restarting services or the server.
  14. Log back in to the primary BIG-IQ.
Important: In the unlikely event that you are unable to log in to a BIG-IQ® 7000 series platform after you upgraded it, refer to SOL40338232: The BIG-IQ system interface might be inaccessible after the BIG-IQ system is upgraded from BIG-IQ Centralized Management version to 5.1.0 at support.f5.com/kb/en-us/solutions/public/k/40/sol40338232.html for more information.

Upgrade the secondary BIG-IQ version 5.0 to BIG-IQ version 5.1

After you upgrade the primary BIG-IQ® Centralized Management system to version 5.1 and discover and import services for your managed devices, you can upgrade the secondary BIG-IQ system in a HA configuration.

You need at least two volumes to upgrade BIG-IQ. If you are running BIG-IQ Virtual Edition and you don't have two volumes, refer to: SOL17406: Using the tmsh utility to create a new software volume for installing a new image or hotfix on the BIG-IQ system at support.f5.com/kb/en-us/solutions/public/17000/400/sol17406.html
You upgrade the secondary BIG-IQ in a HA configuration so it is running the same software version as the primary BIG-IQ.
  1. Log in to the secondary BIG-IQ system's user interface with your admin user name and password.
  2. At the top of the screen, click System.
  3. At the top of the screen, click Inventory.
  4. On the left, click BIG-IQ HA.
  5. On the left, click Software Version.
  6. From the Software Image list, select the image you want to install.
  7. To set the location for where BIG-IQ installs this software image:
    1. Click the Set Default Volume button.
    2. Select Volume Name.
    3. In the Volume Name field, type the name of the volume on which you want to install this image.
    4. Click the Apply button.
  8. Click the Apply button.
    A popup screen opens, prompting you to confirm the installation.
  9. Click the Continue button.
  10. Wait while BIG-IQ loads the new software and reboots.
    Depending on your configuration and the number of devices you are managing, this could take up to an hour. During this time, it is important that you not interrupt the installation process by restarting services or the server.
  11. Log in to the BIG-IQ that will be the secondary BIG-IQ system to confirm that the upgrade succeeded and complete the setup wizard.
    To complete the setup task, you must supply a master key pass phrase that all devices in the logging node cluster must share. Make note of the phrase you use. Each logging node, as well as the primary and secondary BIG-IQ systems must use this phrase before they can join the cluster.
The secondary BIG-IQ system is now upgraded to BIG-IQ version 5.1.
You can now re-establish the BIG-IQ HA configuration.

Re-establish the HA configuration after upgrading to BIG-IQ version 5.1

After you upgrade both F5® BIG-IQ® Centralized Management systems in a HA configuration, you can re-associate the secondary system with the primary BIG-IQ system.
  1. Log in to primary BIG-IQ system with your administrator user name and password.
  2. At the top of the screen, click System.
  3. At the top of the screen, click Inventory.
  4. On the left, click BIG-IQ HA.
  5. Click the Add Device button.
  6. In the IP Address field, type the BIG-IQ system's self IP address.
  7. In the User name and Password fields, type the administrative user name and password for the system.
  8. Click the Add button to add this device to this high availability configuration.
Both BIG-IQ systems in the HA configuration are now running BIG-IQ version 5.1.
Next, you should verify that both BIG-IQ systems have the same configuration.

Discover and reimport services after you upgrade from BIG-IQ version 5.0 to version 5.1

To take advantage of the new features introduced in F5® BIG-IQ® Centralized Management version 5.1, after you upgrade, you must rediscover and reimport the service configurations for your BIG-IP® devices.

  1. Log in to F5® BIG-IQ® Centralized Management with your user name and password.
  2. At the top of the screen, click Devices.
  3. Click the name of the device you want to discover a service configuration from.
  4. On the left, click Services.
  5. Click the Import button next to the service you want to import to the BIG-IQ system.
    If the current configuration on the BIG-IQ is different than the one on the BIG-IP® device, BIG-IQ displays a screen for you to resolve the conflicts.
  6. If there are conflicts, select one of the following options for each object that is different, and then click the Continue button:
    • Use BIG-IQ to use the configuration settings stored on BIG-IQ.
    • Use BIG-IP to override the configuration setting stored on BIG-IQ with the settings from the BIG-IP device.
  7. Click the arrow button to return to the BIG-IP Device inventory screen.
    The device should display with a green status. This means the device is active and running.
    Repeat steps 4-7 for each device in the inventory.

Prepare the Logging Node cluster for data restoration

After you upgrade the Logging Node cluster, use these procedures to bring the Logging Node cluster back online.

Define external storage snapshot locations

Before you can configure the external snapshot storage location, you need the following information on the machine you will use to store the snapshots:
  • Storage-machine-IP-address
  • Storage-file-path
  • User name, password, and (optionally) the domain for the storage file path
  • Read/Write permissions for the storage file path

You need snapshots so you can restore the Logging Node data, especially after performing software upgrades.

When snapshots are created, they need to be stored on a machine other than the Logging Node that stores the data. You define the location for the snapshot by editing the fstab file on each device in your Logging Node cluster.

Important: You must perform this task on each Logging Node device, on the BIG-IQ® Centralized Management device, and on the BIG-IQ HA peer.
  1. On the device, in the folder /var/config/rest/elasticsearch/data/, create a new folder named essnapshot.
    mkdir /var/config/rest/elasticsearch/data/essnapshot
  2. Edit the /etc/fstab file.
    • If there is a valid domain available, add the following entry: //<storage machine ip-address>/<storage-filepath> /var/config/rest/elasticsearch/data/essnapshot cifs iocharset=utf8,rw,noauto,uid=elasticsearch,gid=elasticsearch,user=<username>,domain=<domain name> 0 0
    • If there is no valid domain available, add the following entry: //<storage machine ip-address>/<storage-filepath> /var/config/rest/elasticsearch/data/essnapshot cifs iocharset=utf8,rw,noauto,uid=elasticsearch,gid=elasticsearch,user=<username> 0 0
  3. Run the following command sequence to mount the snapshot storage location to the essnapshot folder. Type the password when prompted.
    • # cd /var/config/rest/elasticsearch/data
    • # mount essnapshot
    • Password:
  4. Confirm that the essnapshot folder has full read, write, and execute permissions, (specifically chmod 777 essnapshot), and that the owner and group are elasticsearch for this folder.
    For example, ls-l yields: drwxrwxrwx 3 elasticsearch elasticsearch 0 Apr 25 11:27 essnapshot.
  5. Create a test file to confirm that the storage file path has been successfully mounted.
    For example: touch testfile.
    The test file should be created on the storage machine at the location storage file path.
  6. Repeat these five steps for each Logging Node, the BIG-IQ Centralized Management, and the BIG-IQ HA peer device.
The storage location should now be accessible to all of the devices in the Logging Node cluster.

Check Logging Node health

You can use the Logging Configuration screen to review the overall health and status of the Logging Nodes you've configured. You can use the data displayed on this screen both before and after an upgrade to verify that your Logging Node cluster configuration is as you expect it to be.
Note: Perform this check on the BIG-IQ® Centralized Management device; not on the Logging Node.
  1. At the top of the screen, click System Management.
  2. At the top of the screen, click Inventory.
  3. On the left, expand BIG-IQ LOGGING and then select Logging Configuration.
    The Logging Configuration screen opens to display the current state of the logging node cluster defined for this device.
  4. Record these Logging Node cluster details as listed in the Summary area.
    • Logging Nodes in Cluster
    • Nodes in Cluster
    • Total Document Count
    • Total Document Size
    This information provides a fairly detailed overview that describes the Logging Node cluster you have created to store alert or event data. After you complete an upgrade, you can check the health again, and use this information to verify that the cluster restored successfully.
  5. If there are any cluster health issues, resolve those issues and then repeat the process until the cluster health is as expected.

Restore event or alert log snapshots

To submit the REST API calls required by this task, you must provide the administrator user name and password.

The BIG-IQ® user interface does not currently support restoring the event or alert snapshots. However, if a logging node fails, you can manually restore the data up to the last snapshot.

Please note the following:

  • The restore operation requires a down time during which no BIG-IQ or Logging Node work is performed.
  • During the restore operation, no event or alert data sent to the Logging Node is retained.
  • The restore operation restores only the data from the time before the chosen snapshot was created. Data from the time that the chosen snapshot was created to the current time is not restored.
  • Before initiating a snapshot restore, make sure that sufficient disk space is allocated to the /var folder on the device to which you are restoring the snapshot.
  1. Log in to BIG-IQ system with your administrator user name and password.
  2. At the top left of the screen, select System Management from the BIG-IQ menu.
  3. On the left, expand BIG-IQ LOGGING and select Logging Configuration.
    The Logging Configuration screen opens.
  4. Click the View History button.
    The BIG-IQ Logging Snapshots screen opens.
  5. Browse through the list to get an idea of which snapshot you want to restore.
  6. On the Logging Configuration screen, next to Last Snapshot/Time, click Restore.

Restart Logging Nodes services

To upgrade your Logging Nodes, you stopped all Logging Node services. Once the upgraded software is installed, you must restart the services before you can resume normal operation.
  1. Log in to BIG-IQ system with your administrator user name and password.
  2. At the top left of the screen, select System Management from the BIG-IQ menu.
  3. On the left, expand BIG-IQ LOGGING.
  4. Under BIG-IQ LOGGING, select Logging Nodes.
  5. Click a Logging Node name.
    The Properties screen for the selected device opens.
  6. On the left, click Services.
  7. For each service that you use, click Activate.
  8. Click Close.
  9. Repeat the steps for each Logging Node in the cluster.
This restarts the services on your Logging Nodes.

Restart BIG-IQ services

To upgrade your BIG-IQ® devices, you stopped a key service on the BIG-IQ. Once the upgraded software is installed, the service must be restarted before you can resume normal operation.
  1. Use SSH to log in the BIG-IQ device.
    You must log in as root to perform this procedure.
  2. At the root prompt, type bigstart restart restjavad.
  3. Repeat the steps for each BIG-IQ device in the cluster.
This restarts the services on the BIG-IQ devices.

Recheck Logging Node health

You can use the Logging Configuration screen to review the overall health and status of the Logging Nodes you've configured. You can use the data displayed on this screen both before and after an upgrade to verify that your logging node cluster configuration is as you expect.
  1. Log in to F5® BIG-IQ® Centralized Management with your user name and password.
  2. At the top of the screen, click System.
  3. On the left, expand BIG-IQ LOGGING.
  4. On the left, select Logging Configuration.
    The Logging Configuration screen opens to display the current state of the logging node cluster defined for this device.
  5. Analyze the Logging Node cluster details listed in the Summary area and make sure that the values after upgrade match the values from the health check you did before the upgrade.
    • Logging Nodes in Cluster
    • Nodes in Cluster
    • Total Document Count
    • Total Document Size
    This information provides a fairly detailed overview that describes the Logging Node cluster you have created to store alerts and event log data.
  6. If there are any cluster health issues, resolve those issues and then repeat the process until the cluster health is as you expect it to be.

Recover from an unsuccessful upgrade

To recover from an unsuccessful upgrade, you need to know the volume names for the volumes into which the pre- and post- upgrade versions were installed.
If you complete the upgrade process and the cluster configuration is not the same as before the upgrade, the upgrade was unsuccessful. You need a way to repeat the process.
  1. Use SSH to log in to BIG-IQ Centralized Management.
    You must log in as root to perform this process.
  2. Reboot the BIG-IQ device into the volume that you used for the previous version BIG-IQ.
    From the command prompt type:
    tmsh reboot volume <pre-upgrade volume name>
    The device reboots. The device goes offline. When it comes back online, you can proceed.
  3. When the device reboot is complete, restart the upgrade process from the beginning. Take particular care to follow the work flow precisely. If you did not use the command line method the first time, we highly recommend using it to increase the likelihood of success.