Manual Chapter : Managing the F5 SSL Orchestrator Basic Deployment

Applies To:

Show Versions Show Versions

F5 SSL Orchestrator

  • 14.0.0
Manual Chapter

Managing the F5 SSL Orchestrator Basic Deployment

Overview: Managing the F5 SSL Orchestrator basic deployment

This section describes how to manage your SSL Orchestrator basic deployment by configuring your logs settings, creating additional outbound or inbound interception rules, and managing your deployment's per-request policy settings using the visual policy editor (VPE).

Assumptions and dependencies

Before managing your SSL Orchestrator basic deployments, make sure you have completed:

  • Configuring your deployment settings.
  • Setting up your required services.
  • Installing your default outbound interception rules with supporting SSL security settings and per-request policies.

Configuring F5 SSL Orchestrator logs settings

Before configuring logs settings, make sure you complete all required areas in the deployment settings, create all the services you require with supporting VLAN network settings, and install your interception rules with supporting SSL security settings and per-request policies.
The SSL Orchestrator Settings option in the Logs menu can be used to enable logging for selected facilities at various levels of severity to describe the system messages. Facilities describe the specific element of the system generating the message:
  • Per-Request Policy
  • FTP
  • IMAP
  • POP3
  • SMTPS
  • SSL Orchestrator Generic

To set you logs settings, do the following:

  1. On the Main tab, click SSL Orchestrator > Logs > Settings . The SSLO Orchestrator Logs Settings screen opens.
  2. Check the Enable box to see the available levels for each facility.
    • Levels describe the severity of the message and are listed in order of the severity of the messages they handle. Generally, higher levels contain all the messages for lower levels.
    • For example, the Alert level will generally also report all messages from the Emergency level, and the Debug level will generally also report all messages for all levels.
  3. For each facility list, select the appropriate level. The default is set at Error.
    Table 1. Facility log levels and severity
    Log Level Level Definition Severity
    Emergency Specifies the emergency system panic messages. Minimum
    Alert Serious errors that require administrator intervention. Low
    Critical Critical errors, including hardware and file system failures. Low
    Error Non-critical, but possibly very important, error messages. Low
    Warning Warning messages that should at least be logged for review. Medium
    Notice Messages that contain useful information, but may be ignored. Medium
    Information Messages that contain useful information, but may be ignored. High
    Debug Messages that are only necessary for troubleshooting. Maximum
  4. Click Save.

You have now completed creating your SSL Orchestrator logs settings.

Creating a new outbound interception rule

Before creating a new outbound interception rule, make sure you complete all required areas in the deployment settings, create all the services you require with supporting VLAN network settings. For more information, refer to the Configuring deployment settings and Create F5 SSL Orchestrator services sections in this document.

You can use the outbound interception rules screen to create a new security policy settings for your deployment.

Note: Fields marked with a blue ribbon are required fields that must be completed before you can finish a task.
Note: Depending on the Interception Rules settings you configure, you may see only some of the screen elements described here.
  1. On the Main tab, click SSL Orchestrator > Interception Rules . The Interception Rules screen opens.
  2. Click Create Outbound Rule. The New Outbound Rule screen opens.
  3. In the Name field, type the name of new outbound interception rule.
  4. In the Description field, type a short description of your interception rule setting.
  5. From the Configuration list, select either Basic or Advanced.

    By selecting the Advanced setting, additional client and server TCP profile and iRules settings appears for additional settings.

  6. In the Label field, the default setting Outbound is displayed.
  7. From the Protocol list, select the protocol of the connection (TCP or UDP). Choose Other if you want to allow any other protocol.
  8. In the Source Address field, type the source IP address of the connection.

    It is best to assign addresses which are adjacent and grouped under a CIDR mask. For example, 203.0.113.8 up through 203.0.113.15 which fill 203.0.113.8/29.

  9. In the Destination Address/Mask field, type the destination IP address and mask information of the connection.

    It is best to assign addresses which are adjacent and grouped under a CIDR mask. For example, 203.0.113.8 up through 203.0.113.15 which fill 203.0.113.8/29.

  10. In the Service Port field, type the service port number, from 0 to 65535.
  11. In the VLANs field, specify one of the available VLANs or click Create New to open the New Network VLANs screen where you can define new VLAN settings.
    Note: If you are configuring a new network VLAN, the New Network screen opens. Follow the task steps found in the Configuring network VLANs section of this guide to complete your new VLAN settings. Once you have completed your new VLAN settings click Finished and SSL Orchestrator returns you to the Install Default Outbound Rules screen to continue your configuration.
  12. From the Client TCP Profile list, select the client TCP profile setting.
  13. From the Server TPC Profile list, select the server TCP profile setting.
  14. From the SSL list, select your SSL management setting or click Create New to open the SSL Management screen to update or create new SSL settings.
    Note: If you are creating new SSL settings, the SSL Management screen opens. Once you have completed your SSL settings and click Finished, SSL Orchestrator returns you to the New Outbound Rule screen to continue your configuration.
  15. From the L7 Profile Type list, click Create New or select one of the following L7 profile types:
    • None
    • IMAP
    • SMTPS
    • POP3
    • FTP
    • HTTP
  16. From the L7 Profile list, select an L7 profile that associates with the L7 profile type or click Create New to create a new profile.
  17. In the Explicit Proxy field, select the check box if you want to designate your policy as an explicit proxy.
  18. From the Access Profile list, select an access profile setting.
  19. From the Per Request Policy list, select a per request policy or click Edit to open the New Policy creation screen for TCP and UDP service chaining.
    Note: If you are creating a new per-request policy, the New Policy screen opens with the Available Services fields automatically pre-populated with any services you created after completing the deployment settings. Follow the task steps found in the Creating a new per-request policy section of this guide to complete your new policy settings. Once you have completed your new policy settings click Finished and SSL Orchestrator returns you to the New Outbound Rule screen to continue your configuration.
  20. In the iRules field, specify the Available iRules you want to select and move them to the Selected field.
  21. From the Pool list, select the desired pool settings.
  22. Click Finished.
You have now completed creating your new outbound interception rule.
Note: To manage and modify your new per-request policy, select the new policy from the policy list ( SSL Orchestrator > Policies > Access Per-Request Policies ) and see the Overview: Using the F5 SSL Orchestrator visual policy editor section for more details.

Creating a new inbound interception rule

Before creating a new inbound interceptin rule, make sure you complete all required areas in the deployment settings, create all the services you require with supporting VLAN network settings. For more information, refer to the Configuring deployment settings and Create F5 SSL Orchestrator services sections in this document.

You can use the inbound interception rules screen to create inbound (reverse proxy) listeners. For example, you can setup a gateway where SSL Orchestrator sits in front of your applications (or a separate ADC to do inspections) where a wildcard or SAN certificate is used to decrypt traffic. Your inbound interception rules can also be optionally (through advanced properties) configured to service individual applications.

Note: Fields marked with a blue ribbon are required fields that must be completed before you can finish a task.
Note: Depending on the Interception Rules settings you configure, you may see only some of the screen elements described here.
  1. On the Main tab, click SSL Orchestrator > Interception Rules . The Interception Rules screen opens.
  2. Click Create Inbound Rule. The New Inbound Rule screen opens.
  3. In the Name field, type the name of new inbound interception rule.
  4. In the Description field, type a short description of your interception rule setting.
  5. From the Configuration list, select either Basic or Advanced.

    By selecting the Advanced setting, additional client and server TCP profile and iRules settings appears for additional settings.

  6. In the Label field, the default setting Inbound is displayed.
  7. From the Protocol list, select the protocol of the connection (TCP or UDP). Choose Other if you want to allow any other protocol.
  8. In the Source Address field, type the source IP address of the connection.

    It is best to assign addresses which are adjacent and grouped under a CIDR mask. For example, 203.0.113.8 up through 203.0.113.15 which fill 203.0.113.8/29.

  9. In the Destination Address/Mask field, type the destination IP address and mask information of the connection.

    It is best to assign addresses which are adjacent and grouped under a CIDR mask. For example, 203.0.113.8 up through 203.0.113.15 which fill 203.0.113.8/29.

  10. In the Service Port field, type the service port number, from 0 to 65535.
  11. From the Client TCP Profile list, select the client TCP profile setting.
  12. From the Server TPC Profile list, select the server TCP profile setting.
  13. From the SSL list, select your SSL management setting or click Create New to open the SSL Management screen to update or create new SSL settings.

    For inbound rules, you must select the SSL inbound reverse proxy setting. If no reverse proxy setting is available, you must create a new SSL inbound reverse proxy setting.

    Note: If you are creating a new SSL inbound reverse proxy setting, in the Forward Proxy field, make sure the Enabled check box is not selected. For inbound traffic the check box must be empty.
  14. From the L7 Profile Type list, click Create New or select one of the following L7 profile types:
    • None
    • IMAP
    • SMTPS
    • POP3
    • FTP
    • HTTP
  15. From the L7 Profile list, select an L7 profile that associates with the L7 profile type or click Create New to create a new profile.
  16. From the Access Profile list, select an access profile setting.
  17. From the Per Request Policy list, select a per request policy or click Edit to open the New Policy creation screen for TCP and UDP service chaining.
    Note: If you are creating a new per-request policy, the New Policy screen opens with the Available Services fields automatically pre-populated with any services you created after completing the Services settings. Follow the task steps found in the Creating a new per-request policy section of this guide to complete your new policy settings. Once you have completed your new policy settings click Finished and SSL Orchestrator returns you to the New Inbound Rule screen to continue your configuration.
  18. In the VLANs field, specify one of the available VLANs or click Create New to open the New Network VLANs screen where you can define new VLAN settings.
    Note: If you are configuring a new network VLAN, the New Network screen opens. Follow the task steps found in the Configuring network VLANs section of this guide to complete your new VLAN settings. Once you have completed your new VLAN settings click Finished and SSL Orchestrator returns you to the Install Default Outbound Rules screen to continue your configuration.
  19. In the iRules field, specify the Available iRules you want to select and move them to the Selected field.
  20. From the Pool list, select the desired pool settings.
  21. Click Finished.
You have now completed creating your new inbound interception rule.
Note: To manage and modify your new per-request policy, select the new policy from the policy list ( SSL Orchestrator > Policies > Access Per-Request Policies ) and see the Overview: Using the F5 SSL Orchestrator visual policy editor section for more details.

Overview: Using the F5 SSL Orchestrator visual policy editor

This section provides an overview of the SSL Orchestrator visual policy editor (VPE) and how to manage your policies created during the configuration of your deployment. The visual policy editor is a screen on which to configure a per-session policy (also known as an access policy) or a per-request policy using visual elements.

For more detailed information on VPE, see the F5's BIG-IP Access Policy Manager: Visual Policy Editor guide.

Assumptions and dependencies

  • You have completed an SSL Orchestrator deployment by creating all necessary:
    • Services (such as HTTP, ICAP, L2/L3 inline, and TAP settings).
    • Network VLANs.
    • SSL security settings.
    • Initial per-request policy service chaining settings.
    • Interception rules.
  • You can view the list of your per-request policies from the Access Per-Request Policies list page (the SSL Orchestrator > Policies > Access Per-Request Policies screen) and from the Access menu page ( Access > Profiles/Policies > Per-Request Policies ).

About the visual policy editor

The visual policy editor is a screen on which to configure a per-session policy (also known as an access policy) or a per-request policy using visual elements.

About the SSL Orchestrator visual policy editor

The SSL Orchestrator visual policy editor (VPE) is accessible from within SSL Orchestrator. Newly created rules appear on the Access Per-Request Policies list page (the SSL Orchestrator > Policies > Access Per-Request Policies screen). For each rule name you want to manage, select + Show All in the Per-Request Policy column. The SSL Orchestrator VPE screen opens.

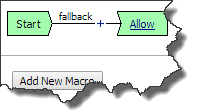
The SSL Orchestrator VPE screen displays a diagram with a complete SSL Orchestrator deployment represented in visual elements. Each element, or box, represents a corresponding macro whose information (and output) influences the next element and its macro, until the traffic is either allowed or blocked.

You can view each macro in detail by either selecting the visual element's blue link or by expanding the corresponding macro + sign below the main figure. Macros that have been configured are signified by the Use Count number (showing a 1 or more). Macros that have not been configured show a Use Count of 0. Macros with a red star next to the macro’s title signify that the required options have not yet been completed.

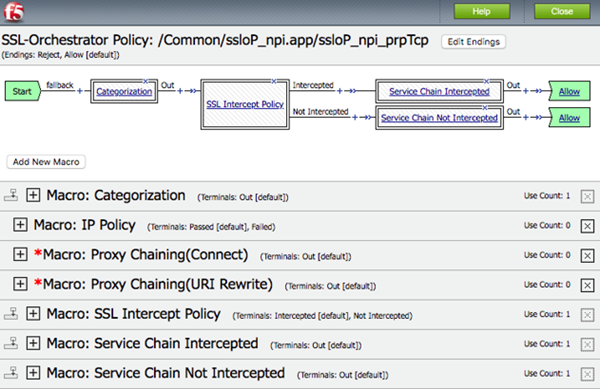
SSL Orchestrator Policy within the VPE

When you select the Categorization visual element and open its macro, you can follow the flow chart and determine what happens to the output of that individual element, which is then fed into the next element’s macro.

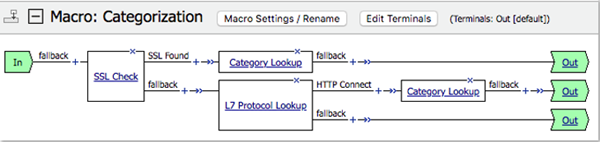
Macro: Categorization

Like the Categorization element, you can select other elements along the flow of the main policy, such as the SSL Intercept Policy visual element link, to view its detailed macro information.

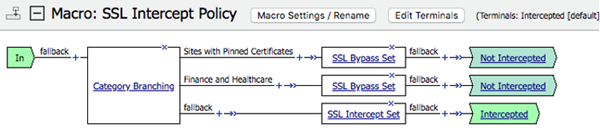
Macro: SSL Intercept Policy

If you select the Service Chain Intercepted link from the main policy, its macro appears. From within that macro, you can also select other visual elements such as the Service Connect link.

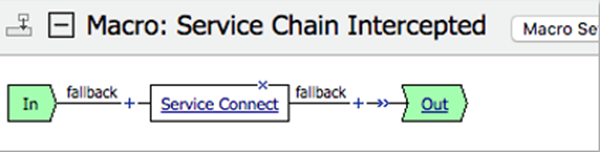
Macro: Service Chain Intercepted

By doing so, you launch a screen with the Service Connect Properties and Branch information that detail, for example, the HTTP service you configured earlier during the SSL Orchestrator basic deployment with HTTP services.

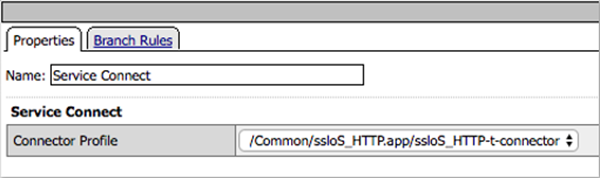
Service Connect Properties and Branch Rules screen

For more information on the VPE conventions and per-session and per-request policies, see the other sections below in this guide.

For further detailed information on how to create a per-request policy and per-session policy from within Access, see the BIG-IP Access Policy Manager: Visual Policy Editor guide.

Visual policy editor conventions

This table provides a visual dictionary for the visual policy editor.

Visual element Element type Description
Green Start icon Initial access policy and initial per-request policy When an access profile is created, usually an initial access policy is also created. A per-request policy starts with similar initial elements.
Green Start icon Start Every access policy and per-request policy contains a start.
branch connects one object to another Branch A branch connects an action to another action or to an ending.
branch connects one object to another Add an action Clicking this icon causes a screen to open with available actions for selection.
Logon page action displays as a rectangle Action Clicking the name of an action, such as Logon Page, opens a screen with properties and rules for the action. Clicking the x deletes the action from the access policy.
Red asterisk in AD Auth action Action that requires some configuration The red asterisk indicates that some properties must be configured. Clicking the name opens a screen with properties for the action.
Ending Ending Each branch has an ending. An access policy includes Allow or Deny endings. A per-request policy includes Allow or Reject endings.
Configure an ending Configure ending Clicking the name of an ending opens a popup screen.
Configure a macrocall Add a macro for use in the access policy Opens a screen for macro template selection. After addition, the macro is available for configuration and for use as an action item.
Macro ready to configure Macro added for use Added macros display under the access policy. Clicking the plus (+) sign expands the macro for configuration of the actions in it.
Logon page action displays as a rectangle Macrocall in an access policy Clicking the macrocall name expands the macro in the area below the access policy.
Logon page action displays as a rectangle Apply Access Policy Clicking it commits changes. The visual policy editor displays this link when any changes remain uncommitted.

About actions on the add item screen

The actions that are available on any given tab of the add item screen depend on the access profile type, such as LTM-APM (for web access) or SSL-VPN (for remote access), and so on. Only actions that are appropriate for the access profile type will display.

branch connects one object to another

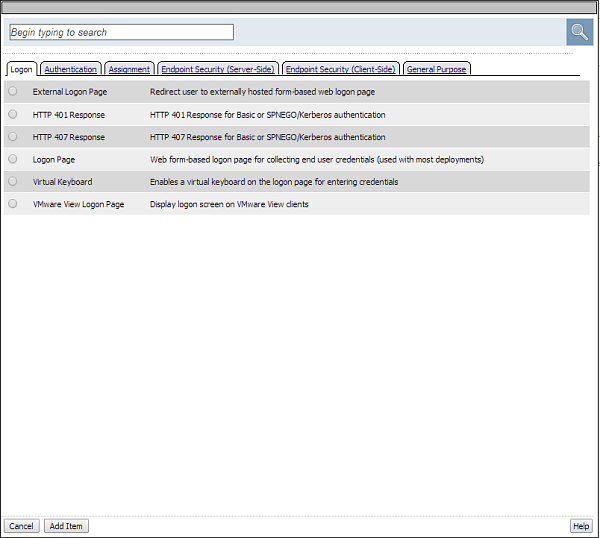
Add action item screen

About macrocalls on the add item screen

The Macrocalls tab displays when one or more macros has been added for use in the access policy. When adding an access policy item to a macro, the Macrocalls tab displays unless adding a macrocall would create a misconfiguration, such as causing a macro loop or causing a series of macrocalls to exceed a depth of three.

Note: Macrocalls can be added to any access policy. Macrocalls cannot be shared across access policies.
branch connects one object to another

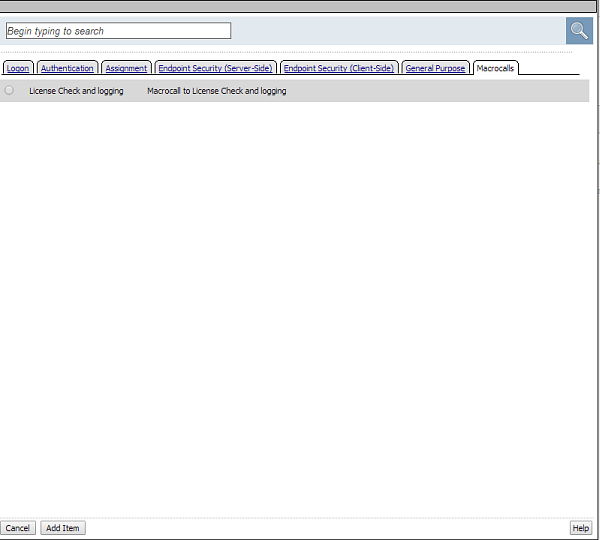
Macrocalls tab on the add item screen

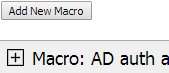
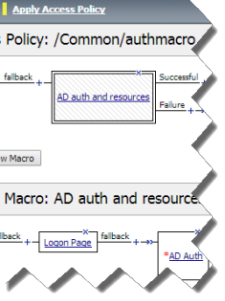
About macros and macrocalls

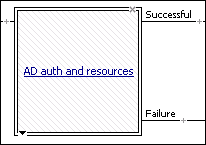
A macro is a collection of access policy actions that provide common access policy functions. For example, AD auth and resources is a preconfigured macro template. It supplies a logon page, an Active Directory authentication action, and a resource assignment action. The properties and rules for the actions are configurable.

After a macro is configured, it can be placed into the access policy by adding a macrocall. A macrocall is an action that performs the functions defined in a macro.

A macro contains actions and terminals and can include macrocalls.

Access policy actions
Any available action or series of actions.
Macrocalls
Calls to other macros (nested macros).
Terminals
An endpoint in a macro. Default terminals are Successful and Failure. Terminals are configurable and can be added and deleted.

Terminals defined in the macro display as the branches that follow the macrocall after it has been added to the access policy.

About maximum depth for nested macros in an access policy

In an access policy, a macro can make a macrocall to another macro until up to three macros have been called in series.

shows macros 1 through macro 4, the equivalent of 3 macros deep

The maximum depth of macrocalls

About access policy endings

An ending provides a result for an access policy branch. An ending for an access policy branch can be one of three types.

Allow
Starts the SSL VPN session and loads assigned resources and a webtop, if assigned, for the user. Typically, you assign this when the user passes specific checks.
Deny
Disallows the SSL VPN session and shows the user an access denied web page. Typically, you assign this when the user does not have access to resources, or fails authentication. Alternatively after a session starts, shows a URL filter denied web page after a per-request policy rejects a request for a URL.
Redirect
Redirects the client to the URL specified in the ending configuration. You can define a redirect URL for each redirect ending. Typically, you can assign a redirect when the user requires remediation or a separate resource. For example, a user who fails the antivirus check because virus definitions are out of date can be redirected to the software manufacturer's site to get an antivirus update.

About maximum expression size for visual policy editor

The maximum size for an expression in the visual policy editor is 64 KB. The visual policy editor cannot save an expression that exceeds this limit.

About per-session and per-request policies

Access Policy Manager® (APM®) provides two types of policies.

Per-session policy
The per-session policy runs when a client initiates a session. (A per-session policy is also known as an access policy.) Depending on the actions you include in the access policy, it can authenticate the user and perform other actions that populate session variables with data for use throughout the session.
Per-request policy
After a session starts, a per-request policy runs each time the client makes an HTTP or HTTPS request. A per-request policy can include a subroutine, which starts a subsession. Multiple subsessions can exist at one time.

One access policy and one per-request policy are specified in a virtual server.

About per-request policies and the Apply Access Policy link

The Apply Access Policy link has no effect on a per-request policy. Conversely, updates made to a per-request policy do not affect the state of the Apply Access Policy link.

About per-request policies and nested macros

Access Policy Manager® (APM®) supports calling a macro from a per-request policy and calling a subroutine macro from a per-request policy subroutine. However, APM does not support calling any type of macro from a per-request policy macro or from a per-request policy subroutine macro.

About per-request policy subroutines

A per-request policy subroutine is a collection of actions. What distinguishes a subroutine from other collections of actions (such as macros), is that a subroutine starts a subsession that, for its duration, controls user access to specified resources. Subroutine properties not only specify resources but also specify subsession timeout values and maximum subsession duration.

About subsessions

A subsession starts when a subroutine runs and continues until reaching the maximum lifetime specified in the subroutine properties, or until the session terminates. A subsession does not count against license limits. A subsession populates subsession variables that are available for the duration of the subsession. Subsession variables and events that occur during a subsession are logged. Multiple subsessions can exist at the same time.

About access policy item configuration

An access policy item is a small action, or rule, that serves a specific purpose in an access policy. Access policy items are all added to the access policy in the same way; but in most cases, each access policy item must be configured individually. In Access Policy Manager®, an access policy item is one of five types.

Item type Configuration details Examples
Blank item This type of access policy item has no explicit configuration on the configuration page, and can be configured to verify a wide range of conditions with Expression screens.
  • General Purpose: Empty action
  • Endpoint Security (Client-Side): Machine Info
Preconfigured branch rule item This type of access policy item has no explicit configuration on the configuration page, and a preconfigured set of rules on the Branch Rules page.
  • Endpoint Security (Server-Side): IP Reputation
  • Endpoint Security (Client-Side): Windows Info
Properties page configuration item This type of access policy has all standard configuration options on the configuration page, to verify the required information, prompt for information, or another action.
  • General Purpose: Logon Page action
  • Endpoint Security (Client-Side): Antivirus
Assignment item An assignment action allows configuration on the configuration page, and contains a list of available resources of a certain type, and allows you to select one or multiple resources to assign. Some resource assignment actions, such as Webtop, Links and Sections Assign, allow you to assign multiple items of different types. Advanced Resource Assign is a special case that allows you to select and assign multiple resources of different types at once.
  • Assignment: Pool Assign
  • Assignment: Webtop, Links and Sections Assign
Mapping assignment item A mapping assignment action allows you to assign one variable or resource to the value of another variable or resource. This kind of assign action includes the assignment of resources or variables on a separate page, linked from the main screen.
  • Assignment: AD Group Resource Assign
  • Assignment: Variable Assign
Note: When naming VPE objects, APM removes special characters such as exclamation marks, equal signs, and brackets before saving the objects. The following characters are allowed: ( ) - _ + [ ].

Adding a blank access policy item to an access policy

Before you start this task, configure an access profile.
Configure a blank item to configure one of several actions that has no explicit configuration defined.
  1. On the Main tab, click Access > Profiles / Policies .
    The Access Profiles (Per-Session Policies) screen opens.
  2. In the Per-Session Policy column, click the Edit link for the access profile you want to configure.
    The visual policy editor opens the access policy in a separate screen.
  3. Click the (+) icon anywhere in the access policy to add a new item.
    Note: Only an applicable subset of access policy items is available for selection in the visual policy editor for any access profile type.
    A popup screen opens, listing predefined actions on tabs such as General Purpose, Authentication, and so on.
  4. Select a blank action:
    Option Description
    Endpoint Security (Client-Side) > Machine Info Collects machine info, and checks it against established values.
    General Purpose > Empty An empty action that you can configure with any allowed checks.
    A properties screen opens.
  5. Click the Branch Rules tab.
    The Branch Rules screen opens.
  6. Click the Add Branch Rule button.
    New Name and Expression settings display.
  7. Click the change link in the Expression area.
    A popup screen opens.
  8. Click Add Expression.
    New properties display.
  9. For each expression you add, select an agent from the Agent Sel. list, a condition from the Condition list, and configure any details.
    See the reference information for each action for more details.
  10. Click Add Expression to add the expression to the list.
  11. Add more expressions to the check as required. You can add expressions as either AND or OR conditions.
  12. Click Finished.
    The popup screen closes.
  13. Click Save.
    The properties screen closes and the policy displays.
The access policy is configured with the empty action you have configured.
Click the Apply Access Policy link to apply and activate your changes to this access policy.
Note: To ensure that logging is configured to meet your requirements, verify the log settings for the access profile.

Adding an access policy item with preconfigured branch rules

Before you start this task, configure an access profile.
Configure an access policy with preconfigured branch rules to add preconfigured settings and branches to an access policy.
  1. On the Main tab, click Access > Profiles / Policies .
    The Access Profiles (Per-Session Policies) screen opens.
  2. In the Per-Session Policy column, click the Edit link for the access profile you want to configure.
    The visual policy editor opens the access policy in a separate screen.
  3. Click the (+) icon anywhere in the access policy to add a new item.
    Note: Only an applicable subset of access policy items is available for selection in the visual policy editor for any access profile type.
    A popup screen opens, listing predefined actions on tabs such as General Purpose, Authentication, and so on.
  4. Select an action with preconfigured branch rules, and click Add Item:
    Option Description
    Endpoint Security (Server-Side) > Client for MS Exchange Checks that the system is a client for Microsoft Exchange.
    Endpoint Security (Server-Side) > Client OS Provides branches based on the result of an operating system check on the client.
    Endpoint Security (Server-Side) > Client Type Provides branches based on the result of an client type check.
    Endpoint Security (Server-Side) > Client-Side Capability Checks whether the client can run client side checks and provides positive and fallback branches.
    Endpoint Security (Server-Side) > Date Time Provides branches based on a certain date or time.
    Endpoint Security (Server-Side) > IP Geolocation Match Provides branches based on a specific geographic origin for the client.
    Endpoint Security (Server-Side) > IP Reputation Checks the client IP against an IP reputation database.
    Endpoint Security (Server-Side) > Jailbroken or Rooted Device Detection Provides branches based on whether the device appears to be jailbroken or rooted.
    Endpoint Security (Server-Side) > Landing URI Provides branches based on a specific landing URI.
    Endpoint Security (Server-Side) > License Provides branches based on the available global APM licenses.
    Endpoint Security (Client-Side) > Windows Info Provides branches based on specific Windows information, such as operating system type and patch level.
    A properties screen opens.
  5. Click the Branch Rules tab.
    The Branch Rules screen opens.
  6. View the preconfigured branch rules.
    You can make changes to the branch rules, or close the item.
  7. Click Save.
    The properties screen closes and the policy displays.
The access policy is saved with the action you have configured.
Click the Apply Access Policy link to apply and activate your changes to this access policy.
Note: To ensure that logging is configured to meet your requirements, verify the log settings for the access profile.

Adding an access policy item with configurable properties

Before you start this task, configure an access profile.
Configure an access policy with configurable properties to check for specific items or policies.
  1. On the Main tab, click Access > Profiles / Policies .
    The Access Profiles (Per-Session Policies) screen opens.
  2. In the Per-Session Policy column, click the Edit link for the access profile you want to configure.
    The visual policy editor opens the access policy in a separate screen.
  3. Click the (+) icon anywhere in the access policy to add a new item.
    Note: Only an applicable subset of access policy items is available for selection in the visual policy editor for any access profile type.
    A popup screen opens, listing predefined actions on tabs such as General Purpose, Authentication, and so on.
  4. Select an action with configurable properties, then click Add Item:
    Option Description
    Logon > External Logon Page Presents an external logon page for the client.
    Logon > HTTP 401 Response Provides a custom HTTP 401 logon page.
    Logon > HTTP 407 Response Provides a custom HTTP 407 logon page.
    Logon > Logon Page Provides a custom logon page that you can configure entirely from the properties screen.
    Logon > Virtual Keyboard Provides a configurable virtual keyboard for logon information entry.
    Logon > VMware View Logon Page Provides a custom logon page for VMware View.
    Endpoint Security (Client-Side) > Anti-Spyware Checks that the client is running specified anti-spyware software.
    Endpoint Security (Client-Side) > Antivirus Checks that the client is running specified antivirus software.
    Endpoint Security (Client-Side) > Firewall Checks that the client is running specified firewall software.
    Endpoint Security (Client-Side) > Hard Disk Encryption Checks that the client hard disk is encrypted.
    Endpoint Security (Client-Side) > Linux File Allows a check for a specific file with specified properties on a Linux system.
    Endpoint Security (Client-Side) > Linux Process Allows a check for a specific process on Linux systems.
    Endpoint Security (Client-Side) > Mac File Allows a check for a specific file with specified properties on a Mac.
    Endpoint Security (Client-Side) > Mac Process Allows a check for a specific process on a Mac.
    Endpoint Security (Client-Side) > Machine Cert Auth Allows a check for a machine certificate.
    Endpoint Security (Client-Side) > Patch Management Allows a check for patches to specific files.
    Endpoint Security (Client-Side) > Peer-to-peer Allows a check for peer to peer software on a system.
    Endpoint Security (Client-Side) > Windows Cache and Session Control Allows you to configure Windows clients to clean certain items after the session closes.
    Endpoint Security (Client-Side) > Windows File Allows a check for a specific file with specified properties on Windows systems.
    Endpoint Security (Client-Side) > Windows Health Agent Allows a check for a health agent on Windows systems.
    Endpoint Security (Client-Side) > Windows Process Allows a check for a specific process on Windows systems.
    Endpoint Security (Client-Side) > Windows Protected Workspace Allows configuration of a protected workspace in Windows.
    Endpoint Security (Client-Side) > Windows Registry Allows a check for a specific registry value in Windows.
    General Purpose > Decision Box Allows configuration of a choice of two branches for the user, with custom text describing each choice.
    General Purpose > Email Sends an email, when reached in the access policy.
    General Purpose > iRule Event Allows configuration of a choice of two branches for the user, with custom text describing each choice.
    General Purpose > Local Database Allows you to add entries to a local database.
    General Purpose > Logging Allows you to log a session variable result.
    General Purpose > Message Box Shows a message, and requires the user to click to continue.
    A properties screen opens.
  5. Configure the properties for the item.
  6. Click Save.
    The properties screen closes and the policy displays.
The access policy is configured with the empty action you have configured.
Click the Apply Access Policy link to apply and activate your changes to this access policy.
Note: To ensure that logging is configured to meet your requirements, verify the log settings for the access profile.

Adding an access policy assignment item

Before you can add an access policy assignment item, you need to configure an access profile.
Configure an access policy with an assignment action to assign a resource, local traffic pool, ACL, profile, or other item. Each assignment action works differently and assigns different items.
  1. On the Main tab, click Access > Profiles / Policies .
    The Access Profiles (Per-Session Policies) screen opens.
  2. In the Per-Session Policy column, click the Edit link for the access profile you want to configure.
    The visual policy editor opens the access policy in a separate screen.
  3. Click the (+) icon anywhere in the access policy to add a new item.
    Note: Only an applicable subset of access policy items is available for selection in the visual policy editor for any access profile type.
    A popup screen opens, listing predefined actions on tabs such as General Purpose, Authentication, and so on.
  4. Select an assignment action, then click Add Item:
    Option Description
    Assignment > ACL Assign Assigns an ACL to the access policy branch.
    Assignment > Advanced Resource Assign Directly assigns all types of resources.
    Assignment > BWC Policy Assigns a Bandwidth Controller policy to an access policy branch.
    Assignment > Citrix Smart Access Assigns a Citrix Smart Access filter to an access policy branch.
    Assignment > Dynamic ACL Assigns a dynamic ACL to an access policy branch.
    Assignment > Resource Assign Allows you to assign connection resources, remote desktops, and SAML resources.
    Assignment > Route Domain and SNAT Selection Allows you to assign a route domain, SNAT, and SNAT pool to an access policy branch.
    Assignment > SSO Credential Mapping Allows you to assign attributes for the SSO username and password.
    Assignment > Webtop, Links and Sections Assign Allows you to assign a webtop, webtop links, and webtop sections to an access policy branch.
    A properties screen opens.
  5. Configure the properties for the item.
  6. Click Save.
    The properties screen closes and the policy displays.
The access policy is configured with the assignment action you have configured.
Click the Apply Access Policy link to apply and activate your changes to this access policy.
Note: To ensure that logging is configured to meet your requirements, verify the log settings for the access profile.

Adding an access policy mapping item

Before you start this task, configure an access profile.
Configure an access policy with a mapping action to map resources or variables of one type to another type or value. Each mapping action works differently and assigns different items.
  1. On the Main tab, click Access > Profiles / Policies .
    The Access Profiles (Per-Session Policies) screen opens.
  2. In the Per-Session Policy column, click the Edit link for the access profile you want to configure.
    The visual policy editor opens the access policy in a separate screen.
  3. Click the (+) icon anywhere in the access policy to add a new item.
    Note: Only an applicable subset of access policy items is available for selection in the visual policy editor for any access profile type.
    A popup screen opens, listing predefined actions on tabs such as General Purpose, Authentication, and so on.
  4. Select a mapping action, then click Add Item:
    Option Description
    Assignment > AD Group Resource Assign Maps resources from an Active Directory group to access policy resources.
    Assignment > LDAP Group Resource Assign Maps resources from an LDAP group to access policy resources.
    Assignment > Variable Assign Allows you to assign predefined or custom variables to attributes, values, text, or expressions.
    A properties screen opens.
  5. For the Variable assign action, click the Add new entry button.
    The AD and LDAP Group Assign actions already include an entry.
  6. Click the Edit link.
  7. Configure the settings for the assign action.
    For the AD or LDAP group resource assign action, type the name of the group, then click Add group manually.
  8. Configure the mapping items.
    Refer to the specific documentation for each item to map items.
  9. Click Save.
    The properties screen closes and the policy displays.
The access policy is configured with the assignment action you have configured.
Click the Apply Access Policy link to apply and activate your changes to this access policy.
Note: To ensure that logging is configured to meet your requirements, verify the log settings for the access profile.