Updated Date: 07/07/2026
CRLDP Authentication
Access Policy Manager supports retrieving Certificate Revocation Lists (CRLs) from network locations (distribution points). A Certificate Revocation List Distribution Point (CRLDP) AAA server defines how to access a CRL file from a distribution point. A distribution point is either an LDAP Uniform Resource Identifier (URI), a directory path that identifies the location where the CRLs are published, or a fully qualified HTTP URL.
Using AAA high availability with Access Policy Manager (APM®), you can configure multiple authentication servers to process requests, so that if one authentication server goes down or loses connectivity, the others can resume authentication requests, and new sessions can be established, as usual.
Note: Although new authentications fail if the BIG-IP system loses connectivity to the server, existing sessions are unaffected provided that they do not attempt to re-authenticate.
APM supports the following AAA servers for high availability: RADIUS, Active Directory, LDAP, CRLDP, and TACACS+. APM supports high availability by providing the option to create a pool of server connections when you configure the supported type of AAA server.
Note: If you use AAA with pools, such as RADIUS pools or Active Directory pools, APM assigns each pool member with a different number for the pool member’s priority group value. APM must define each pool member with a different priority group because AAA load balancing is not used. The priority group number increases automatically with each created pool member. Alternative AAA pool configurations can be defined manually using the full flexibility of Local Traffic Manager (LTM) if high availability is desired.
If you are adding CRLDP items to an existing access policy, you do not need to create another access profile.
Create a CRLDP AAA configuration to specify how to access certificate revocation lists (CRLs).
-
On the Main tab, click Access > Authentication > CRLDP.
The CRLDP Servers list screen opens.
-
Click Create.
The New Server properties screen opens.
-
In the Name field, type a unique name for the authentication server.
-
For the Server Connection setting, select one of these options:
-
Select Use Pool to set up high availability for the AAA server.
Note: If you select Use Pool, the Timeout value does not apply.
-
Select Direct to set up the AAA server for standalone functionality.
-
Select No Server to use a fully qualified HTTP URL as the CRL location.
Note: The BIG-IP system uses the URI from the user’s certificate.
Note: When you select No Server, the screen updates to omit the fields that are not necessary, such as Server Addresses, Server Port, and so on.
-
-
If you selected Use Pool, type a name in the Server Pool Name field.
You create a pool of servers on this screen.
-
Provide the addresses required for your server connection:
-
If you selected Direct, type an IP address in the Server Address field.
-
If you selected Use Pool, for each pool member you want to add, type an IP address in the Server Addresses field and click Add.
Note: When you configure a pool, you have the option to type the server address in route domain format:
**IPAddress**%*RouteDomain*.
-
-
If you selected Use Pool, you have the option to select a Server Pool Monitor to track the health of the server pool.
-
If you specified Use Pool or Direct for the server connection, the Base DN field displays; type a CRLDP base distinguished name into it.
This setting applies for certificates that specify the CRL distribution point in directory name (dirName) format. Access Policy Manager uses the Base DN when the value of the X509v3 attribute,
crlDistributionPoints, is of typedirName. In this case, Access Policy Manager tries to match the value of the crlDistributionPoints attribute to the Base DN value. An example of a Base DN value iscn=lxxx,dc=f5,dc=com.Note: If the client certificate includes the distribution point extension in LDAP URI format, the IP address, Base DN, and Reverse DN settings configured on the agent are ignored; they are specific to directory-based CRLDP. All other settings are applicable to both LDAP URI and directory-based CRL DPs.
-
Click Finished.
The new server displays on the list.
An CRLDP AAA server is available for use in a CRLDP Auth agent in an access policy.
You create an access profile to provide the access policy configuration for a virtual server that establishes a secured session.
-
On the Main tab, click Access > Profiles / Policies.
The Access Profiles (Per-Session Policies) screen opens.
-
Click Create.
The New Profile screen opens.
-
In the Name field, type a name for the access profile.
Note: A access profile name must be unique among all access profile and any per-request policy names.
-
From the Profile Type list, select one these options:
-
LTM-APM: Select for a web access management configuration.
-
SSL-VPN: Select to configure network access, portal access, or application access. (Most access policy items are available for this type.)
-
ALL: Select to support LTM-APM and SSL-VPN access types.
-
SSO: Select to configure matching virtual servers for Single Sign-On (SSO).
Note: No access policy is associated with this type of access profile
-
RDG-RAP: Select to validate connections to hosts behind APM when APM acts as a gateway for RDP clients.
-
SWG - Explicit: Select to configure access using Secure Web Gateway explicit forward proxy.
-
SWG - Transparent: Select to configure access using Secure Web Gateway transparent forward proxy.
-
System Authentication: Select to configure administrator access to the BIG-IP system (when using APM as a pluggable authentication module).
-
Identity Service: Used internally to provide identity service for a supported integration. Only APM creates this type of profile.
Note: You can edit Identity Service profile properties.
Note: Depending on licensing, you might not see all of these profile types.
Additional settings display.
-
-
From the Profile Scope list, select one these options to define user scope:
- Profile: Access to resources behind the profile.
- Virtual Server: Access to resources behind the virtual server.
- Global: Access to resources behind any access profile with global scope.
- Named: Access for SSL Orchestrator users to resources behind any access profile with global scope.
- Public: Access to resources that are behind the same access profile when the Named scope has configured the session and is checked based on the value and string configured in the Named scope field.
-
In the Language Settings area, add and remove accepted languages, and set the default language.
A browser uses the highest priority accepted language. If no browser language matches the accepted languages list, the browser uses the default language.
-
Click Finished.
The access profile displays in the Access Profiles List. Default-log-setting is assigned to the access profile.
Confirm that the correct log settings are selected for the access profile to ensure that events are logged as you intend.
Note: Log settings are configured in the Access > Overview > Event Log > Settings area of the product. They enable and disable logging for access system and URL request filtering events. Log settings also specify log publishers that send log messages to specified destinations.
-
On the Main tab, click Access > Profiles / Policies.
The Access Profiles (Per-Session Policies) screen opens.
-
Click the name of the access profile that you want to edit.
The properties screen opens.
-
On the menu bar, click Logs.
The access profile log settings display.
-
Move log settings between the Available and Selected lists.
You can assign up to three log settings that enable access system logging to an access profile. You can assign additional log settings to an access profile provided that they enable logging for URl request logging only.
Note: Logging is disabled when the Selected list is empty.
-
Click Update.
An access profile is in effect when it is assigned to a virtual server.
You add CRLDP authentication to an access policy when you want to verify certificate revocation status before granting a user access.
-
On the Main tab, click Access > Profiles / Policies.
The Access Profiles (Per-Session Policies) screen opens.
-
In the Per-Session Policy column, click the Edit link for the access profile you want to configure.
The visual policy editor opens the access policy in a separate screen.
-
Click the (+) icon anywhere in the access policy to add a new item.
Note: Only an applicable subset of access policy items is available for selection in the visual policy editor for any access profile type.
A popup screen opens, listing predefined actions on tabs such as General Purpose, Authentication, and so on.
-
From the Authentication tab, select either Client Cert Inspection or On-Demand Cert Auth, and click Add item.
Client Cert Inspection checks the result of an SSL handshake request that occurs at the start of an SSL session. On Demand Cert Auth performs an SSL re-handshake and checks the result. The CRLDP and OCSP Auth actions require certificate information made available by one of these policy items.
-
Click Save.
The popup screen closes.
-
Click the (+) icon anywhere in the access policy to add a new item.
Note: Only an applicable subset of access policy items is available for selection in the visual policy editor for any access profile type.
A popup screen opens, listing predefined actions on tabs such as General Purpose, Authentication, and so on.
-
On the Authentication tab, select CRLDP Auth, then click Add item.
A properties popup screen opens.
-
From the CRLDP Server list, select a server.
-
Click Save.
The popup screen closes.
-
To grant access at the end of any branch, change the ending from Deny to Allow:
-
Click Deny.
The default branch ending is Deny.
A popup screen opens.
-
Select Allow and click Save.
The popup screen closes. The Allow ending displays on the branch.
-
-
Click Apply Access Policy to save your configuration.
The access policy is complete.
To apply this access policy to network traffic, add the access profile to a virtual server.
Note: To ensure that logging is configured to meet your requirements, verify the log settings for the access profile.
You need a client SSL profile to use CRLDP authentication from an access policy.
-
On the Main tab, click Local Traffic > Profiles > SSL > Client.
The Client SSL profile list screen opens.
-
Click Create.
The New Client SSL Profile screen opens.
-
In the Name field, type a unique name for the profile.
-
From the Parent Profile list, select clientssl.
-
If the access policy uses On-Demand certificate authentication, perform these substeps:
-
From the Configuration list, select Advanced.
Additional settings display.
-
Select the Custom check box for Configuration.
The settings become available.
-
In the Ciphers field, type the name of a NATIVE cipher.
The list of supported NATIVE ciphers includes these:
- RC4-MD5
- RC4-SHA
- AES128-SHA
- AES256-SHA
- DES-CBC3-SHA
- DES-CBC-SHA
- EXP1024-RC4-MD5
- EXP1024-RC4-SHA
- EXP1024-DES-CBC-SHA
- EXP-RC4-MD5
- EXP-DES-CBC-SHA
- NULL-MD5
- NULL-SHA
-
-
From the Client Certificate list, select the option that is applicable to the item you selected when you edited the policy.
- Select request if the Client Cert Inspection agent is used in the policy.
- Select ignore if the On-Demand Cert Auth agent is used.
-
From the Trusted Certificate Authorities list, select the Certificate Authority that issues the user certificates.
-
From the Advertised Certificate Authorities list, select the Certificate Authority that issues the user certificates.
-
Click Finished.
A new client SSL profile is available.
Note: CRLDP authentication does not verify a certificate revocation list if one is selected in the client SSL profile. CRLDP authentication verifies the certificate revocation list (CRL) at a distribution point defined in the CRLDP AAA server.
You associate the client SSL and access profiles with the virtual server so that the BIG-IP system handles client-side SSL traffic as specified, and so that Access Policy Managercan apply the access profile to incoming traffic.
-
On the Main tab, click Local Traffic > Virtual Servers.
The Virtual Server List screen opens.
-
Click the name of the virtual server you want to modify.
-
For the SSL Profile (Client) setting, from the Available list, select the name of the Client SSL profile you previously created and move the name to the Selected list.
-
In the Access Policy area, from the Access Profile list, select the access profile that you configured earlier.
-
Click Update to save the changes.
The access policy and client-side SSL profiles are now associated with the virtual server.
To effectively test that high availability works for your authentication servers, you should have two servers that are accessible, where you can remove one of them from the network.
Note: High availability is supported for these authentication server types only: RADIUS, Active Directory, LDAP, CRLDP, and TACACS+.
If you configured a supported authentication server type to use a pool of connection servers, you can test the configuration using these steps.
-
Begin a
tcpdumpon the Access Policy Manager, using a protocol analyzer, and scanning for packets destined for the specific port for your authentication server. -
Log in to the virtual server with both servers active.
-
Using the
tcpdumprecords, verify that the requests are being sent to the higher priority server. -
Log out of the virtual server.
-
Disable the higher-priority server.
-
Log in to the virtual server again.
-
Verify that the request is being sent to the other server.
-
Log out again, re-enabling the server, and try one more time to verify that the new requests are being sent to the high priority server.
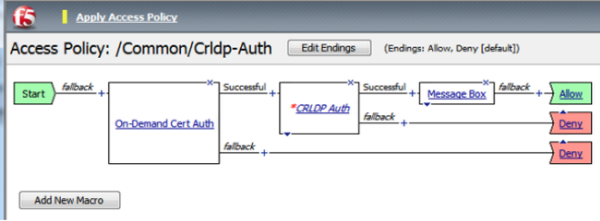
This is an example of an access policy with all the associated elements needed to retrieve CRLs using CRLDP. Notice that you must add either the Client Cert Inspection agent or On-Demand Cert Auth agent before the CRLDP object in your access policy. One of those agents is required in order to receive the X.509 certificate from the user. This is also important because both agents store the user information, as well as the issuer certificates, in the session variables. This allows the CRDLP Auth agent to check the revocation status of the user’s certificate.
When the CRLDP Auth access policy item runs, it populates session variables which are then available for use in access policy rules. The table lists the session variables for the CRLDP access policy item and for the certificate item used in the access policy.
|
Session Variable |
Description |
|---|---|
|
session.ssl.cert.whole |
Provides the client certificate received from the user in PEM format. |
|
session.ssl.cert.certissuer |
Provides the issuer certificate of the client certificate in PEM format. |
|
session.crldp.last.result |
Sets the result of the CRLDP authentication. The available values are: - 0: Failed
|
|
session.crldp.last.status |
Sets the status of the authentication to Failed. |
You might run into problems with CRLDP authentication in some instances. Follow these tips to try to resolve any issues you might encounter.
| Possible error messages | Possible explanations and corrective actions |
|---|---|
No AAA server associated with the agent |
Make sure that a valid CRLDP responder configuration is assigned to the CRLDP agent in the access policy. |
User/Issuer certificate not found for the session |
The user/issuer certificate session variables are missing. Make sure that either the Client Cert Inspection agent or On-Demand Cert Auth agent is configured in the access policy (or use a variable assignment agent to create them). |
Failure to connect to CRLDP server |
Make sure that the CRLDP server is up and running and reachable from the BIG-IP system. |
No LDAP URL found in the DP list |
Indicates that no valid CRL DP is configured on the LDAP server. Make sure that the LDAP server used in the CRLDP server configuration has valid CRL DPs configured. |
CRLDP response - Cert with serial number 'x' has been revoked |
Indicates that the status of the user certificate is revoked. |