Updated Date: 07/07/2026
Tenant Management
A tenant is a guest system running software on the F5OS platform layer (for example, a BIG-IP system). You can run several tenants on one appliance. The maximum number of lightweight tenants that can be created is 22.
For the r10000 Series, the maximum number of lightweight tenants that can be created is 36. Appliances have up to 256 GB memory, of which 95 GB is reserved for tenants. Each lightweight tenant requires a minimum of one vCPU and 4096MB minimum memory.
For the r5000 Series, the maximum number of lightweight tenants that can be created is 26. Appliances have up to 128 GB memory, of which 95 GB is reserved for tenants. Each lightweight tenant requires a minimum of one vCPU and 4096MB minimum memory.
The administrator can connect to the tenant’s webUI, CLI, or REST API and have the same experience as on their existing F5 platforms. A BIG-IP tenant on the rSeries platform is managed similarly to how a vCMP guest is managed today on the VIPRION platform. The tenant is assigned dedicated vCPU and memory resources and is restricted to specific VLANs for network connectivity.
The admin is responsible for configuring tenant deployments within the appliance. Once a tenant has been deployed, there is a per-tenant administrator role, whose responsibilities include configuring the services that are available on that tenant.
Note: Tenants inherit certain capabilities, such as the license and VLANs, from the rSeries system. Do not try to install a new license or delete the existing license on the tenants.
In this diagram, an rSeries system has up to 8 tenants (Red and Blue) that can be run on the F5OS platform.
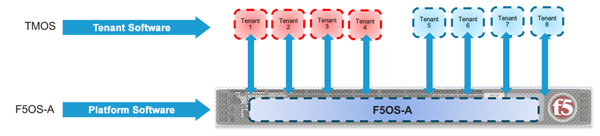
Each tenant has its own IP address, set of users, and software. You can access each tenant via the CLI, web-based user interface, or API.
After you have configured and deployed a tenant, you can use the tenant management IP address to connect to the tenant’s web-based user interface, API, or CLI. A BIG-IP tenant is running standard TMOS and is managed like any other BIG-IP instance.
These BIG-IP tenant images are available to deploy on F5 rSeries systems:
- ALL-F5OS
- T4-F5OS
- T2-F5OS
- T1-F5OS
Note: T1-F5OS has limitations so using the other images is recommended. Other images must be downloaded from the F5 downloads site.
Each image type has different uses so you need to be sure to use the correct type for your tenant needs. For additional information about tenant image types, see K45191957: Overview of the BIG-IP tenant image types.
This table lists general use cases for tenant images.
|
Tenant image |
Description of Use |
|---|---|
|
ALL-F5OS |
* See the F5 rSeries data sheet for all currently-supported features. |
|
T4-F5OS |
|
|
T2-F5OS |
|
|
T1-F5OS |
|
Each image has different sizing requirements. You will need to understand the system and the tenant requirements to determine the number and type of tenants you can deploy. The amount of memory and disk space that a tenant actually needs is dependent on the number of modules provisioned and its use.
| Tenant image | Disk size | Minimum memory | Minimum # vCPUs | Max tenants per system |
|---|---|---|---|---|
| T1-F5OS | 22 GB | 4 GB | 1 | 22 |
| T2-F5OS | 45 GB | 8 GB | 2 | 11 |
| ALL-F5OS | 76/82 GB2 | 8 GB | 2 | 9 |
| T4-F5OS | 142 GB | 8 GB | 2 | 4 |
These are recommended resource considerations for determining the amount of memory (RAM) to allocate when planning tenant deployments on rSeries systems:
-
Most systems have up to 128 GB of memory that can be allocated to tenants. Larger r10000 Series systems have up to 256 GB. Not all of that memory is available for tenants.
-
95 GB is available for tenants, the rest (~33 GB) is for use by the OS/Platform layer.
-
There are recommended minimum memory allocations for each tenant based on the number of vCPUs assigned.
-
There is an advanced setting where additional memory can be assigned out of the pool to a tenant.
-
This formula is used for default memory allocation:
min-memory = (3.5 * 1024 * vcpu-cores-per-node) + 512 -
You can specify more than the minimum amount of memory when configuring a tenant, if needed.
These are some of the resource considerations for disk space when planning tenant deployments on rSeries systems:
- Each system has approximately 1300 GB of disk storage available for tenants.
- The amount of disk space that a tenant actually needs is dependent on the number of modules provisioned and its use.
- As the aggregate disk usage within deployed tenants increases, the host disk can start to reach capacity on systems with many large tenants. The administrator will need to monitor disk usage to make sure there is sufficient space for the tenants.
You can add or delete tenant images from the webUI. You must use HTTPS image import or export. Note that tenant images are specific to the rSeries system, and the software version must be compatible with it.
-
Log in to the webUI using an account with admin access.
-
On the left, click TENANT MANAGEMENT > Tenant Images.
-
To add a tenant image, click Add.
The Add Tenant Image popup opens.
-
Add the image:
-
For URL, type the URL of the remote image server.
F5 recommends that the remote host be an HTTPS server with PUT/POST enabled and have a valid CA-signed certificate. You can opt to select the Ignore Certificate Warnings check box if you want to skip the certificate check.
-
For Username, type the user name for an account on the remote image server, if required.
-
For Password, type the password for the account, if required.
-
Select Ignore Certificate Warnings to skip the certificate check.
-
Click Add Image.
Note: Depending on the image file size and network availability, the import might take a few minutes. When the import is successful, the software image is listed in the webUI.
-
-
To delete a tenant image, select the image and click Delete.
After you have added the tenant images that you want to use to the system, you can create and deploy tenants that will use that software image. The tenant image must be one that is listed as compatible with the rSeries system.
You must have imported the tenant images that you want to use for the tenant deployments into the system. You must also have previously created any required VLANs. Before you can create and deploy tenants, you also need to estimate resource requirements so you know how many vCPUs, memory, and other options to assign to the tenant.
An administrator can deploy tenants from the webUI.
-
Log in to the webUI using an account with admin access.
-
On the left, click TENANT MANAGEMENT > Tenant Deployments.
The Tenant Deployment screen displays showing the existing tenant deployments and associated details.
-
To add a tenant deployment, click Add.
The Add Tenant Deployment screen displays.
-
For Name, type a name for the tenant deployment (up to 49 characters).
Note: The first character in the name cannot be a number. After that, only lowercase alphanumeric characters and hyphens are allowed.
-
For Type, keep the default setting of BIG-IP.
-
For Image, select the software image that was previously imported onto the system.
Ensure that the image you selected meets your tenant deployment needs.
-
For IP Address, type the IPv4 address, IPv6 address, or Fully Qualified Domain Name (FQDN) for the tenant.
-
For Prefix Length, type a number from 1-32 for the length of the prefix.
-
For Gateway, type the IPv4 address or IPv6 address of the gateway.
-
For VLANs, select one or more VLANs that are available to the tenant.
You can assign VLANs to more than one tenant.
-
For Resource Provisioning, select one of these options:
Option Description Recommended Recommended values for vCPUs and memory for the tenant. Advanced Enables you to configure custom values for vCPUs and memory on the tenant. For example, if you want to configure a single vCPU tenant, or a tenant that uses more than the recommended amount of memory. -
For vCPUs, select the number of vCPUs to provide to the tenant.
The minimum recommended number of vCPUs per typical tenant is two (one vCPU is sufficient only for lightweight tenants that cannot be updated). Each blade has up to 22 vCPUs. The number of vCPUs needed depends on the amount of traffic the tenant will be handling. More vCPUs provide faster throughput.
-
For Memory, specify the amount of RAM, in MB, to allocate to the tenant.
The amount of memory needed depends on the number of vCPUs assigned. The minimum amount of memory needed is determined by the formula
[(3.5 * 1024 * #ofvCPUs) + 512], so a two vCPU tenant needs a minimum of 7680 MB, and a four vCPU tenant needs a minimum of 14,848MB.If you do not allocate sufficient memory, you receive a warning message.
-
For Virtual Disk Size, specify the storage quota, in GB, for the tenant virtual disk.
Default size depends on the image type used. The default size for the ALL image is 82GB.
-
For State, choose one of these options:
|
Options |
Description |
|---|---|
|
Configured |
The tenant configuration exists on the system, but the tenant is not running, and no hardware resources (CPU, memory) are allocated to it. This is the initial state and the default. |
|
Provisioned |
Moves the tenant into the Provisioned state, which causes the system to install the software, assign the tenant to nodes, and create virtual disks for the tenant on those nodes. If you choose this option, it takes a few minutes to complete the provisioning. The tenant does not run while in this state. |
|
Deployed |
Changes the tenant to the Deployed state. The tenant is set up, resources are allocated to the tenant, the image is moved onto the system, the software is installed, and after those tasks are complete, the tenant is fully deployed and running. If you choose this option, it takes a few minutes to complete the deployment and bring up the system. Note: Once a tenant is Deployed (and is up and running), changing its state back to Configured or Provisioned stops the tenant. You will receive a warning message before this occurs. |
-
For Crypto/Compression Acceleration, select Enabled if the tenant requires high-performance crypto processing and compression.
When this option is enabled, the tenant receives dedicated crypto devices proportional to number of vCPU cores. Crypto processing and compression are off-loaded to the hardware. When the option is disabled, the tenant receives no crypto devices.
-
To restrict usage of the Bash shell for tenant administrators, set Appliance Mode to Enabled (this is Disabled by default.)
-
Click Save & Close.
The tenant is now configured and in the Deployed state. When the status says Running, the tenant administrator can log in to the tenant webUI or CLI using the management IP address (with HTTPS or SSH) and continue configuring the tenant system.
Depending on the state that the tenant is in, you can change certain tenant settings from the webUI. A warning displays if you try to make any other changes.
-
Deployed: You can add or remove Allowed Slots or change the State only while tenants are running.
Note: Once a tenant is Deployed (and is up and running), changing its state back to Provisioned or Configured stops the tenant. You will receive a warning message before this occurs.
-
Provisioned: You can change all settings except Image.
-
Configured: You can change all settings except Image.
-
Log in to the webUI using an account with admin access.
-
On the left, click TENANT MANAGEMENT > Tenant Deployments.
The Tenant Deployment screen displays showing the existing tenant deployments and associated details.
-
Click the name of the tenant deployment you want to modify.
The Tenant Deployment screen displays.
-
For Image, select a different software image to use for the tenant, if in Configured state.
-
To update Allowed Slots, select the slots (or blades) that you want the tenant to span from the list.
-
You can change the IP Address, Prefix Length (1-32), and Gateway for the tenant, if in Configured or Provisioned state. Enter an IPv4 address or IPv6 address.
-
For VLANs, you can select different VLANs for the tenant, if in Configured or Provisioned state.
-
For Resource Provisioning, if changing resources, select either: Recommended (to use recommended values) or Advanced (to customize values), if in Configured or Provisioned state.
-
For vCPUs Per Slot, select the number of vCPUs for the tenant, if in Configured or Provisioned state.
The minimum recommended number of vCPUs per typical tenant is two (one vCPU is sufficient only for lightweight tenants that cannot be updated). Each blade has up to 22 vCPUs. The number of vCPUs needed depends on the amount of traffic the tenant will be handling. More vCPUs provide faster throughput.
-
For Memory Per Slot, specify the amount of RAM in MB to allocate to the tenant, if in Configured or Provisioned state.
The amount of memory needed depends on the number of vCPUs assigned. The minimum amount of memory needed is determined by the formula
[(3.5 * 1024 * #ofvCPUs) + 512], so a two vCPU tenant needs a minimum of 7680 MB, and a four vCPU tenant needs a minimum of 14,848MB. -
Change State (with caution!):
Option Description Configured If tenant has been Provisioned or Deployed, the virtual disk is deleted. Provisioned If Deployed, this option stops the tenant from running, but maintains the configuration. If Configured, causes the system to install the software, assign the tenant to nodes, and create virtual disks for the tenant on those nodes. The tenant does not run, consume resources, or pass traffic. Deployed Directly deploy the tenant. This sets up the tenant, allocates resources, moves the image onto the blade, and installs the software. When these tasks are complete, the tenant is fully deployed and running. -
Change Crypto/Compression Acceleration only if the tenant is in either the Configured or Provisioned state.
-
To restrict usage of the Bash shell for tenant administrators, set Appliance Mode to Enabled (this is Disabled by default.)
-
Click Save & Close.
The tenant is reconfigured according to the changes made.
You can configure tenants for high-availability (HA) on a rSeries system similar to how it is done on a BIG-IP system, or for vCMP guests. To implement high-availability, you set up device service clustering or DSC. DSC provides synchronization and failover of BIG-IP configuration data and traffic groups on two or more tenants. The tenant administrator sets up DSC on the tenants.
If you plan to set up mirroring, you must use two system. Connection mirroring requires that both rSeries systems have identical hardware platforms.
For more information, see these guides at support.f5.com:
Before you begin, you must set up two rSeries systems with initial configuration, management IP addresses, gateways, DNS servers, and licensing. For more information, see F5 rSeries Systems: Software Installation and Upgrade and other sections in this guide.
You can set up high availability (HA) for two BIG-IP tenants that reside on two separate systems.
-
Log in to the system and deploy a BIG-IP tenant.
Note: Make sure that both tenants are running the same BIG-IP software version and that it is compatible with rSeries systems.
-
On the tenants, set up L2 network connectivity between the two tenants including setting up VLANs and self-IPs for ConfigSync, failover, and mirroring.
For example, create the same VLAN on both tenants with management IP addresses that can communicate with each other.
-
Log in to each tenant and set the failover ConfigSync address to the self IP addresses on both sides.
-
Establish device trust: On one of the tenants, go to Device Management > Device Trust, create a device trust and add the management IP of the other tenant.
-
Create a Sync-Failover device group: On the tenants, go to Device Management > Device Group and create a device group with the Group Type option set to Sync-Failover (see BIG-IP Device Service Clustering: Administration at support.f5.com).
-
On the tenants, go to Device Management > Devices, select the device and initiate the first ConfigSync manually.
After setting up HA for tenants, you can optionally create traffic groups, enable mirroring on the virtual servers, and sync the configurations.
Understand that there are many ways to configure HA, and this summary explains the general work flow for how to approach tenant HA. Your environment might require additional steps.