Updated Date: 07/07/2026
Configuring Content Adaptation for HTTP Requests and Responses
This implementation describes how to configure the BIG-IP content adaptation feature for adapting HTTP requests and responses. With this feature, a BIG-IP system virtual server can conditionally forward HTTP requests and HTTP responses to a pool of Internet Content Adaptation Protocol (ICAP) servers for modification, before sending a request to a web server or returning a response to the client system. There is support for secure connectivity for ICAP between a BIG-IP system internal virtual server and a pool of ICAP servers.
In this implementation, you create a standard HTTP virtual server and pool of web servers for processing client requests. The HTTP virtual server accepts each client request in the normal way, but before load balancing the request to the pool of web servers, the virtual server forwards the HTTP request to a special internal virtual server.
The internal virtual server receives the HTTP request from the standard virtual server, and load balances the request to a pool of ICAP servers for modification. After the ICAP server modifies the request, the BIG-IP system sends the request to the appropriate web server for processing. When the web server sends the HTTP response back to the HTTP virtual server, the BIG-IP system sends the response to a second internal virtual server, which in turn load balances the response to the pool of ICAP servers for modification. After the ICAP server modifies the response, the BIG-IP system sends the response back to the client system.
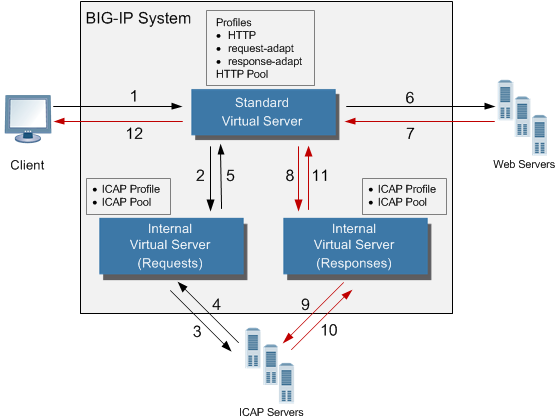
The internal virtual server references the pool of content adaptation servers, including the load balancing method to use for those servers. The internal virtual server also references an ICAP profile, which includes specific instructions for how the BIG-IP system should modify each request or response. You can create two separate ICAP profiles, one for wrapping the HTTP request in an ICAP message for adaptation, and one for wrapping the HTTP response in an ICAP message for adaptation.
Optionally, each internal virtual server can reference:
- Any persistence method that you would like the BIG-IP system to use when load balancing traffic to the ICAP pool.
- Any health or performance monitor that you would like the BIG-IP system to use when load balancing traffic to the ICAP pool.
- Any iRules® related to the content adaptation.
Complete the tasks in this implementation to create a BIG-IP configuration that performs content adaptation for HTTP requests and responses.
You create this ICAP profile when you want to use an ICAP server to wrap an HTTP request in an ICAP message before the BIG-IP system sends the request to a pool of web servers. The profile specifies the HTTP request-header values that the ICAP server uses for the ICAP message.
Important: You can use macro expansion for all ICAP header values. For example, if an ICAP header value contains ${SERVER_IP}, the BIG-IP system replaces the macro with the IP address of the ICAP server selected from the pool assigned to the internal virtual server. If an ICAP header value contains ${SERVER_PORT}, the BIG-IP system replaces the macro with the port of the ICAP server selected from the pool assigned to the internal virtual server. For example, you can set the URI value in an ICAP profile to icap://${SERVER_IP}:${SERVER_PORT}/virusScan.
-
On the Main tab, click Local Traffic > Profiles > Services > ICAP.
-
Click Create.
-
In the Name field, type a unique name for the profile.
-
For the Parent Profile setting, retain the default value,
icap. -
On the right side of the screen, select the Custom check box.
-
In the URI field, type a URI in this format:
icap://hostname:port/path.For example, using macro expansion, you can set the URI value to:
icap://${SERVER_IP}:${SERVER_PORT}/virusScan.
-
In the Preview Length field, type a length or retain the default value
0.This value defines the amount of the HTTP request or response that the BIG-IP system offers to the ICAP server when sending the request or response to the server for adaptation. This value should not exceed the length of the preview that the ICAP server has indicated it will accept.
-
In the Header From field, type a value for the
From:ICAP header. -
In the Host field, type a value for the
Host:ICAP header. -
In the Referer field, type a value for the
Referer:ICAP header. -
In the User Agent field, type a value for the
User-Agent:ICAP header. -
Click Finished.
After you create the ICAP profile, you can assign it to an internal virtual server so that the HTTP request that the BIG-IP system sends to an ICAP server is wrapped in an ICAP message, according to the settings you specified in the ICAP profile.
You create this ICAP profile when you want to use an ICAP server to wrap an HTTP response in an ICAP message before the BIG-IP system sends the response back to the client. The profile specifies the HTTP response-header values that the ICAP server uses for the ICAP message.
Important: Optionally, you can use macro expansion for all ICAP header values. For example, if an ICAP header value contains ${SERVER_IP}, the BIG-IP system replaces the macro with the IP address of the ICAP server selected from the pool assigned to the internal virtual server. If an ICAP header value contains ${SERVER_PORT}, the BIG-IP system replaces the macro with the port of the ICAP server selected from the pool assigned to the internal virtual server. For example, you can set the URI value in an ICAP profile to icap://${SERVER_IP}:${SERVER_PORT}/videoOptimization.
-
On the Main tab, click Local Traffic > Profiles > Services > ICAP.
-
Click Create.
-
In the Name field, type a unique name for the profile.
-
For the Parent Profile setting, retain the default value,
icap. -
On the right side of the screen, select the Custom check box.
-
In the URI field, type a URI in this format:
icap://hostname:port/path.For example, using macro expansion, you can set the URI value to:
icap://${SERVER_IP}:${SERVER_PORT}/videoOptimization -
In the Preview Length field, type a length or retain the default value
0.This value defines the amount of the HTTP request or response that the BIG-IP system offers to the ICAP server when sending the request or response to the server for adaptation. This value should not exceed the length of the preview that the ICAP server has indicated it will accept.
-
In the Header From field, type a value for the
From:ICAP header. -
In the Host field, type a value for the
Host:ICAP header. -
In the Referer field, type a value for the
Referer:ICAP header. -
In the User Agent field, type a value for the
User-Agent:ICAP header. -
Click Finished.
After you create the ICAP profile, you can assign it to an internal virtual server so that the HTTP response that the BIG-IP system sends to an ICAP server is wrapped in an ICAP message, according to the settings you specified in the ICAP profile.
You perform this task to create a pool of ICAP servers that perform content adaptation on HTTP requests.
-
On the Main tab, click Local Traffic > Pools.
The Pool List screen opens.
-
Click Create.
The New Pool screen opens.
-
In the Name field, type a unique name for the pool.
-
For the Health Monitors setting, from the Available list, select the http monitor and move the monitor to the Active list.
-
From the Load Balancing Method list, select how the system distributes traffic to members of this pool.
The default is Round Robin.
-
For the Priority Group Activation setting, specify how to handle priority groups:
- Select Disabled to disable priority groups. This is the default option.
- Select Less than, and in the Available Members field type the minimum number of members that must remain available in each priority group in order for traffic to remain confined to that group.
-
Using the New Members setting, add each resource that you want to include in the pool:
-
(Optional) In the Node Name field, type a name for the node portion of the pool member.
-
In the Address field, type an IP address.
-
In the Service Port field, type a port number, or select a service name from the list.
-
(Optional) In the Priority field, type a priority number.
-
Click Add.
-
-
Click Finished.
The pool of ICAP load balancing servers appears in the Pools list.
A virtual server of type internal provides a destination that a standard type of virtual server can use when forwarding HTTP requests slated for ICAP-based content adaptation.
-
On the Main tab, click Local Traffic > Virtual Servers.
The Virtual Server List screen opens.
-
Click Create.
The New Virtual Server screen opens.
-
In the Name field, type a unique name for the virtual server.
-
In the Description field, type a description of the virtual server.
For example:
This virtual server ensures HTTP request modification through the use of the *service\_name* ICAP service.. -
From the Type list, select Internal.
-
For the State setting, verify that the value is set to Enabled.
-
From the Configuration list, select Advanced.
-
From the ICAP Profile list, select the ICAP profile that you previously created for handling HTTP requests.
-
From the Default Pool list, select the pool of ICAP servers that you previously created.
-
Click Finished.
After you perform this task, a standard type of virtual server can forward HTTP requests to an internal type of virtual server. The internal virtual server then sends the request to a pool of ICAP servers, before sending the request back to the standard virtual server for forwarding to the pool of web servers.
A virtual server of type internal provides a destination that a standard type of virtual server can use when forwarding HTTP responses slated for ICAP-based content adaptation.
-
On the Main tab, click Local Traffic > Virtual Servers.
The Virtual Server List screen opens.
-
Click Create.
The New Virtual Server screen opens.
-
In the Name field, type a unique name for the virtual server.
-
In the Description field, type a description of the virtual server.
For example:
This virtual server ensures HTTP response modification through the use of the *service\_name* ICAP service.. -
From the Type list, select Internal.
-
For the State setting, verify that the value is set to Enabled.
-
From the Configuration list, select Advanced.
-
From the ICAP Profile list, select the ICAP profile that you previously created for handling HTTP responses.
-
From the Default Pool list, select the pool of ICAP servers that you previously created.
-
Click Finished.
After you perform this task, a standard type of virtual server can forward an HTTP response to an internal type of virtual server. The internal virtual server then sends the response to a pool of ICAP servers before sending the response back to the standard virtual server for forwarding to the client system.
You create a Request Adapt type of profile when you want a standard HTTP virtual server to forward HTTP requests to an internal virtual server that references a pool of ICAP servers. A Request Adapt type of profile instructs the HTTP virtual server to send an HTTP request to a named internal virtual server for possible request modification.
-
On the Main tab, click Local Traffic > Profiles > Services > Request Adapt.
-
Click Create.
-
In the Name field, type a unique name for the profile.
-
For the Parent Profile setting, retain the default value,
requestadapt. -
On the right-side of the screen, clear the Custom check box.
-
For the Enabled setting, retain the default value,
Enabled.When you set this value to Enabled, the BIG-IP system forwards HTTP requests to the specified internal virtual server for adaptation.
-
From the Internal Virtual Name list, select the name of the internal virtual server that you previously created for forwarding HTTP requests to the pool of iCAP servers.
-
In the Preview Size field, type a numeric value.
This specifies the maximum size of the preview buffer. This buffer holds a copy of the HTTP request header and the data sent to the internal virtual server, in case the adaptation server reports that no adaptation is needed. Setting the preview size to
0disables buffering of the request and should only be done if the adaptation server always returns a modified HTTP request or the original HTTP request. -
In the Timeout field, type a numeric value, in seconds.
If the internal virtual server does not return a result within the specified time, a timeout error occurs. To disable the timeout, use the value
0. -
From the Service Down Action list, select an action for the BIG-IP system to take if the internal virtual server returns an error:
- Select Ignore to instruct the BIG-IP system to ignore the error and send the unmodified HTTP request to an HTTP server in the HTTP server pool.
- Select Drop to instruct the BIG-IP system to drop the connection.
- Select Reset to instruct the BIG-IP system to reset the connection.
-
Click Finished.
After you perform this task, the BIG-IP system contains a Request Adapt profile that a standard HTTP virtual server can use to forward an HTTP request to an internal virtual server for ICAP traffic.
You create a Response Adapt type of profile when you want a standard HTTP virtual server to forward HTTP responses to an internal virtual server that references a pool of ICAP servers. A Response Adapt type of profile instructs the HTTP virtual server to send an HTTP response to a named internal virtual server for possible response modification.
-
On the Main tab, click Local Traffic > Profiles > Services > Response Adapt.
-
Click Create.
-
In the Name field, type a unique name for the profile.
-
For the Parent Profile setting, retain the default value,
responseadapt. -
On the right-side of the screen, select the Custom check box.
-
For the Enabled setting, retain the default value,
Enabled.When you set this value to Enabled, the BIG-IP system forwards HTTP responses to the specified internal virtual server for adaptation.
-
From the Internal Virtual Name list, select the name of the internal virtual server that you previously created for forwarding HTTP responses to the pool of iCAP servers.
-
In the Preview Size field, type a numeric value.
This specifies the maximum size of the preview buffer. This buffer holds a copy of the HTTP response header and the data sent to the internal virtual server, in case the adaptation server reports that no adaptation is needed. Setting the preview size to
0disables buffering of the response and should only be done if the adaptation server always returns a modified HTTP response or the original HTTP response. -
In the Timeout field, type a numeric value.
If the internal virtual server does not return a result within the specified time, a timeout error occurs. To disable the timeout, use the value
0. -
From the Service Down Action list, select an action for the BIG-IP system to take if the internal virtual server returns an error:
- Select Ignore to instruct the BIG-IP system to ignore the error and send the unmodified HTTP response to an HTTP server in the HTTP server pool.
- Select Drop to instruct the BIG-IP system to drop the connection.
- Select Reset to instruct the BIG-IP system to reset the connection.
-
Click Finished.
After you perform this task, the BIG-IP system contains a Response Adapt profile that a standard HTTP virtual server can use to forward an HTTP response to an internal virtual server for ICAP traffic.
An HTTP profile defines the way that you want the BIG-IPsystem to manage HTTP traffic.
Note: Other HTTP profile types (HTTP Compression and Web Acceleration) enable you to configure compression and cache settings, as required. Use of these profile types is optional.
-
On the Main tab, click Local Traffic > Profiles > Services > HTTP.
The HTTP profile list screen opens.
-
Click Create.
The New HTTP Profile screen opens.
-
In the Name field, type a unique name for the profile.
-
From the Parent Profile list, select http.
-
Select the Custom check box.
-
Modify the settings, as required.
-
Click Finished.
The custom HTTP profile now appears in the HTTP profile list screen.
You can create a pool of web servers to process HTTP requests.
-
On the Main tab, click Local Traffic > Pools.
The Pool List screen opens.
-
Click Create.
The New Pool screen opens.
-
In the Name field, type a unique name for the pool.
-
For the Health Monitors setting, from the Available list, select the http monitor and move the monitor to the Active list.
-
From the Load Balancing Method list, select how the system distributes traffic to members of this pool.
The default is Round Robin.
-
For the Priority Group Activation setting, specify how to handle priority groups:
- Select Disabled to disable priority groups. This is the default option.
- Select Less than, and in the Available Members field type the minimum number of members that must remain available in each priority group in order for traffic to remain confined to that group.
-
Using the New Members setting, add each resource that you want to include in the pool:
-
Type an IP address in the Address field.
-
Type
80in the Service Port field, or select HTTP from the list. -
(Optional) Type a priority number in the Priority field.
-
Click Add.
-
-
Click Finished.
The new pool appears in the Pools list.
You perform this task to create a standard virtual server that can forward an HTTP request or response to an internal virtual server. The internal virtual server then sends the request or response to a pool of ICAP servers before the BIG-IP system sends the request or response to the client or web server. There is support for secure connectivity for ICAP between a BIG-IP system internal virtual server and a pool of ICAP servers.
-
On the Main tab, click Local Traffic > Virtual Servers.
The Virtual Server List screen opens.
-
Click Create.
The New Virtual Server screen opens.
-
In the Name field, type a unique name for the virtual server.
-
In the Destination Address field, type the IP address that you want to use as a destination for client traffic destined for a pool of HTTP web servers.
The supported format is address/prefix, where the prefix length is in bits. For example, an IPv4 address/prefix is
10.0.0.1or10.0.0.0/24, and an IPv6 address/prefix isffe1::0020/64or2001:ed8:77b5:2:10:10:100:42/64. When you use an IPv4 address without specifying a prefix, the BIG-IP system automatically uses a/32prefix.Note: The IP address you type must be available and not in the loopback network.
-
In the Service Port field, type
80, or select HTTP from the list. -
From the Configuration list, select Advanced.
-
From the HTTP Profile list, select the name of the HTTP profile that you created previously.
-
From the Request Adapt Profile list, select the name of the Request Adapt profile that you previously created.
-
From the Response Adapt Profile list, select the name of the Response Adapt profile that you previously created.
-
From the Source Address Translation list, select Auto Map.
-
From the Default Pool list, select the name of the HTTP server pool that you previously created.
-
Click Finished.
After you create the virtual server, the BIG-IP system can forward an HTTP request or response to a pool of ICAP servers before sending the request or response to the client or web server, respectively.
After performing the tasks in this implementation, the BIG-IP can perform content adaptation on HTTP requests and responses as they pass through the BIG-IP system during normal HTTP processing. The new objects that this implementation creates are:
- Two custom ICAP profiles (for requests and responses)
- One pool of ICAP content adaptation servers
- Two separate internal virtual servers. One internal virtual server load balances HTTP requests to the ICAP pool , while the other load balances responses to the ICAP pool.
- Two custom adaptation profiles (a Request Adapt profile and a Response Adapt profile) that each reference a separate internal virtual server (for requests and responses, respectively)
- A custom HTTP profile
- A standard HTTP pool of web servers
- A standard HTTP virtual server that sends HTTP requests and responses to an internal virtual server for content adaptation, load balances HTTP requests to the web pool, and forwards HTTP responses to the relevant client